16 | English
Implement additional safety measures to protect the oper-
ator from the effects of vibration, such as servicing the
power tool and application tools, keeping the hands warm,
and organising workflows correctly.
Fitting
u Remove the battery from the power tool before carry-
ing out work on the power tool (e.g. maintenance,
changing tool, etc.). The battery should also be re-
moved for transport and storage. There is risk of injury
from unintentionally pressing the on/off switch.
Charging the Battery
u Use only the chargers listed on the accessories page.
Only these chargers are matched to the lithium-ion bat-
tery of your power tool.
Note: The battery is supplied partially charged. To ensure
full battery capacity, fully charge the battery in the charger
before using your power tool for the first time.
The lithium-ion battery can be charged at any time without
reducing its service life. Interrupting the charging process
does not damage the battery.
The lithium-ion battery is protected against deep discharge
by the "Electronic Cell Protection (ECP)". When the battery
is discharged, the power tool is switched off by means of a
protective circuit: The application tool no longer rotates.
u Do not continue to press the On/Off switch after the
power tool has automatically switched off. The battery
can be damaged.
The battery features NTC temperature monitoring, which
only permits charging in a temperature range between 0 °C
and 45 °C. This achieves a long battery life.
A significantly reduced operating time after charging indic-
ates that the battery has deteriorated and must be replaced.
Follow the instructions on correct disposal.
Removing the battery (see figures A)
The battery (8) is equipped with two locking levels to pre-
vent the battery from falling out if the battery release button
(9) is pressed unintentionally. As long as the battery is inser-
ted in the power tool, it is held in position by means of a
spring.
To remove the battery (8):
– Push the battery against the base of the power tool (1.)
and press the release button (9) at the same time (2.).
– Pull the battery off the power tool (3.).
Battery charge indicator (see figure B)
The five green LEDs of the battery charge indicator (17) in-
dicate the state of charge of the battery (8).
The state of charge can only be checked when the battery is
removed.
– Press the button (16) to show the state of charge. After
approx. five seconds, the charge indicator goes out auto-
matically.
LED Capacity
Continuous lighting 5 x green > 80–100%
Continuous lighting 4 x green > 60 – ≤ 80%
Continuous lighting 3 x green > 40 – ≤ 60%
Continuous lighting 2 x green > 20 – ≤ 40%
Continuous lighting 1 x green > 0 – ≤ 20%
Flashing light 1 x green 0%
If no LED lights up after pressing the button (16), then the
battery is defective and must be replaced.
During the charging process, the five green LEDs light up one
after the other and then briefly go out. The battery is fully
charged once the five green LEDs are lit up continuously.
The five green LEDs go out again approximately five minutes
after the battery has been fully charged.
Auxiliary Handle
u Do not operate your power tool without the auxiliary
handle (14).
Swivelling the auxiliary handle (see figure C)
You can swivel the auxiliary handle (14) to any angle for a
safe work posture that minimises fatigue.
– Turn the lower gripping end of the auxiliary handle (14)
anticlockwise and swivel the auxiliary handle (14) into
the required position. Then, turn the lower gripping end
of the auxiliary handle (14) clockwise to retighten.
Make sure that the strap of the auxiliary handle is in the
provided groove on the housing.
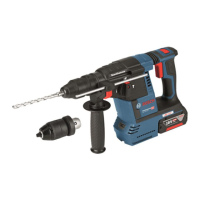
Selecting Drill Chucks and Tools
Hammer drilling and chiselling require SDS-plus application
tools that are inserted into the SDS-plus drill chuck.
For drilling without impact in wood, metal, ceramic and
plastic as well as for screwdriving, tools without SDS‑plus
are used (e.g. cylindrical shank drill bits). For these tools, a
keyless chuck or a keyed chuck are required.
Inserting/removing the keyed chuck
(seefigureD)
You must use a suitable drill chuck (keyed or keyless chuck,
accessories) to work with tools that do not have SDS-plus
(e.g. cylindrical shank drill bits).
Fitting the keyed chuck
– Screw the SDS-plus shank (20) into a keyed chuck (19).
Secure the keyed chuck(19) using the securing screw
1 609 92A 4F0 | (05.11.2018) Bosch Power Tools
 Loading...