English | 9
Bosch Power Tools 1 609 929 R77 | (24.2.09)
Assembly
Replacing/Inserting the Saw Blade
f Before any work on the machine itself, pull
the mains plug.
f When mounting the saw blade, wear protec-
tive gloves. Danger of injury when touching
the saw blade.
f When changing the saw blade, take care
that the saw blade holder is free of material
residue, e. g. wood or metal shavings.
Selecting a Saw Blade
An overview of recommended saw blades can
be found at the beginning of these operating in-
structions. Use only saw blades with single-nose
shank. The saw blade should not be longer than
required for the intended cut.
Use a thin saw blade for narrow curve cuts.
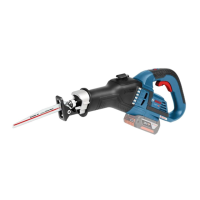
Inserting the Saw Blade (see figure A)
Press the SDS clamping lever 5 forward and
guide the saw blade 1 behind the clamping plate
11 into the saw blade holder 3. Release the SDS
clamping lever 5.
f Check the tight seating by pulling on the
saw blade. A loose saw blade can fall out and
cause injury.
For certain work, the saw blade 1 can also be
turned through 180° (with the teeth pointed up-
wards) and re-inserted again.
Removing the Saw Blade
f Before removing, allow the saw blade to
cool down. Danger of injury when touching
the hot saw blade.
Press the SDS clamping lever 5 forward and pull
out the saw blade 1. Release the SDS clamping
lever 5.
Dust/Chip Extraction
f Dusts from materials such as lead-containing
coatings, some wood types, minerals and
metal can be harmful to one’s health. Touch-
ing or breathing-in the dusts can cause aller-
gic reactions and/or lead to respiratory infec-
tions of the user or bystanders.
Certain dusts, such as oak or beech dust, are
considered as carcinogenic, especially in
connection with wood-treatment additives
(chromate, wood preservative). Materials
containing asbestos may only be worked by
specialists.
– Provide for good ventilation of the work-
ing place.
– It is recommended to wear a P2 filter-
class respirator.
Observe the relevant regulations in your
country for the materials to be worked.
Operation
Operating Modes
f Before any work on the machine itself, pull
the mains plug.
Pivoting and Retractable Footplate
(see figure B–C)
Due to its movability, the adjustable footplate 2
adapts to the required angular position of the
surface.
Depending on the application and the saw blade
being used, the footplate 2 can be moved varia-
bly in length direction. Loosen the screws 12
with Allen key 9 and move the footplate 2 to the
requested position. Tighten the screws 12 again
and check if the footplate 2 is tightly seated.
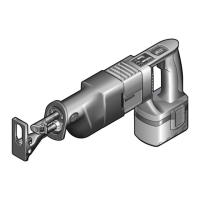
Utility Hook (see figure D)
Your tool is equipped with a utility hook 6 for
hanging it, e. g., to a ladder, etc. Simply fold out
the utility hook 6 to the required position.
f When the tool is hanging by the utility hook,
ensure that the saw blade is protected
against unintended contact. Danger of inju-
ry.
Fold the utility hook 6 back in again when you
are ready to continue working.
OBJ_BUCH-829-004.book Page 9 Tuesday, February 24, 2009 9:04 AM
 Loading...