-13-
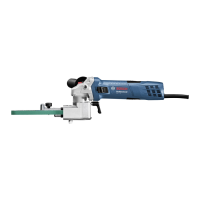
Changing the Sanding Pad
(Fig. 2, Fig. 3)
Observe for and replace damaged
sanding pad immediately. Using a
damaged sanding pad could cause a hazard.
Pull off the Sanding Sheet 14 and the Intermediate Pad
15. While grabbing the Sanding Pad 17, turn the screw 16
counter-clockwise to loosen completely and remove it. Attach
the new Sanding Pad 17 and retighten the screw by turning
it clockwise.
Note: For proper fit, the keyed hub on the sanding pad must
align with the keyed flange on the Sanding Head Output Shaft
21.
Assembly
Inserting and Removing Extension Tubes
(Fig. 4)
Use the Extension Tubes 10 when necessary. The effort re-
quired to perform the sanding operation is reduced when
working without the extension tube.
Note: A maximum of two extension tubes may be inserted.
Undoing the Connection between Sanding
Head/Handle Section/Extension Tube
(Fig. 1, Fig. 4)
1. Open the Clamping Lever 9 .
2. Open the Safety Hook 8 .
3. Pull the previously connected parts apart .
Fastening the Connection between Sanding
Head/Handle Section/Extension Tube
(Fig. 1, Fig. 5)
1. Slide the Sanding Head 11, Handle Section 7, and/or
Extension Tubes 10 into each other depending on the
required connection .
2. Close the Safety Hook 8 .
3. Push the Clamping Lever 9 until it is at a right angle to
the Sanding Head 11, Handle Section 7, or Extension
Tube 10 .
4. To avoid loosening during operation, firmly tighten the
Eccentric Screw 22 clockwise .
5. Close the Clamping Lever 9 by pressing it back in place
.
17
16
21
Fig. 3
9
8
8
9
10
7
11
10
11
10
7
10
7
11
Fig. 4
 Loading...