Do you have a question about the Bosch HEI8056U and is the answer not in the manual?
Manual not followed may cause fire, shock, property damage, or personal injury.
Range can tip, causing death or serious injury. Ensure anti-tip bracket is securely installed.
Unit is heavy; use caution with sharp edges; do not use oven or warming drawer for storage.
Remove packaging safely, dispose of plastic bags, and keep away from children.
Avoid cabinet storage above surface units; limit cabinet depth to 13" to reduce burn or fire risk.
Do not store items of interest to children above range; children climbing can be seriously injured.
Ensure controls are OFF before plugging in; install per NEC and local electrical codes.
Product may contain chemicals causing cancer or reproductive harm, as required by California.
Overview of initial steps, tools, and parts needed before starting installation.
Lists required tools like screwdrivers, wrenches, and parts like cord kits for installation.
Lists components provided with the appliance, such as the anti-tip bracket and screws.
Specifies extra parts needed for hard-wired setups, like flexible conduit and torque wrench.
Step-by-step guide on safely removing packaging materials from the appliance.
A checklist to verify completion of installation steps and ensure accuracy.
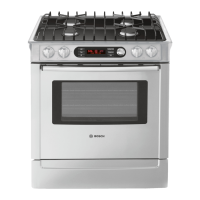
Provides the height, width, and depth specifications of the range in inches and centimeters.
Advises ensuring the installation location is level for optimal performance and to prevent damage.
Offers tips for easier handling and installation, such as removing the oven door and using floor protection.
Lists the range's power ratings (kW) for different voltage inputs and required circuit breaker sizes.
Illustrates the required location and clearance for the electrical outlet for proper installation.
Details minimum clearances between the range, cabinets, and overhead surfaces to prevent fire risks.
Recommends installing a ventilation hood and specifies the required CFM rating.
Step-by-step guide to securely installing the anti-tip bracket to prevent tipping hazards.
Explains how to connect the range's power supply, using either a cord or flexible conduit.
Diagrams and explanation for a 3-wire electrical connection for the range.
Diagrams and explanation for a 4-wire electrical connection for the range.
Detailed steps for connecting the range using a four-wire power cord.
Steps to adjust the range's leveling legs to ensure it is stable and properly positioned.
Details how to strip wires and connect them to terminal lugs with specified torque.
Specific steps for connecting the range via flexible conduit using a four-wire setup.
Step-by-step instructions and safety precautions for removing the oven door.
Guide on how to properly install the warming drawer back into its housing.
Guidance on troubleshooting and what information to have ready before contacting service.
Explains where to find the rating label for model and serial numbers for service.
Steps to test the oven's functionality, including bake mode and self-clean lock.