Do you have a question about the Bosch Plena PLE-10M2-EU and is the answer not in the manual?
Icons indicating hazards, double insulation, and waste disposal.
Key instructions for safe operation and maintenance.
Guidelines for ventilation, heat, water, and installation location.
Rules for power sources, grounding, and cord protection.
Route power cords to avoid damage from walking or pinching.
Do not overload outlets or spill liquids to prevent hazards.
Procedures for qualified servicing and handling damaged units.
Procedures for safety checks, replacement parts, and disconnection.
Advice on lightning protection and reading separate safety instructions.
Provides information for installing, configuring, and operating the mixer.
Manual is also available as a PDF document.
Manual is for installers and users of Plena systems.
Refers to Safety Instructions (9922 141 1036x).
Explains four types of alerts: Note, Caution, Warning, Danger.
Details Note icons and hazard icons (Caution, Warning, Danger).
Provides conversions for length, mass, pressure, and temperature units.
Plena offers public address solutions and system elements.
Lists items included in the product packaging.
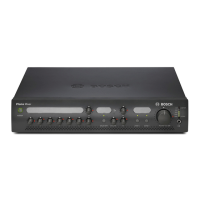
High-performance unit for mixing up to six microphone/line signals.
Details controls and indicators on the front panel.
Describes the optional remote control wall panel.
Details connectors and switches on the rear panel.
Instructions for removing the unit from its packaging.
Guidance on mounting the unit in a 19" rack.
Verify connections and settings before connecting power.
Steps to connect the unit to the mains power supply.
Overview of connecting various input signals to the mixer.
How to connect a 24 VDC battery for backup or primary power.
Connecting the priority microphone with PTT functionality.
Connecting the secondary microphone with VOX activation.
Connecting additional microphones for background music.
Connecting telephone or 100V signals for emergency announcements.
How to connect a 100 Volt input signal.
Connecting telephone lines via a coupler for safety.
Connecting CD players, tuners, or other devices for background music.
Connecting power amplifiers and other devices to the mixer outputs.
Using the master output for music or mixed signals.
Connecting external processing equipment via insert points.
Overview of rear panel settings including DIP switches.
Details DIP switch configurations for various functions.
Explains ducking level, chime volume, and emergency volume controls.
Explains settings for the line out or music only master switch.
How to use custom labels and pins for settings.
Procedure for turning the unit on and off.
Adjusting individual volume levels for microphone/line inputs.
Selecting and adjusting volume for music sources.
Adjusting bass and treble for microphone/line and music inputs.
Controls for managing audio output to zones.
Routing audio to loudspeaker zones 1 and 2.
Adjusting the master volume for all outputs.
Details mains and battery power supply specifications.
Frequency response and tone control range.
Detailed specifications for microphone/line inputs 1 through 6.
Sensitivity, impedance, and S/N for music inputs.
Dimensions, mounting, color, and weight.
Operating and storage temperatures, relative humidity.
| THD | < 0.1% |
|---|---|
| Input Channels | 6 |
| Line Inputs | 4 |
| Power Consumption | 15 W |
| Output Channels | 2 |
| Dimensions (H x W x D) | 100 x 430 x 270 mm |
| Power Supply | 230 V AC, 50 Hz |
| Frequency Response | 50 Hz to 20 kHz (+1/-3 dB) |