Do you have a question about the Bosch Professional GSB-20-2 and is the answer not in the manual?
This document provides a comprehensive guide for the Bosch GSB Professional series of impact drills, including models 20-2, 20-2 RE, 20-2 RCE, and 20-2 RET. It covers safety warnings, functional descriptions, usage instructions, and maintenance advice, ensuring users can operate the tool safely and effectively.
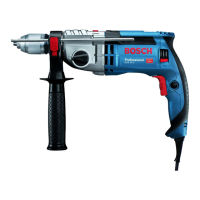
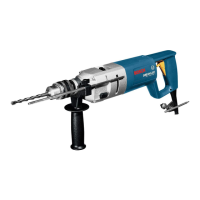
The Bosch GSB Professional impact drill is designed for versatile drilling tasks. Its primary function is impact drilling in hard materials such as brick, concrete, and stone. Additionally, it is capable of standard drilling in softer materials like wood, metal, and plastic. Models equipped with electronic control and right/left rotation are also suitable for screwdriving and thread-cutting applications, expanding their utility across various projects.
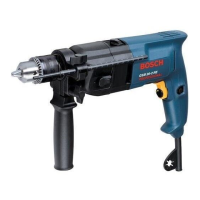
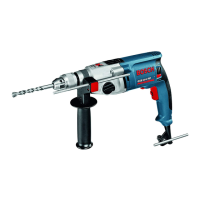
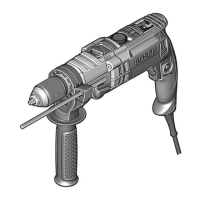
The machine features a keyless chuck (1) on some models, allowing for quick and convenient tool changes without the need for a separate chuck key. Other models utilize a key type drill chuck (15) for secure tool clamping. A "Drilling/Impact Drilling" selector switch (2) enables users to switch between different operating modes based on the material and task at hand. For models GSB 20-2 RCE and GSB 20-2 RET, a thumbwheel for electronic speed preselection (3) allows for precise control over the speed and impact frequency. The GSB 20-2 RET model further includes a "Drilling/screwdriving" selector switch (4) for specialized applications.
Rotational direction is controlled by a dedicated switch (5), available on GSB 20-2 RE, GSB 20-2 RCE, and GSB 20-2 RET models, facilitating both forward and reverse operations. The tool is designed with a soft grip (6) for enhanced user comfort and reduced slippage during operation. An On/Off switch (7) controls power, complemented by a lock-on button (9) for continuous operation. A thumbwheel for speed preselection (8) is present on the GSB 20-2 RE model, offering adjustable speed settings.
The machine incorporates a gear selector (10) for mechanical speed adjustment, providing two speed ranges: Gear I for low speed and high torque (suitable for large drilling diameters or screwdriving) and Gear II for high speed and lower torque (ideal for small drilling diameters). A button for depth stop adjustment (11) works in conjunction with the auxiliary handle (12) and depth stop (13) to control drilling depth accurately. For models with a key type drill chuck, a chuck key (14) is provided. Screwdriver bits (16) and a universal bit holder (17) are optional accessories for screwdriving tasks. An Allen key (18) is used for specific maintenance procedures.
The Bosch GSB Professional series offers several features designed to enhance user experience and operational efficiency.
Assembly and Tool Changes: The auxiliary handle (12) is crucial for safe operation and can be adjusted to any position for a secure and comfortable grip. To adjust, turn the bottom part of the handle counterclockwise, swivel it to the desired position, and then retighten clockwise. The drilling depth can be precisely set using the depth stop (13). Press the depth stop adjustment button (11), insert the depth stop into the auxiliary handle, and pull it out until the desired drilling depth (X) is achieved, ensuring the knurled surface of the depth stop faces upward.
For models with a keyless chuck (1), tool changes are quick and easy. With the On/Off switch (7) not pressed (which locks the drill spindle), turn the collar of the keyless chuck in the rotation direction to open it, insert the tool, and then firmly tighten the collar in the opposite direction until a "click" is heard, indicating automatic locking. To remove the tool, turn the collar in the opposite direction. For key type drill chucks (15), protective gloves are recommended due to potential heat buildup. Open the chuck by turning it, insert the tool, and then use the chuck key (14) in the corresponding holes to uniformly clamp the tool. When using screwdriver bits (16), a universal bit holder (17) should always be employed, and the "Drilling/Impact Drilling" selector switch (2) should be set to the "Drilling" symbol for driving screws.
Operation: Before starting, ensure the mains voltage matches the specified voltage on the machine's nameplate. The rotational direction switch (5) should only be actuated when the machine is at a standstill. For right rotation (drilling and screwdriving), push the switch downward on the left side and upward on the right. For left rotation (loosening screws and nuts), push the switch upward on the left side and downward on the right.
The operating mode is selected via switch (2). Set it to the "Drilling" symbol for drilling and screwdriving, or to the "Impact drilling" symbol for impact drilling. This switch engages noticeably and can be actuated while the machine is running. The mechanical gear selector (10) allows for two speed ranges: Gear I for low speed/high torque and Gear II for high speed/lower torque. This can be adjusted at a standstill or while running, but not under full load. If the gear selector doesn't fully engage, lightly rotate the drive spindle.
To switch the machine on, press and hold the On/Off switch (7). For continuous operation, press the lock-on button (9). To switch off, release the On/Off switch, or if locked, briefly press and release it. The machine is equipped with a safety clutch (anti-rotation) to limit dangerous reaction torque. If the tool jams, the drive to the drill spindle is interrupted. In such cases, hold the power tool firmly with both hands, switch it off, and loosen the tool insert.
Speed and Torque Control: The speed/impact frequency is variably adjusted by how far the On/Off switch (7) is pressed. Light pressure results in low speed, while increased pressure increases the speed. For models with a thumbwheel for speed preselection (8 or 3), the required speed/impact frequency can be preset, even during operation, depending on the material and working conditions. Models GSB 20-2 RCE and GSB 20-2 RET feature constant electronic control, maintaining a nearly constant preselected speed and impact rate under varying load conditions.
The GSB 20-2 RET model also offers electronic torque limitation/speed preselection. For drilling with speed preselection, set selector switch (4) to the "Drilling" symbol and adjust speed with thumbwheel (3). For screwdriving with torque limitation, set switch (4) to the "Screwdriving" symbol, and adjust the effective torque with thumbwheel (3) (I=low torque, III=high torque). If the preselected torque is reached during screwdriving, the machine switches off. For screwdriving without torque limitation, turn thumbwheel (3) to the right stop.
Working Advice: Always apply the power tool to the screw/nut only when it is switched off to prevent slipping. After extended periods of low-speed operation, allow the machine to cool down by running it at maximum speed without load for about 3 minutes. For drilling in tiles, start in "Drilling" mode and only switch to "Impact Drilling" after drilling through the tile. Use carbide-tipped drill bits for concrete, masonry, and brick, and perfectly sharpened HSS drill bits for metal.
Proper maintenance is essential for the longevity and safe operation of your Bosch GSB Professional impact drill.
General Maintenance and Cleaning: Always pull the mains plug before performing any maintenance or cleaning work on the machine. Keep the machine and its ventilation slots clean to ensure safe and proper working conditions. Regular cleaning prevents dust and debris buildup, which can affect performance and potentially lead to overheating.
Replacing the Drill Chuck: If the drill chuck needs to be replaced, first pull the mains plug. For power tools without a spindle lock, this procedure should be carried out by an authorized Bosch after-sales service agent. To remove the drill chuck, disassemble the auxiliary handle and set the gear selector (10) to the center position between the 1st and 2nd gears. Insert a steel pin (Ø 4 mm, approx. 50 mm long) into the drill hole on the spindle neck to lock the spindle. Clamp the short end of an Allen key (18) into the keyless chuck (1). Place the machine on a stable surface, hold it firmly, and loosen the keyless chuck by turning the Allen key in the rotation direction. For tight-seated chucks, a light blow to the long end of the Allen key may be necessary. Remove the Allen key and completely unscrew the keyless chuck. Mounting the drill chuck is done in reverse order, ensuring the steel pin is removed from the spindle neck after completion and the chuck is tightened with a torque of approximately 35-40 Nm.
Electrical Safety and Cord Maintenance: In case of a damaged cable, never use the machine. Do not touch the damaged cable and pull the mains plug immediately. Damaged cables increase the risk of electric shock. If a new 3-pin plug needs to be connected to the 2-wire cable, ensure it is fitted by a qualified professional. The brown wire is live, and the blue wire is neutral. Do not connect either to the earth terminal. If the molded plug is removed, it must be disposed of safely.
After-Sales Service and Customer Assistance: If the machine malfunctions despite careful manufacturing and testing, repairs should be carried out by an authorized Bosch power tools after-sales service center. When ordering spare parts or inquiring about service, always include the 10-digit article number found on the machine's type plate. Bosch provides comprehensive after-sales service and customer assistance, including information on spare parts and exploded views, available at www.bosch-pt.com. Customer consultants are available to answer questions regarding product application, adjustment, and accessories.
Disposal: The machine, accessories, and packaging should be sorted for environmental-friendly recycling. For EC countries, power tools that are no longer usable must not be disposed of with household waste. According to European Guideline 2002/96/EC for Waste Electrical and Electronic Equipment, these tools must be collected separately and disposed of in an environmentally correct manner.
| Chuck Capacity | 1.5 - 13 mm |
|---|---|
| Drilling Diameter in Concrete | 20 mm |
| Drilling Diameter in Steel | 13 mm |
| No-load Speed | 0-3000 rpm |
| Power Source | Corded |
| Chuck Type | Keyless |