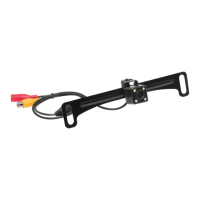
The BOSS LPCB40 is a rear-view license plate mount camera designed for use as either a front or rear-facing backup camera. It features a hidden mounting bracket for a neat installation behind a vehicle's license plate. When paired with a camera-capable head unit, the camera view can be automatically triggered when shifting into reverse or manually selected from the head unit's home screen.
Function Description:
The LPCB40 provides a visual aid for parking and backing up, enhancing safety by offering a wider view of the area behind or in front of the vehicle. It integrates with compatible head units to display the camera feed. The camera can be configured to display parking guidelines on-screen, which can be removed by cutting a specific wire loop. Additionally, the image orientation can be adjusted (reversed) by cutting another wire loop, catering to different mounting orientations or user preferences.
Important Technical Specifications:
- Power Supply: 12 VDC
- Viewing Angle: 170°
- TV System: NTSC
- Video Output: 1.0 vp-p, 75 Ω
- S/N Ratio: ≤45 dB
- Ingress Protection Rating: IP67 (waterproof)
- Operating Conditions: -22 to +140°F (-30 to +60°C), max. 95% RH
- White Balance: Auto
- Illumination: min. 0.1 lux
- Automatic Gain Control (AGC): Auto
- Resolution (TV lines): 480
- Electronic Shutter Speed: 1/60 (NTSC)
- Effective Pixels: 648 x 488
- Dimensions (L x W x H): 7.756" x 0.88" x 0.88" (197 x 22 x 22 mm)
- Cable Lengths:
- Video cable: 197"/5m
- Power cable: 39"/1m
- Camera's cable: 20"/0.5m
Usage Features:
- Versatile Mounting: Designed to mount behind the license plate using existing screw holes, requiring no additional drilling.
- Automatic Triggering: When installed as a rear camera and connected to the vehicle's reverse light, the camera view automatically activates when the vehicle is put into reverse.
- Manual Selection: Both front and rear camera views can be manually selected from the head unit's home screen options.
- Configurable Parking Guidelines: On-screen parking guidelines can be enabled (default) or disabled by cutting a white wire loop.
- Image Reversal: The camera image can be reversed by cutting a blue wire loop, useful for correcting image orientation if needed.
- Easy Adjustment: The camera angle can be adjusted after installation by loosening screws, positioning the camera, and then re-tightening the screws.
Installation Process:
- Cable Routing: Remove the license plate lamp and route the camera's cable from outside the car into the interior through the lamp opening.
- Mounting: Remove license plate screws. Align the camera frame with the top two screw holes on the license plate and secure it with the screws. Ensure correct orientation to avoid a reverse image.
- Angle Adjustment: Verify and adjust the camera angle as needed, then re-tighten the screws.
- Video Cable Connection:
- Connect one yellow RCA plug of the video cable to the head unit's "Front Camera Input" or "Rear Camera Input" RCA socket, depending on the camera's intended use.
- Connect the other yellow RCA plug of the video cable to the yellow RCA socket on the camera.
- Power Cable Connection:
- Connect the red split wire of the video cable to the head unit's "Front Camera Power Output" or "Rear Camera Power Output" wire.
- Connect the other red split wire of the video cable to the red wire of the power cable.
- Connect the black (ground) wire of the power cable to the car chassis.
- Connect the black plug of the power cable to the red socket on the camera.
- For rear camera functionality, ensure the "Reverse Input" wire on the head unit is connected to the vehicle's reverse light for automatic triggering.
Maintenance Features:
- Troubleshooting: The manual provides solutions for common issues:
- No image: Check power cable connection, wiring between camera and head unit, reverse input wire connection, and camera settings on the head unit.
- Image blurry: Clean the camera lens with a damp, fiber-free cloth to remove water drops or dust.
- Image shaking: Ensure the camera is tightly mounted.
- Image slanted: Adjust the camera frame position.
- Waterproof Design: With an IP67 rating, the camera is protected against dust and temporary immersion in water, contributing to its durability in outdoor automotive environments.
- Configuration Reset: After cutting the white or blue wire loops for parking guidelines or image reversal, unplugging and re-plugging the power cable from the camera is necessary to enable the new setting.
Important Safety Precautions:
- The camera is an aid and should not replace safe driving habits. Precise control and looking around are still necessary when backing up.
- The camera's displayed area is limited, and some obstacles may not be detected reliably.
- Installation should always be performed by a professional installer to avoid damage, injury, or accidents.
- Disconnect the negative terminal of the vehicle battery before wiring.
- Ensure that any modifications to the car do not impair its safety and structural integrity.
- Hide wires properly under car floor mats or through the headliner, ensuring they are not squeezed or damaged by sharp edges. Use rubber bushings for penetrations.