Do you have a question about the Boss Audio Systems MRGB65S and is the answer not in the manual?
Details physical measurements of the speaker for installation.
Connects multiple MRGB65 units for synchronized LED lighting.
Explains remote buttons for illumination modes, speed, and color.
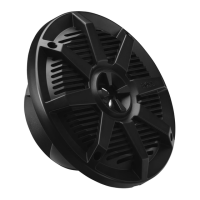
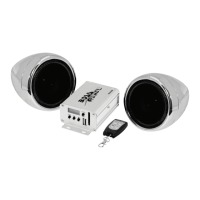
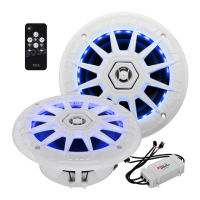
The BOSS Audio Systems MRGB65S is a marine 2-way full-range speaker system designed for outdoor use, featuring multicolor illumination options. This user manual provides comprehensive instructions for proper installation and operation of the product.
The package contents include two speakers with LED lights, a lighting remote control with a keychain, an LED sync hub, a hub cable for connecting multiple sync hubs, two LED connection cables, and two speaker wires with polarity connectors. For installation, an inline fuse holder with a glass fuse, two quick splice wire connectors, two cable ties, eight mounting screws, and clip nuts are provided. The package also includes installation instructions, a cutout template, and warranty information.
Before installation, it is crucial to consult an expert if in doubt, as professional installation is always recommended. Disconnect the negative terminal of the vehicle battery prior to starting any work. The LED lighting should only be connected to a 12V power supply and not to the vehicle's navigational lighting circuits. When installing the speakers, ensure they are firmly secured and the mounting area is sufficiently stable to prevent them from being torn away in case of an accident. Avoid routing wires near sharp or moving parts, and keep them away from other wires that might cause unwanted noise. Proper insulation of bare wires and sealing of connections are essential for a water-tight connection. If modifications to the vehicle are necessary for speaker installation, ensure that the safety and structural integrity of the vehicle are not impaired. Before drilling or cutting any holes, carefully investigate the vehicle's layout, paying special attention to areas near the fuel tank, fuel lines, hydraulic lines, and electrical wiring.
For audio signal wiring, use the supplied speaker wires to connect the speakers to your 12VDC source unit, which could be audio outputs on an amplifier or speaker wires of a head unit. The red wire connects to the positive terminal, and the black wire connects to the negative terminal. Ensure all wires are firmly attached to the terminals. Refer to your amplifier or head unit's user manual for additional connection details. It is important to ensure the speakers are wired correctly at 4 ohms and to observe speaker polarity during connections.
The speaker LED wiring utilizes an LED sync hub that receives wireless signals from the provided remote control. To complete the LED wiring, connect the "POWER INPUT" wires: the black wire to your vehicle's grounding plate or the negative battery terminal, and the red wire to your vehicle's lighting circuit with an on/off switch. If the red wire is connected directly to the positive battery terminal, a dedicated on/off switch (not included) should be installed in line with the red wire for power control. Ensure the ground wire (black) is securely fastened to a clean ground point, scraping away any paint, rust, or dirt for optimal contact. An important safety measure is to install the supplied fuse in-line with the red wire connecting to the power source using the two supplied splice wire connectors; this provides short-circuit protection. To extend the power wires (red and black), use a minimum of 16 gauge wires (not included), keeping the ground wire as short as possible. The SYNC OUT and SYNC IN connections are specifically for linking two or more LED sync hubs together. If replacing a fuse, use one with the same rating (3A) and type.
To synchronize more than one set of MRGB65 for LED lighting, first complete the LED wiring for additional MRGB65 sets (sold separately) following the provided illustration. Then, use the supplied LED sync hub connection cable to connect the "SYNC OUT" on the first/primary LED sync hub to the "SYNC IN" on the second LED sync hub. This allows for the synchronization of lighting across multiple speakers.
For mounting, if replacing existing speakers, utilize the existing mounting locations. Alternatively, create a cutout in your vehicle panel for new speaker installation. Crucially, mount the speakers in the correct orientation so that the drain hole/notch on the grill points downward for water drainage, and ensure this hole is not blocked. Determine the desired location (e.g., side panels or dash panel) for the speakers. Cut a mounting hole and screw holes on the mounting surface using the supplied template to ensure it matches the speaker and mounting cut-out. After marking the holes, cut them for speaker installation. Once the speaker signal and LED wiring are complete, fasten the speaker into the mounting hole using the four supplied screws and clip nuts, ensuring it sits flush across the entire mounting surface. It is recommended to properly break in the speakers by not reaching maximum volume until after two 20-minute cycles at regular volume.
The RGB LED lights on both speakers are controlled by the supplied remote control. Ensure the LED power cable is correctly and securely connected, and that the speaker lights are powered on through this cable. The RF remote has a range of up to 25 feet (line of sight), so avoid obstructing it with metal. The remote features several controls:
Important notes regarding the battery in the lighting controller: There is a danger of explosion if the battery is incorrectly replaced. Only replace it with the same or an equivalent type, and observe correct polarity during insertion. Do not expose the battery to fire or direct sunlight. If the lighting controller will not be used for an extended period, remove the battery. Dispose of batteries properly for environmental protection. The lighting controller contains a coin/button type battery, which can be swallowed. Keep the battery out of reach of children at all times. If swallowed, the battery can cause serious injury or death, with severe internal burns potentially occurring within two hours of ingestion. If a battery is suspected of being swallowed or placed inside any part of the body, seek immediate medical attention. Ensure the battery compartment is completely secure after replacement. If the battery compartment cannot be completely secured, discontinue use of the product and keep it out of reach of children. The battery type for replacement is CR2025.
| Type | 2-Way |
|---|---|
| Size | 6.5 inches |
| RMS Power | 100 Watts |
| Peak Power | 300 Watts |
| Impedance | 4 Ohms |
| Sensitivity | 90 dB |
| Voice Coil | 1 inch |
| Cone Material | Polypropylene |
| Surround Material | Rubber |
| Tweeter Material | PEI |
| RGB Illumination | Yes |
| Color | Black |