4
5
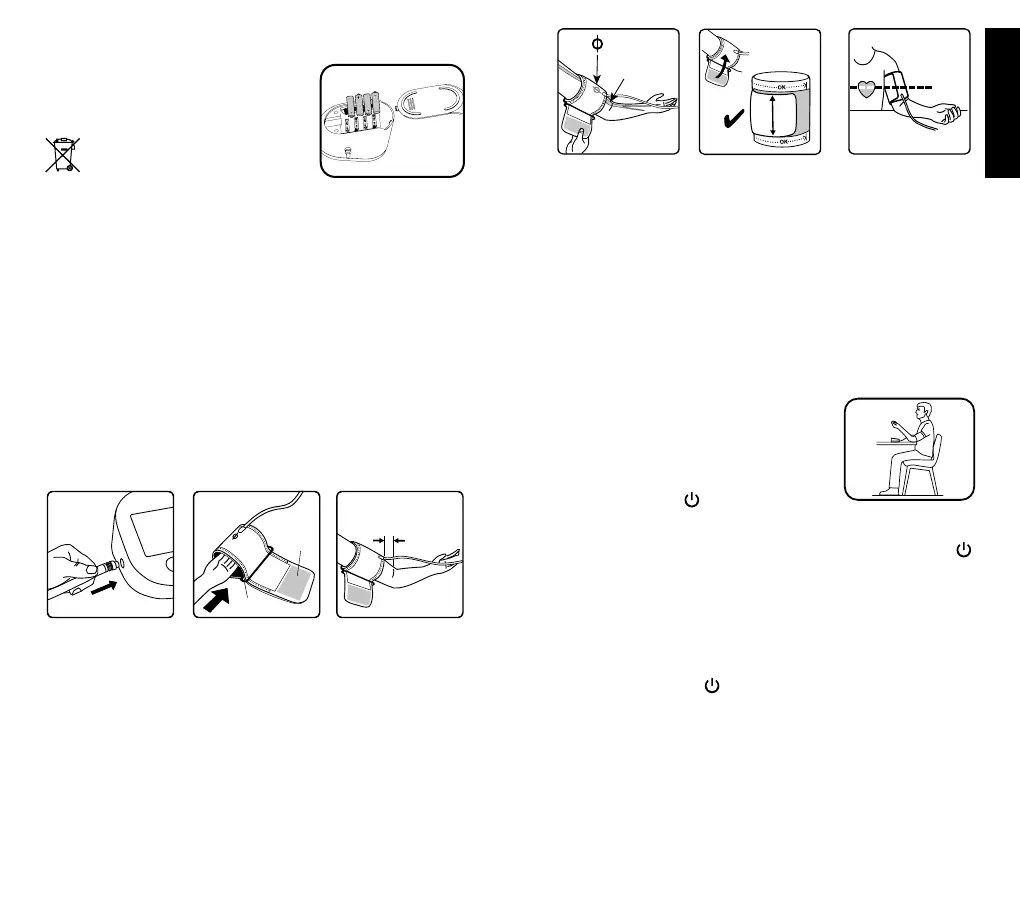
Inserting batteries
• Use alkaline batteries, type AA 1.5V
as supplied with this product.
• Remove the battery compartment cover and
insert four batteries with correct polarity (see
symbol in the battery compartment).
Only discard empty batteries. They
should not be disposed of in the
household waste, but at appropriate
collection sites or at your retailer.
Key rules for accurate blood pressure measurement
Always take readings at the same time of day, under the same conditions.
Do not take a measurement within 30 minutes of smoking, drinking coee or
tea or any form of exertion. These factors will inuence the measurement.
Ensure at least 5 minutes of quiet rest before measurements; if possible,
10 minutes of rest are recommended. Try to always use the same resting time
before taking a measurement.
Always measure on the same arm. The left arm is recommended. Do not move
or speak. Sit comfortably, keep your legs uncrossed and feet at on the oor,
back and arm supported.
Place the cu in direct contact with the skin. Do not wrap the cover over
clothing.
If you want to take multiple measurements, wait approximately 5 minutes
before repeating.
Applying the arm cuff
Fig 4_ leftArm Main Artery
Fig 2_ Pileside
Fig 1_ Hand- Plug in Fig 5_ index tFig 3_ Velcro Fig 6_ Arm position
2-3 cm
22-42 cm
Fig 4_ leftArm Main Artery
Fig 2_ Pileside
Fig 1_ Hand- Plug in Fig 5_ index tFig 3_ Velcro Fig 6_ Arm position
2-3 cm
Velcro
Metal ring
Fig 4_ leftArm Main Artery
Fig 2_ Pileside
Fig 1_ Hand- Plug in Fig 5_ index tFig 3_ Velcro Fig 6_ Arm position
2-3 cm
22-42 cm
Left arm
Fig. 1 Fig. 2 Fig. 3
Left arm
1. Plug the air hose into the connector (Fig. 1).
2. The cu is located correctly when the velcro is on the outside of the cu
and the metal ring does not touch the skin (Fig. 2).
3. Put your arm through the cu loop. The bottom of the cu should be
approximately 2-3 cm above elbow (Fig. 3). The tube should lie over the
brachial artery on the inside of the arm (Fig. 4).
Fig 4_ leftArm Main Artery
Fig 2_ Pileside
Fig 1_ Hand- Plug in Fig 5_ index tFig 3_ Velcro Fig 6_ Arm position
2-3 cm
22-42 cm
Fig 4_ leftArm Main Artery
Fig 2_ Pileside
Fig 1_ Hand- Plug in Fig 5_ index tFig 3_ Velcro Fig 6_ Arm position
2-3 cm
22-42 cm
Fig 4_ leftArm Main Artery
Fig 2_ Pileside
Fig 1_ Hand- Plug in Fig 5_ index tFig 3_ Velcro Fig 6_ Arm position
2-3 cm
22-42 cm
Fig. 4 Fig. 5 Fig. 6
Artery mark
Main arteries
4. Pull the cu so that the top and bottom edges are tightened around your
arm, make sure not to wrap the cu very tightly. Allow space for one nger
to t between the cu and the arm..
5. When the cu is positioned properly, press the velcro rmly against the
pile side of the cu.
6. This cu is ready for use if the arrow heads fall within the range on the
other side of the cu when the cu is tightened around your arm
(Fig. 5).
7. Sit on a chair and place your arm on the table so that the cu is at the same
level as your heart (Fig. 6).
Taking a measurement
8. Sit down with straight back with your feet at
on the oor.
9. Ensure the cu is wrapped snugly (per the
“Applying the arm cu” section above, Fig. 3-6).
10. Do not move the unit during measurement, or
the proper measurement will not be achieved.
11. Press power button
to begin. The last results
will be shown on the screen (M reading). The measurement starts
automatically. While measurement is in progress, do not move or speak.
Note: If necessary to interrupt a measurement, press the power button
at any time. The device immediately cancels the measurement, lowers cu
pressure and automatically turns o.
12. The cu will rst inate and then deate. At the end of the measurement
the reading is displayed:
Upper (systolic) value
Lower (diastolic) value
Pulse
13. Press the power button
to turn the product o. Otherwise the product
will turn o automatically after 1 minute.
14. Test results will be saved into the memory automatically (see memory
function below).
This device is not intended as a substitute for regular check-ups by your doctor,
please continue to visit your doctor on a regular basis for a professional
reading.
English







 To Next Page