This document is a user manual for the Breville Stainless Steel Pro Fryer. It provides detailed information on the product's features, safety instructions, usage, maintenance, and technical specifications.
Function Description:
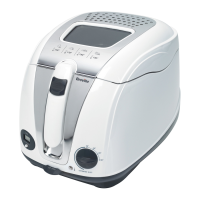
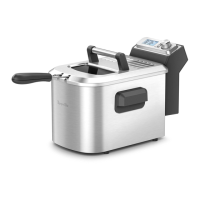
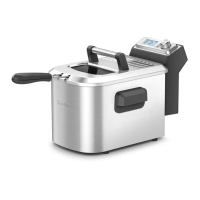
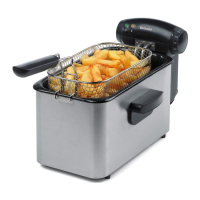
The Breville Stainless Steel Pro Fryer is a deep fryer designed for household use, allowing users to fry various food items. It features a removable frying bowl, a heating element, and a control panel for temperature regulation. The fryer is equipped with a basket handle for easy handling of food during frying and a lid for covering the oil when not in use or for storage. The device is designed to "Turn on your creativity" in the kitchen by providing a convenient way to deep fry.
Important Technical Specifications:
While specific wattage and voltage are not explicitly listed in the provided pages, the manual mentions that the appliance is designed for household use only and should not be used outdoors. It also states that the maximum basket capacity is 1 kg for best results, and users should not exceed the weights given in the table for various food items. The temperature control allows for frying at temperatures ranging from 130°C (265°F) to 190°C (375°F). The appliance requires a 13 amp socket and a correctly fitted plug.
Usage Features:
- Power and Heating Indicators: The fryer has a green power indicator that lights up when the fryer is connected to the mains supply and a red heating indicator that illuminates when the oil is heating up. The red light goes out when the desired temperature is reached.
- Temperature Control: A temperature control dial allows users to choose the desired frying temperature.
- Frying Basket: The frying basket is designed to be lowered and removed from the fryer easily and quickly.
- Basket Handle: The handle folds for easy storage.
- Removable Frying Bowl: The fryer features an integrated MIN and MAX mark and a frying basket rest. It separates from the control panel/heating assembly and body for easy cleaning.
- Body with Carrying Handles: The main body of the fryer houses the removable frying bowl and control unit, and it has handles to facilitate moving the fryer easily.
- Control Panel/Heating Assembly: This consists of the control panel, heating element, handy cord storage, and a reset switch.
- Lid: The lid is used to cover cooling oil or for storage when not in use. It should not be used when frying.
- Over-temperature Thermostat: The fryer is fitted with an over-temperature thermostat that can be manually reset. This is a safety device that switches off the fryer if it becomes too hot or if there is too little or no oil present. To reset, the control panel needs to be unplugged, allowed to cool down completely, and then the reset button (located on the back of the control panel) should be pressed with a small screwdriver or similar implement.
- Cool Zone: There is a cool zone area below the element that ensures stray pieces of food that have dropped to the bottom will not burn and contaminate the oil. This helps to keep the oil clean and prolong its life.
- Oil Selection: The manual provides guidelines for recommended oils (sunflower, vegetable, groundnut, rapeseed, corn) and oils not recommended (hard fats, olive oil of any type).
- Oil Quantity: Users should always use the recommended (MAX) quantity of oil when deep frying and never exceed this amount. The fryer should not be used without any oil in it.
- Utensils: Cooking utensils should be selected carefully. Plastic utensils that may melt should not be used. Metal handles might get hot, so oven gloves or insulated handles are recommended. Slotted spoons, slotted fish slices, or tongs are suitable. Wooden or plastic non-heat resistant utensils, knives, or sharp implements are not suitable.
- Frying Guidelines: The manual includes a conversion table with recommended weights, temperatures, and approximate frying times for various food items (fresh frying chips, frozen frying chips, frozen scampi in bread crumbs, frozen plaice coated in batter/bread crumbs, frozen cod/haddock coated in batter, fresh cod/haddock coated in batter, fresh prawns in batter, frozen cod fish fingers, frozen chicken nuggets, frozen onion rings, vegetable fritters in batter, banana/fruit fritters).
- Food Preparation: For even frying, food items should be cut to a similar size. Overloading the basket should be avoided to prevent oil temperature drop and greasy food. Food should be cooked in batches.
- Checking Doneness: To check if food is cooked through, a knife or metal skewer can be inserted into the center. If the skewer or knife is hot to the touch, the food is hot in the middle. A food thermometer can also be used.
- Hints and Tips:
- The lid should not be used when frying.
- Smaller pieces of food fry faster than larger ones.
- Delicate foods like prawns or thinly sliced vegetables require less cooking at higher temperatures.
- A food thermometer or skewer can be used to ensure food is cooked through.
- The MAX level should never be exceeded when filling the frying bowl with oil.
- The MIN level should always be filled above with oil before using the fryer.
- Hands should not be placed in contact with hot oil or steam.
- Battered or coated food should be stuck to the frying basket. A slotted spoon can be used to lift food away from the mesh.
- For even cooking, food should be stirred or turned with suitable utensils.
- Draining: A drip tray (and rack) can be used to drain large food items after frying. A drip tray with kitchen paper can be used for smaller items. Leaving food to drain for too long in the basket over the fryer may make it soft and lose crispiness.
Maintenance Features:
- Disassembly for Cleaning: Before cleaning, the appliance must be unplugged, and the oil must be cool. The lid and frying basket should be removed. The control panel/heating element assembly can be carefully removed from the body by holding the control unit with one hand and lifting the body with the other. The frying bowl can then be removed.
- Reassembly After Cleaning: The body should be placed on a stable, secure, dry, and level surface. The frying bowl should be held at both sides and lowered into the body. The control panel/heating element assembly has two L-shaped runners that must be fitted into matching slots in the fryer body. The two runners should be lined up with the slots in the fryer body (A). The control panel/heating element assembly should be slid downwards into the grooves (B) until the assembly is fully lowered into the slots and goes no further. The fryer will not function if the control panel/heating element assembly is not correctly fitted to the body. The frying basket handle should be lifted upwards, then rotated backward into its locked position. To store, the basket should be replaced, folded down the handle, and the lid replaced.
- Cleaning the Removable Frying Bowl, Frying Basket, and Lid: These parts can be washed using kitchen paper, then with warm soapy water using a cloth, sponge, or brush. They should be dried completely before use or storage.
- Cleaning the Control Unit, Element, and Body: Excess oil should be wiped from the element with kitchen paper (taking care not to damage the wires connected to the heating element). The control unit and body should be wiped with a clean, slightly damp cloth and dried.
- Oil Removal: Before removing oil, the fryer should always be switched off, unplugged, and allowed to cool completely. A slotted spoon or a suitable tray or large plate, kitchen paper, a funnel or jug with a pouring lip, and muslin (if reusing the oil) are needed. Used oil can be removed by using a slotted spoon to skim off any food scraps, removing the basket, and placing it on kitchen paper to drain. The drip tray with kitchen paper can be used to remove the control panel/heating element assembly and place it on a drip tray. The oil bottle can be placed next to the sink, and the funnel with a piece of muslin can be used as a filter. The rim of the removable frying bowl should be gripped with both hands and carefully lifted out of the body. The oil can then be poured into the bottle through the funnel. Alternatively, the oil can be poured into a jug with a pouring lip and then transferred to the bottle. If attempting to pour oil from the fryer straight into the bottle, it should be ensured that the bottle is only ended up spilling the oil. When all the oil has been poured into the bottle, the funnel (discard the muslin, if used) and the bottle cap should be removed. The oil can either be stored for reuse or discarded safely and cleanly.
- Disposal of Oil: Always dispose of oil in an environmentally safe way. Oil should never be poured into drains. Contact the local recycling center for advice on oil disposal.
- Dishwasher Safety: No parts of this appliance are dishwasher safe.
- Earthing: The appliance must be earthed. The plug is not suitable for socket outlets in your home, it can be removed and replaced by a plug of the correct type. If the fuse in a moulded plug needs to be changed, the fuse cover must be refitted. If the appliance is unsuitable, it should be dismantled and removed from the supply cord and an appropriate plug fitted. If the terminals in the plug are not marked or if unsure about the installation, a qualified electrician should be contacted. The plug should be ASTA approved to BS1363. The wiring diagram for the plug shows green/yellow for earth, blue for neutral, and brown for live. The outer sheath of the cable must be firmly held by the cord grip.