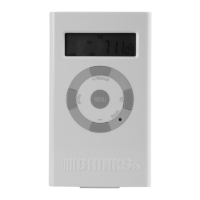
BUTTON FUNCTIONS
In clock mode, press to change output to ON,
OFF.
In program and time setting mode, press to
change channel and time in ascending order.
In program setting and time setting mode, press
to change channel and time in descending order.
In clock mode, press to enter or exit random
function.
Press to enter or exit programming.
Press to conrm selected setting.
Press and hold for 4 seconds to enter the time
setting mode.
In clock mode, press to turn on or off the DLST
Time function.
Clears the program under setting.
In CTD mode, press to stop countdown function,
return to CTD setting mode.
Press and hold for a few seconds to clear all
settings, clock mode is restored as 00:00
+
/Manual
–
OK
MENU
Reset
Recall
TiMER
Hampton Products International Corp.
50 Icon, Foothill Ranch, CA 92610-3000 USA
www.hamptonproducts.com 1-800-562-5625
Made in China
© 2012 Hampton Products International Corp.
999-60975_44-1031_REVB 8/12
Brink's trademark & copyright work are used with permission.
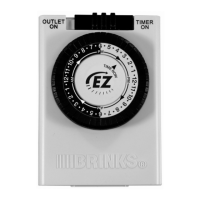
LCD
INSTRUCTIONS
44-1031
7-DAY DIGITAL INDOOR TIMER
The electrical system and the method of connecting this timer to the system must be in accordance with local, state,
and national electric codes.
• 1 Timer controlled grounded outlet
• Weekly / 7 Day programming.
• Countdown feature.
• Invisa-Sheild cover.
• Manual Override and Always ON feature.
• Up to 16 ON/OFFs per day.
• Random ON/OFF setting.
• 125VAC/60Hz 15A, 1875W Resistive.
FEATURES
WARNINGS
• Do not use with any appliance which exceeds the capacity of the Timer.
• Always ensure that the plug of any appliance is fully inserted into the Timer.
•
If you need to clean the Timer, remove from the power source and wipe with a dry cloth. Do not immerse in water or any liquid.
• Fan heaters and heaters with exposed elements should not be left unattended, and it is highly recommended that these
type of appliances are not to be connected to timers.
CAUTIONS
• This unit is to be connected to a 125V, 60Hz
power source only.
• Total Capacity: 15A 1875W Resistive, 1250W
Tungsten (Lighting). 1/2 HP. Do not exceed
rated capacity.
• FOR INDOOR USE ONLY.
• Do not attempt to disassemble unit. There are
no serviceable parts inside.
• Unplug when not in use.
• RISK OF ELECTRIC SHOCK:
o Keep children away.
o Unplug timer before cleaning.
o Do not use in wet locations.
• RISK OF FIRE: Do not use to control appliances
that contain heating elements (Cooking appliances,
heaters, irons, etc…)
• PLEASE READ THROUGH THE INSTRUCTIONS
PRIOR TO USE.
FULL LIFETIME WARRANTY
CURRENT TIME SETTING
1. Press and hold the OK button for 4 seconds. Day Display ashes.
2. Press
+
/Manual or
–
to select the day. Press OK to conrm.
3. Hour display will ash. Press
+
/Manual or
–
to select the hour. Press OK to conrm.
4. Minute display will now ash. Press
+
/Manual or
–
to select the minute. Press OK to conrm.
5. Press MENU to exit the time setting mode. Now the timer is in clock mode.
PROGRAM SETTING
• NOTE: This timer can be set up for up to 16 different programs per day. We will use PROG 1 for
this example, however these steps can be repeated for any of the 16 programs. To cycle
through the individual programs use the (
+
/Manual or
–
) after pressing MENU in step one until
the desired PROG “#” is ashing. To clear a program setting hit the Recall button when you
have the program selected.
1. Press MENU button, PROG 1 “ON” will ash, press OK.
2. Days will ash. Cycle through possible day settings with (
+
/Manual or
–
), press OK on desired
setting.
3. Cycle with (
+
/Manual or
–
) to desired hour, press OK.
4. Minutes will ash. Cycle through minutes (
+
/Manual or
–
) to desired minute, press OK.
5. Program will be ashing again. Press (
+
/Manual ) to get to PROG 1 “OFF” blinking, press OK.
6. Repeat steps 2-4 to complete PROG 1 setting.
7. When done setting programs press the MENU button twice to return to clock mode.
8. Press
+
/Manual to have LCD showing either “AUTO ON” or “AUTO OFF” for the timer to
execute the programmed settings.
COUNTDOWN SETTING
1. Under clock mode press MENU twice, or under program setting mode press MENU once.
Enter countdown setting. (Press MENU once again to return the clockmode) LCD shows ashing
CTD setting range 00 00:00 ~ 99 59:59
2. “Hour” ashes. Press
+
/Manual or
–
to choose the “hour”. Press OK to conrm.
3. “Minute” ashes. Press
+
/Manual or
–
to choose the “minute”. Press OK to conrm.
4. “Second” ashes. Press
+
/Manual or
–
to choose the “second”. Press OK to conrm.
5. Countdown function starts. CTD will ash.
6. Two countdown functions:
• Power OFF countdown. Under ON or AUTO ON mode, enter Countdown function. This timer
will switch to ON mode automatically. When countdown nishes, power to appliance will turn
OFF.
• Power ON countdown. Under OFF or AUTO OFF mode, enter Countdown function. This
timer will switch to OFF mode automatically. When countdown nishes, power to appliance
will come ON.
o Under countdown mode, pressing Recall will stop countdown and return to countdown
setting, press MENU once more to return to clock mode.
o Under countdown mode, press MENU once to return to clock mode. Countdown function
is still running.
RANDOM (RND) SETTING
1. Under clock mode, press
–
to active the random function, Display shows RND.
2. Under random mode, the set on and off times (programs from 1-16 ) will be delayed 4-32 minutes
3. Press
–
to recall the random function. No RND will be shown on LCD.
NOTE: When RND under running, the delay cannot change by program, but randomly.
DAYLIGHT SAVING TIME SETTING (DLST)
1. In clock mode, press Recall to turn on or off the Daylight Saving Time.
2. Turn on DLST, the below of LCD shows +1H. Time is adjusted by adding one hour.
3. Turn off DLST, +1H will disappear and LCD shows the real time,
MANUAL OVERRIDE AND ALWAYS ON/OFF
When in clock mode the
+
/Manual sign cycles through 4 settings that serve as manual override.
ON - Indicates that the timer is in the ON mode, and will always be on regardless the programmed settings.
AUTO ON - At this selection, the timer will come on regardless of the programmed setting, but it will follow the next programmed command.
OFF - Indicates that the timer is always off (i.e. the wall socket is turned off)
AUTO OFF - Indicates that the timer is in the OFF mode until the next programmed step that turns it ON.
NOTE: For normal timer function, the selection must be either “AUTO ON” or “AUTO OFF”.
RESET
At any mode, press Reset for 5 seconds. All settings will be cleared, return to clock mode, 12:00 MO, AM, AUTO OFF will be shown on LCD.
This product is fully warranted to be free of defects in material and workmanship for the life of the product. If a defect in material or workmanship occurs, call 800-562-5625 for instructions on how to have it
replaced or repaired free of charge. This warranty is null and void if the product was used for purposes for which it was not designed, is abused, misused, modied or improperly installed, operated,
maintained, and/or repaired. NOT LIABLE FOR INCIDENTAL, INDIRECT, OR CONSEQUENTIAL DAMAGES. Some states do not allow the exclusion or limitation of incidental or consequential damages, so
the above limitation or exclusion may not apply to you. This warranty gives you specic rights, and you may also have other rights that vary from state to state.
MO
PROG
AUTO ON
AM
PM
OFF
TU
WE
TH FR SA SU
RND
DTD
+
1h
http://waterheatertimer.org/Woods-timers-and-manuals.html#Brinks