This document is the owner's manual for the Brinly Plug Aerator, available in 40-inch (PA-403BH, PA-403BH-A) and 48-inch (PA-482BH, PA-482BH-A) models. It provides comprehensive information on assembly, installation, operation, and repair parts, emphasizing safety throughout.
Function Description:
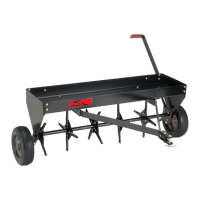
The Brinly Plug Aerator is an attachment designed for lawn care, specifically for aerating lawns by removing small plugs of soil. This process helps to reduce soil compaction, allowing air, water, and nutrients to penetrate the grass roots more effectively, leading to a healthier lawn. It is intended for use with riders and lawn/garden tractors. The manual highlights the importance of proper assembly and operation to ensure dependability and performance.
Important Technical Specifications:
PA-403BH & PA-403BH-A (40" Plug Aerator):
- Maximum Towing Speed: 5 MPH
- Aerator Capacity: 150 lbs.
- Empty Weight: 66 lbs.
- Maximum Towing Weight: 216 lbs.
- Type of Tire: Semi Pneumatic
- Aeration Depth: Up to 3"
- Working Width: 40"
- Tube Assemblies: 3 sets of tube assemblies.
PA-482BH & PA-482BH-A (48" Plug Aerator):
- Maximum Towing Speed: 5 MPH
- Aerator Capacity: 200 lbs.
- Empty Weight: 90 lbs.
- Maximum Towing Weight: 290 lbs.
- Type of Tire: Semi Pneumatic
- Aeration Depth: Up to 3"
- Working Width: 48"
- Tube Assemblies: 4 sets of tube assemblies.
- Additional Feature: Has a Center Support Plate.
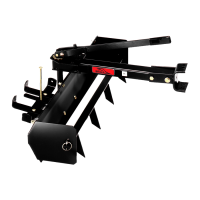
Both models feature plugging spoons (24 for the 40" model, 32 for the 48" model) designed to resist wear from abrasive soil.
Usage Features:
Safety Precautions (General):
- Always read and retain the manual, paying close attention to the safety section.
- Do not exceed the maximum drawbar pull rating or towing capacity of the towing vehicle.
- Tow only in the vehicle's tow mode/speed setting or less than 5 mph.
- Maintain slow speeds, especially over rough terrain, and avoid sudden turns.
- Use wide turning angles to ensure the attachment follows the towing vehicle's path.
- Avoid steep slopes; heavy loads can cause loss of control or overturn.
- Reduce towed weight when operating on slopes and make gradual movements.
- Do not start or stop suddenly on hills.
- Exercise extreme caution near drop-offs, creeks, ditches, and roadways.
- Be aware that the attachment can obstruct rear view when operating in reverse.
- Stop on level ground, disengage drives, set the parking brake, and shut off the engine before leaving the operator's position.
- Use the attachment only for its intended purpose (lawn care and home applications).
- Do not tow behind a motor vehicle on highways or at high speeds.
- Wear substantial footwear and avoid loose-fitting clothing.
- Stay alert for holes and hidden hazards.
- Keep the towing vehicle and attachment in good operating condition with safety devices in place.
- Inspect for damage after striking foreign objects and repair immediately.
- Do not modify the attachment or safety devices.
Towing Vehicle and Towing Safely:
- Familiarize yourself with towing vehicle controls and braking.
- Stopping distance increases with speed and weight; allow extra time.
- Use only approved hitches and connect only at the approved hitch point.
- Follow towing vehicle manufacturer's recommendations for weight limits and towing on slopes.
- Do not shift to neutral and coast downhill.
- Do not allow children or untrained adults to operate the towing vehicle.
Protecting Those Around You:
- Observe surroundings and look for bystanders before operating.
- Keep children, bystanders, and pets at a safe distance.
- Exercise care when reversing.
Keep Riders Off Towed Attachment & Towing Vehicle:
- Do not carry passengers on the attachment or towing vehicle.
Keep Body Parts From Under Towbar:
- Before disconnecting, stop on level ground, shut off the engine, lock the park brake, and block the machine's wheels.
When to Aerate:
- Determining Lawn Condition: Dig a small amount of soil (about three inches deep) and roll it into a small ball.
- Too Dry: Soil appears powdery & brittle; tines will not penetrate properly. Wait for later.
- Ideal Condition: Soil is not powdery & brittle but still falls apart; begin aerating.
- Too Wet: Soil forms a ball; tines will not operate effectively, and the tractor may lose traction. Wait for soil to dry.
- Use of Additional Weight: Weight (concrete blocks, patio blocks, sand bags) can be added to the aerator tray to achieve a recommended penetration of two to three inches. Tie-downs can be used through holes in the tray flanges.
- Drive the tractor to the aeration location and lower the aerator to the operating position.
- Drive forward approximately ten feet and stop.
- Observe the operation: there should be a plug hole approximately every ten to twelve inches and not more than three inches deep.
- Add or remove weight to achieve this condition.
Mounting and Transporting:
- Attach the aerator to the rider or lawn/garden tractor using the supplied pin and hairpin cotter.
- Transport Position: Push REARWARD on the Lift Handle (11) towards the Transport Lock Pin in the Side Plate. Pull the Handle OUT and move it over the Lock Pin. The aerator will rest on its wheels.
- Operating Position: Pull OUT on the Lift Handle (releasing from the Transport Lock Pin) and move FORWARD. The aerator will rest on the Plugging Spoons.
- Caution: After the first thirty minutes of use, check all fasteners for tightness. Always engage transport wheels to raise the spoons when crossing concrete or asphalt surfaces to avoid damage. Use only on established lawns, not newly laid sod. Do not exceed 3-5 MPH operating speed. Do not stand or ride on the aerator. Disconnect from the tractor when cleaning or servicing. Never exceed the Weight Tray capacity. Do not attempt to disconnect with weight in the tray. Back up carefully to avoid jack-knifing.
Maintenance Features:
General Maintenance:
- Keep the aerator clean and dry for trouble-free service.
- Never allow wet material to remain in the tray for extended periods.
- Periodically check all moving parts for free movement and lubricate with oil if necessary.
- Sand lightly and paint any areas where rust develops.
- Periodically check all fasteners for tightness.
Before Every Use:
- Apply a drop of lubricating oil to each Nylon Bearing and the Aerator Axle.
- Apply a light coat of oil to the working areas of the plugging spoons after each use to prevent rust. If rust appears elsewhere, sand lightly and coat with enamel.
- Plugging spoons are made of special heat-treated steels to resist wear. Striking sub-surface objects can cause breakage. Replacement spoons (Part# B-4855-10) can be purchased by contacting Customer Service.
- Periodically check and remove any debris that might restrict spoon action.
- After each use, service the unit as described and store it in a dry area, shielding tines to avoid injury.
Sharpening Guide:
- Sharpening the spoons can improve performance.
- Use a metal file or grinding wheel to sharpen the outer edge of the spoon end at a 30° angle.
- After sharpening, spray paint the exposed metal to prevent rust.
- Allow the paint to fully dry according to the paint's recommended drying time.
Optional Accessory:
- Magnetic Hitch Pin (MHPK-12BH): A quick-connect magnetic hitch pin (1/2" diameter, 3" pin length) is available as an extra-strong, convenient upgrade to replace a regular cotter pin.
Customer Service:
- For installation questions, missing parts, or replacement parts, contact Customer Service toll-free at 877-728-8224, chat online at www.brinly.com, or email customerservice@brinly.com.
- Additional information and videos are available on the Brinly website: www.brinly.com.
Limited Warranty:
- Brinly-Hardy Company warrants products against defects in material and workmanship.
- Standard / Residential Use Warranty Periods:
- Steel Frame & Steel Parts: 2 years
- Stars & Plugs: 90 days
- Tires / Wheels: 90 days
- Drive: Chain & Sprocket: 90 days
- All other normal wear parts or component failures: 90 days
- Commercial Application Warranty: 90 days after purchase for all parts.
- The warranty begins with proof of purchase. Without proof, it starts from the date of manufacture.
- The warranty does not cover routine maintenance, normal deterioration of exterior finish, transportation/labor charges, or commercial/rental use.
- The exclusive remedy is repair or replacement of defective parts.
- The warranty is non-transferable and applies only to the original purchaser.