2 Brisa Evaporative Window Cooler Use and Care Manual
INTRODUCTION
Your Brisa evaporative air cooler was thoroughly tested and inspected
before leaving the factory. This manual is your guide to proper
installation procedures along with information about reasonable care
and maintenance that will ensure safe, economical and trouble free
cooling. Failure to follow these instructions may damage your cooler,
impair its operation, create the potential for serious personal injury
and/or void the warranty.
Read it carefully.
A Note About Air Exhausting / Maximum Cooling
To get the maximum capacity of your cooler, and to help
keep insects, dust, dirt, etc out of the cooled space, the house should
be maintained at a slightly positive air pressure (that is, there should
be slightly more air going into the house than is leaving). This is
controlled by how much the windows or doors are opened.
INSTALLATION
Carefully read the contents of this manual and review the
drawings of the cooler to familiarize yourself with the various
parts before beginning the installation process.
CAUTION: Disconnect all electrical power to the cooler
before attempting to install, open, or service your cooler.
Even while routinely inspecting or servicing the inside, the cooler can
be accidentally started. Keep people and pets away from the cooler
and electrical supply when you are working on it. Before opening,
servicing or cleaning the unit, unplug the unit from the wall receptacle
and take steps to ensure that the cord cannot be plugged back in and
the cooler turned on accidentally. Do not plug power cord into the wall
receptacle until installation or service work is complete.
Before attempting to install the cooler, confirm that the following
preparations have been made:
This cooler must be plugged into a 120 volt GFCI (Ground Fault
Circuit Interrupter) protected receptacle. If you are not sure that
the receptacle is GFCI protected, consult with a qualified
electrician. This receptacle should be located within 5 feet of the
window opening (cooler power cord is 6 feet long. Use of
extension cords is not recommended).
Install cooler in a window where only fresh outside air can enter.
Avoid installing the cooler in an area where the free air
movement around and into the cooler is restricted or locations
where obnoxious odors or fumes may be drawn into cooler from
vent pipes, kitchen exhausts, etc.
Verify that the supporting surface is strong enough to bear the
weight of the cooler when in use. This unit will weigh
approximately 250 pounds when operating at full capacity.
Verify that the supporting surface is level in all directions.
Since coolers function best when there are plenty of openings for the
air to exhaust, you can leave doors or windows open so your house
can breathe.
How much should you open your windows or doors? You should
adjust your openings until the air pressure inside the house is
nearly balanced with the air outside. A good method to determine
when the air is reasonably balanced is to place a tissue paper
against the screen in the window or door farthest from the cooler
and adjust the other openings in the house until the tissue paper
stays lightly on the screen. You can adjust different windows in the
house to direct the most airflow to the areas that are occupied
during different times of the day or night (example: living room
windows during the daytime, bedroom windows at night.)
HINT: To avoid a rush of warm air when starting the cooler be sure to
turn on the pump for a few minutes to completely wet out the pads
before starting the blower.
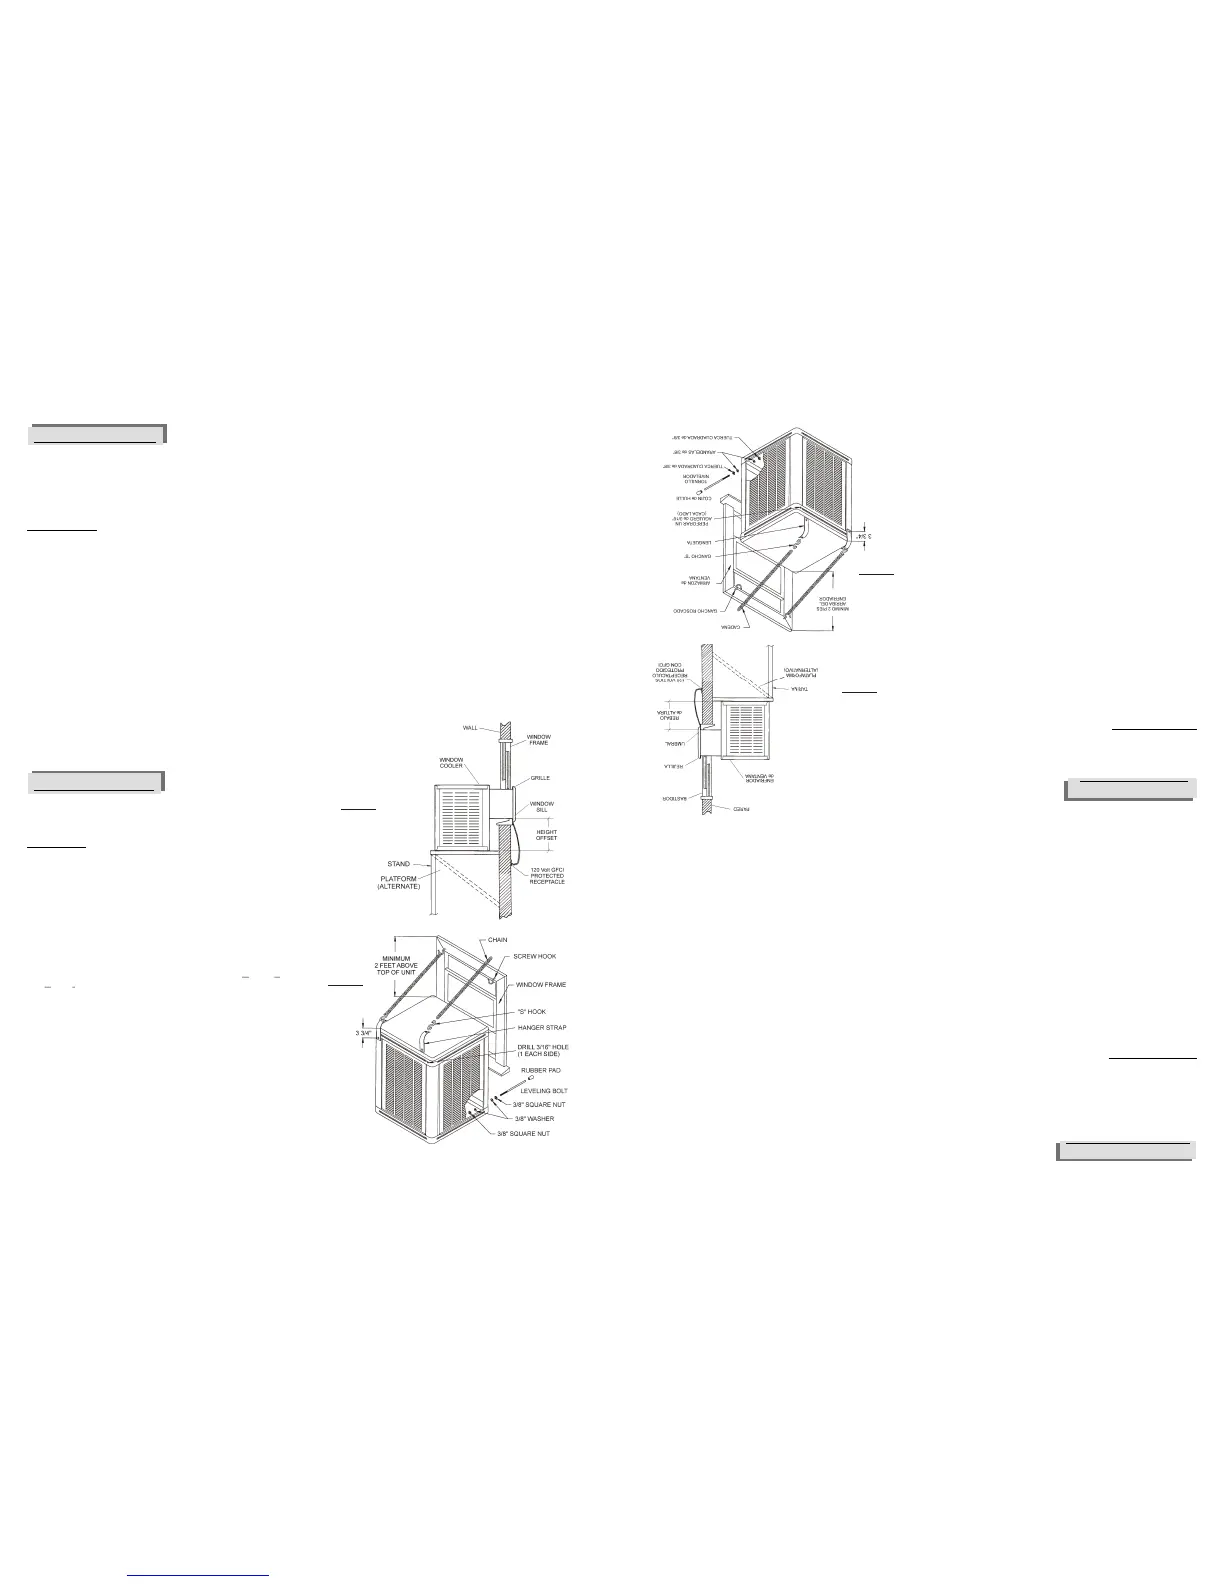
Platform or Stand Mounting
See
illustration (Fig. 1) for a typical installation. Construct a platform or
stand below the window strong enough to support the weight of the
cooler (approximately 250 pounds).
Measure and construct a level platform or stand that will allow the
bottom surface of the cooler duct to rest on the window sill. Allow
clearance for the drain/overflow standpipe connection.
Position the cooler so that the duct rests on the window sill and the
grille flanges are inside the window frame. DO NOT drive nails or
screws through bottom pan into mounting surface, this will
void the warranty.
Lower the window to rest on the top of the duct (vertically hung
windows) or slide window closed against side of duct (horizontal
slider windows). Block any remaining unused portion of the
window opening with a suitable blocking material (Plexiglas, solid
plastic sheet, solid wood panel, etc.). It will be necessary to seal
any joints around the duct to prevent entry of rain, dust/dirt,
insects, etc. Any good quality caulking or foam tape will work.
Installation normally involves locating the unit in a suitable window
and the construction of a platform or stand to support the weight of the
cooler. Since every installation is different, the exact requirements to
mount and seal a cooler against the weather will be best determined
by the location and at the time of the installation. Most installations will
require blocking of the unused portion of the window around the duct
or other modifications to the window frame may be necessary.
Figure 1
Figure 2
2 Brisa Enfriador Evaporativo de Ventana - Maunal de Uso y Cuidado
INTRODUCCIÓN
Su enfriador fue detalladamente probado e inspeccionado antes de
salir de la fábrica. Ester manual es una guía de procedimientos para
una instalación propia junto con información de un cuidado razonable
y mantenimiento que le asegurará un enfriamiento seguro,
económico y sin problemas. El no seguir estas instrucciones puede
dañar su enfriador, incapacitar su operación, crear un potencial para
una seria lastimadura personal y/o anular la garantía.
Lea cuidadosamente
Notas para Salidas de Aire / Enfriamiento Máximo
Esto
se controla con que tanto se abran las ventanas y puertas.
INSTALACION
Cuidadosamente lea los contenidos de este manual y revise los
planos del enfriador para que usted se familiarize con las varias
partes antes de comenzar el proceso de instalación.
PRECAUCION: Desconecte toda la corriente eléctrica
del enfriador antes de intentar instalar, abrir, o darle
servicio a su enfriador.
Aún cuando rutinariamente se inspeccione o de servicio al interior, el
enfriador puede empezar accidentalmente. Mantenga todo el personal
alejado del enfriador y suministro de corriente al trabajar en él. Antes de
darle servicio o limpiar la unidad, desenchufe la unidad del receptáculo de
la pared y asegurese que el cordón no sea enchufado de nuevo y el
enfriador prenda accidentalmente. No enchufe el cordón en el
receptáculo hasta que la instalación o trabajo de servicio esté completo.
Antes de intentar instalar el enfriador, asegúrese que las
siguientes preparaciones se hayan hecho:
Instale enfriadores en un ventana donde solamente aire fresco de
afuera entre de enfriamiento. Evite el instalar las unidades en áreas
que restringen el movimiento libre del aire alrededor y la entrada del
enfriador, o cerca de tubos de venteo, extractores de cocina, etc.; ya
que repugnantes olores o vapores pueden ser inducidos por la
unidad.
Asegúrese que la superficie de soporte es lo suficiente fuerte para
soportar el peso del enfriador cuando esté en uso. Esta unidad pesará
aproximadamente 250 libras cuando opere en plena capacidad.
Verifique que la superficie de soporte esté nivelada en todas
direcciones.
Ya que los enfriadores funcionan mejor cuando el escape de aire es
en abundancia, usted puede dejar puertas o ventanas abiertas para
que su casa pueda respirar. Para obtener la capacidad máxima de su
enfriador, y ayudar a mantener insectos, polvo, tierra, etc fuera del
espacio enfriador, la casa debe mantenerse ligeramente a una
presión positiva (aire entrando la casa sea más que el que sale)
¿Que tanto debe habrir sus ventanas o puertas? Debe habrir sus
aberturas hasta que el aire dentro de la casa casi se balance con el
aire de afuera. Un metodo usado para determinar si el aire esta
razonablemente es el de poner un pedazo de papel en contra del
alambre mosquitero de la ventana más lejana al enfriador y ajustar
la abertura de las ventanas hasta que el papel se quede
lijeramente en el alambre mosquitero de la ventana. Usted puede
ajustar diferentes ventanas en la casa para dirigir más flujo de aire
a las areas que estén ocupadas durante diferentes tiempos del día
o la noche (ejemplo: ventanas de la sala durante el día, de la
recámara durante la noche)
NOTA: Para eliminar el torrente de aire caliente al poner a
funcionar el enfriador, asegurese de encender la bomba unos
minutos antes para humedecerlos filtros de poner a funcionar la
turbina.
Este enfriador tiene que ser enchufado a una fuente de 120 voltios con
receptáculo protegido con GFCI (Interruptor de Circuito a Falta de
Tierra). Si usted no está seguro si el receptáculo tiene protección
GFCI, consulte con un electricista competente. Este receptáculo
debe estar situado entre una distancia de 5 pies de la abertura de la
ventana. (El cordón de suministro es de 6 pies de largo, el uso de una
extensión no es recomendable).
Montado en plataforma o tarima
La instalación normalmente envuelve el situar la unidad en una
ventana apropiada y la construcción de una plataforma o tarima para
que soporte el peso del enfriador. Ya que cada instalación es
diferente, los requerimientos exactos para montar y sellar el enfriador
en contra del clima será determinado por el sitio y al momento de la
instalación. La mayoría de las instalaciones requieren el cerrar la
parte sin uso alrededor del ducto, u otras modificaciones al cuadro de
la vantana quizás sean necesarias. Vea ilustración (Fig. 1) para
instalación típica. Construya la plataforma o tarima debajo de la
ventana, lo suficiente fuerte para soportar el peso del enfriador
(aproximadamente 250 libras).
Mida y construya una plataforma nivelada o suporte que permita
la superficie inferior del ducto del enfriador descansar sobre el
umbral de ventana. Permita espacio para la conexión del drenaje /
tubo de rebosadero.
Sitúe el enfriador de tal manera que el ducto descanse en el marco
de la ventana y las cejas de la rejilla estén dentro del armazón de la
ventana. NO clave clavos o tornillos a través del fondo y la
superficie en que se va a montar, esto anula la garantía.
Cierre la ventana para que descanse sobre la parte superior del
ducto (en ventanas que cuelgan verticalmente) o ventanas que se
deslizan al lado del ducto (ventanas que se deslizan hacia los
lados). Bloquee la abertura restante de la ventana con un material
apropiado para el caso (plexiglás, hoja sólida de plástico, panel
sólido de madera, etc.). Será necesario sellar cualquier unión
alrededor del ducto para prevenir la entrada de la lluvia,
polvo/tierra, insectos, etc. Cualquier sellador de buena calidad o
cinta serviría para el propósito.
Figura 1
Figura 2
 Loading...