2
3
4
6
1
5
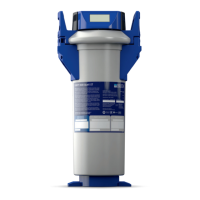
Inserting the filter cartridge
A. Remove the red protective cap (1)
B. Insert the filter cartridge (5) vertically into the filter head (2).
C. Turn the locking handle (3) until you feel it engage.
BRITA P 1000 Kit – easy installation
In countries where DIY installation of the dispensers is not
permitted, BRITA recommends the installation via our partner’s
installation service or via an authorised plumber. If you install your
BRITAP1000 kit yourself and not via our partner’s installation
service, please check and follow our partner’s instruction manual
before starting. You will see that there are only a few steps to the
installation.
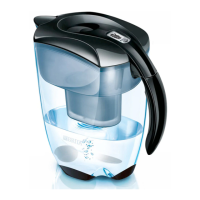
Why filter tap water?
Tap water is perfectly safe, but it does not always taste, look or smell as good as many of us would
like. Impurities that affect your tap water’s taste, odour, and colour include, for example, chlorine and
organic impurities. Apart from these substances, the BRITA P 1000 filter cartridge reduces limescale
(carbonate hardness), metals (like lead and copper) and certain pesticides for your well-being.
Maintenance
• Regularly check the filter system for leaks. Regularly check
the hoses for kinks. Bent hoses must be replaced. Even
though the product life time is 10 years, we recommend to
check it after 5 years after extraordinary wear and tear.
• Regularly clean the outside of the filter system with a soft,
damp cloth.
Replacing the BRITA P 1000 (see pictures on page 45)
A. Open the locking handle (3).
B. Place a suitable container under the flush hose to catch the
rinsed water. Activate the flush valve (6) and release pressure
from the system.
C. Remove the exhausted filter cartridge (5) from the filter head (2).
D. Insert the new filter cartridge
E. Close the locking handle (3)
Open the valve on your dispenser and rinse through until the
filtered water runs clear and without any bubbles (at least 2 litres).
Reset your cartridge exchange indicator for reassurance about your
filter’s performance.
Replacing the filter cartridge
The filter cartridge must be replaced when it runs out or at
latest 6 months after commissioning, irrespective of the level
of exhaustion of the filter system.
Read the Important Information
prior to exchange. After storage and transport below 0°C,
the product must be stored in the open original packaging
for at least 24 hours at the stated ambient temperatures
for operation.
Do not use any abrasive chemicals, cleaning solutions or
astringent cleaning agents.
NOTE
The filter cartridge can be pivoted by 90° in the wall mount
for easy removal. When the locking handle is open, the water
supply to the cartridge is interrupted and water by-passes
directly to the outlet without being filtered.
The filter cartridge can only be inserted when the locking
handle is open. Make sure that the filter cartridge is positioned
correctly.
4 | 5
en