EasyManua.ls Logo

Broco Prime-Cut - User Manual

Broco Prime-Cut
49 pages
Print Icon
To Next Page IconTo Next Page
Loading...
O
PE
RA
T
I
N
G
I
N
S
T
RUC
T
I
O
N
S
AND
T
E
CHN
I
CA
L
M
ANUA
L
F
O
R
P
R
I
M
E
-
C
U
T
U
L
T
R
A
T
H
E
R
M
I
C
C
U
TT
I
N
G
S
Y
S
T
E
M

Other manuals for Broco Prime-Cut

Questions and Answers

  • J
    Jesus SweeneyAug 16, 2025
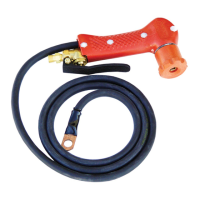
    Why is there uneven oxygen flow in my Broco Prime-Cut Cutter?
    • T
      Tony MitchellAug 16, 2025
      Uneven oxygen flow in your Broco Cutter can stem from a dirty or worn flash arrestor, a dirty or worn flash arrestor screen, or a dirty torch. To address this: * Inspect and clean or replace the flash arrestor. * Clean or replace the flash arrestor screen. * Clear the oxygen path by depressing and releasing the oxygen control valve lever with the torch connected to an oxygen source. Then, reinstall the flash arrestor and screen.
  • S
    Scott BurnettAug 22, 2025
    Why the cutting rod will not fit into the collet in the Broco Cutter torch?
    • M
      Meagan GonzalezAug 22, 2025
      If the cutting rod doesn't fit into the collet of your Broco Cutter torch, it might be due to the wrong size collet or a damaged collet. Here's how to fix it: * Check if the collet size matches the cutting rod. If not, replace it with the correct size. * Inspect the collet for burrs or slag. If found, clean and reinstall it. Alternatively, use a standard slotted screwdriver to gently open up the collet slots.
  • T
    Tony RamosAug 26, 2025
    How to fix oxygen leaks at the collet nut on a Broco Cutter?
    • T
      Tara TurnerAug 26, 2025
      Oxygen leaks at the collet nut of your Broco Cutter can occur if the cutting rod isn't properly seated against the neoprene washer, or if the collet washer is dirty, worn, damaged, or missing. To resolve this, try the following: 1. Loosen the collet nut slightly. 2. Firmly seat the rod and then re-tighten the collet nut. 3. If the leak continues, remove the collet nut, collet, and collet washer to clean or replace the collet washer. As a temporary fix, you can turn the washer over to expose the unworn face.
  • C
    Claire BakerAug 28, 2025
    What to do if the valve stem won't move freely on my Broco Cutter?
    • D
      David GreenAug 28, 2025
      If the valve stem in your Broco Cutter won't move freely when you depress and release the oxygen control lever, it could be due to a bent valve stem, a worn valve stem spring, or a worn valve stem o-ring. To address this, you'll need to follow the oxygen control valve disassembly/reassembly procedures to remove and replace the affected part. Remember to always replace the valve stem O-ring when replacing the valve stem.
  • C
    Charles HansonAug 31, 2025
    How to fix oxygen leaks at hose adapter on Broco Cutter?
    • W
      William MorenoAug 31, 2025
      To fix oxygen leaks at the hose adapter of your Broco Cutter, first tighten the fittings. Then, test the connection with soapy water to identify the leak's location by observing bubble formation. If the leak persists, apply PTFE tape to the threads for a better seal.
  • M
    Mary ShawSep 3, 2025
    What to do if oxygen leaks at the collet nut of Broco Cutter?
    • M
      Michael KlineSep 3, 2025
      If you have oxygen leaks at the collet nut of your Broco Cutter, try this: Loosen the collet nut by about half a turn, firmly seat the cutting rod, and then tighten the collet nut again. If the leak continues, take off the collet nut, collet, and collet washer. Clean the collet washer, or replace it if it's worn. If a new collet washer isn't available, you can temporarily turn the old one over to expose the least worn surface.
  • L
    lorilunaSep 6, 2025
    Why the valve stem will not move freely while depressing and releasing the control lever on my Broco Prime-Cut?
    • S
      snyderstaceySep 6, 2025
      If the valve stem on your Broco Cutter isn't moving freely, it could be due to several reasons. The valve stem might be bent, or the valve stem spring or o-ring could be worn. To fix this, follow the oxygen control valve disassembly/reassembly procedures to remove and replace the valve stem. Always replace the valve stem o-ring when replacing the valve stem. Also follow the oxygen control valve disassembly/reassembly procedures to remove and replace the valve stem spring and o-ring.
  • A
    Anna MelendezSep 9, 2025
    How to stop oxygen leaks at the control valve nut on a Broco Prime-Cut Cutter?
    • F
      flongSep 9, 2025
      To stop oxygen leaks at the control valve nut on your Broco Cutter, consider the following: - The rubber gasket might be dirty or worn, so remove and clean or replace it as needed. - The valve stem o-ring could be dirty or worn; follow the control valve disassembly procedures to remove the valve stem and clean or replace it. - The valve stem washer might also be dirty or worn; follow the control valve disassembly procedures to remove and clean or replace it. - The valve stem itself may be worn, in which case you should replace it and install a new o-ring. - Finally, the control valve nut may be loose; partially unscrew it, ensure the rubber valve nut gasket is in place, and then retighten it as described in the control valve reassembly procedures.
  • W
    williamsalazarSep 10, 2025
    What to do if there are oxygen leaks at the control valve nut on my Broco Prime-Cut Cutter?
    • A
      Allen HallSep 12, 2025
      If you notice oxygen leaks at the control valve nut of your Broco Cutter, it could be due to a loose control valve nut, a pinched or damaged valve nut o-ring gasket, or damaged threads on the control valve nut or valve body. Here's what you can do: 1. Partially unscrew the control valve nut, then re-tighten it according to the re-assembly procedures. 2. Remove the valve nut, inspect the o-ring gasket, and replace it if needed. 3. Remove the control valve nut and inspect the threads on both the nut and the control valve body. Replace any damaged parts.
  • D
    dawsonvictoriaSep 12, 2025
    What to do if the cutting rod will not fit into the collet in the torch head of my Broco Prime-Cut Cutter?
    • A
      Annette WhiteSep 12, 2025
      If the cutting rod won't fit into the collet of your Broco Cutter's torch head, it might be due to a few reasons. First, check that the collet is the correct size for the cutting rod you're using; if it's not, replace it with the right size. Also, the collet might be damaged, so remove it and check for burrs; if you find any, remove them and then replace the collet. Another solution is to remove the collet and use a slotted screwdriver to apply pressure in the collet slots to open up the collet. Then, replace the collet in the torch.

Summary

Chapter 1 GENERAL INFORMATION AND SAFETY PRECAUTIONS

Critical Safety Warnings and Precautions

Essential warnings and precautions to prevent injury, death, and damage during operation.

Chapter 2 PREPARATION

Oxygen System Setup and Connections

Procedures for connecting the oxygen system components, including adapters.

Ignition System Setup and Battery Usage

Instructions for setting up and using the ignition system, including battery care.

Chapter 3 OPERATING INSTRUCTIONS

Core Operating Procedures

Detailed steps for rod insertion, ignition methods, and shutdown.

CHAPTER 5 TROUBLESHOOTING

Oxygen System Malfunctions

Troubleshooting oxygen leaks and uneven flow issues.

Valve Stem and Collet Malfunctions

Troubleshooting issues with the control valve stem and collet problems.

CHAPTER 6 CORRECTIVE MAINTENANCE

Broco Prime-Cut Specifications

General IconGeneral
BrandBroco
ModelPrime-Cut
CategoryCutter
LanguageEnglish

Related product manuals