2
Thank you
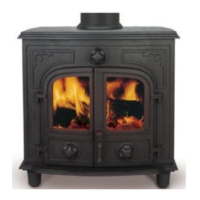
for choosing a Hercules cast iron multi-fuel stove.
Please take time to read this manual and follow the guidelines on how to install and operate
your new stove. This will help you to enjoy, for many years to come, safe and cost effective
use of your stove.
The term ‘multi-fuel’ means that the stove is capable of burning a variety of solid fuels, for
example, wood logs, coal, Phurnacite, peat and various pre-formed briquettes or a
combination of these fuels. The specially designed multi-fuel grate inside your stove allows
a flow of air through the base of the fire that is necessary when burning coal, or a hot ash
bed to be supported when burning wood. See the section on ‘Operation’ for more details.
INSTALLATION - ALL MODELS
The stove must be installed and commissioned by a fully qualified, registered engineer. A
“Declaration of Completion Certificate” must be obtained for the installation and retained by the end
user. Failure to comply with these requirements may void the warranty.
The stove must be stood on a level hearth constructed of an incombustible material such as
stone, brick, quarry tile or slate etc and project at least 300mm in front and 225mm on each side of
the stove.
The stove must have sealed connections from the Top Plate flue outlet through a flue pipe of
200mm diameter and appropriate length into a chimney. (In most situations 175mm diameter flue
pipe will not be suitable for chimneys less than 7.5m high, and must be used in conjunction the
‘reducer ring’ supplied with the stove as a standard part).
The sealed connection can be achieved by passing the flue pipe from the Top Plate flue outlet
through a closure plate that seals off the fireplace opening vertically or the base of the chimney
horizontally (the plate must be made of rigid fireproof material and for durability stainless steel sheet
is recommended) or directly into a pre-lined chimney.
All joints at stove and flue connections must be made airtight with ceramic rope of appropriate
diameter using fire cement only to point-up and finish. Glass-fibre rope may be used for joints in
other locations.
• If the flue pipe is connected to a vertical closure plate the outlet end must terminate not
less than 100mm from the back wall of the chimney.
• If the flue pipe is connected to a horizontal closure plate the outlet end must project a
minimum of 50mm above the plate with steep haunching in sand/cement mortar and
skimmed with fireclay cement, to prevent soot deposits building-up within the chimney on
top of the closure plate. (If the closure plate is large and haunching impracticable, an
access panel must be fitted in the closure plate or the chimney-breast above the closure
plate level from which soot deposits can be removed - particular attention must be given to
the fixing and sealing detail of the closure plate within the chimney construction to achieve
airtight construction at this location).
• If the flue pipe is connected directly into a pre-lined chimney the outlet end must
project a minimum of 75mm into the lining. The internal diameter of the lining should be
25mm or less than the external diameter of the flue pipe.
Access for chimney sweeping can be achieved from within the stove by removal of the baffle
plate. The baffle plate can be removed by raising either the right-hand or left-hand edge to the
underside of the Top Plate and lowering the opposite handed edge into the fire chamber space
where there is sufficient room to rotate and remove it through the front of the stove. Alternatively,
a section of flue pipe incorporating an access door can
 Loading...