3
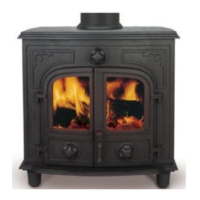
INSTALLATION - BOILER MODELS ONLY
All boiler models are fitted with four water pipe connection bosses each with a 1.5 inch BSP
female tapping located on the outside rear face of the wrap-round boiler.
The primary circuit supply to the hot water cylinder must be 28mm diameter pipe with the ‘flow’
pipe rising vertically from one of the top connection bosses to ensure good convectional flow and
permit all air to evacuate the boiler. If horizontal pipe runs are essential air bleed valves must be
incorporated where air locks are prone to occur. The hot water cylinder must be of the ‘indirect’ type
(where the domestic hot water tap supply remains separate from the water circulating through the
boiler and radiators - if standard radiators and hot water cylinder are already installed this will
normally be an ‘indirect’ system but the fitter or plumber will be able to confirm the type of system
installed). It is strongly recommended that a pipe mounted thermostat is fitted to the ‘primary return’
pipe, close to the stove location but shielded from the direct heat of the stove or, alternatively, a
surface mounted thermostat fitted directly to the hot water cylinder. The thermostat should be set to
switch the water pump ‘ON’ when the water temperature reaches approximately 55 degrees C (a
safe temperature for domestic hot water tap supply). The thermostat will ensure that the hot water
cylinder will have priority to the supply of heat from the boiler, this is particularly important when the
fire in the stove has been damped down for overnight burning.
The secondary circuit supply to the radiators must have pipe diameter sizes appropriate to the
system design for a solid fuel appliance. Pipe sizes will depend on length, height of pipe runs and
number and sizes of radiators and their sequence on the circuit.
ASSEMBLY
For top outlet flue assembly
Place the Top Plate casting on the hearth and use a plumb line to determine the centre point for the
flue alignment from the opening in the closure plate to the flue outlet opening of the Top Plate.
Mark the position of the four corners of the Top Plate with a piece of chalk (these correspond
exactly with the four corners of the Base Plate casting).
Place the Base Plate over the chalk marks
Use the chalk marks as the ‘template’ to accurately position the Base Plate (the use of the four
Base Cups is optional but when used ensure these are squarely seated and accurately located
under the Base Plate). Check the Base Plate with a spirit level and if necessary adjust the height by
turning the cups.
From this stage onwards the final position of the stove assembly is set.
Fit the Non-Boiler/Boiler Unit
Place the Non-Boiler/Boiler Unit onto the Base Plate and ensure that the bottom edges are properly
located onto the rebated Rope Seal that runs around the four sides of the Base Plate.
It is convenient at this stage to use a ‘gun’ applicator of fire cement to form a horizontal ‘fillet seal’ at
the internal junction between the Non-Boiler/Boiler Unit and the Base Plate.
It may also be advantageous to fit the plumbing elbows and the first lengths of pipe to the Boiler
Unit before locating on the Base Plate close to the rear wall of the fireplace opening within which
the stove is to be located.
Ensure that the ‘flow’ and ‘return’ pipes to the primary and secondary circuits respectively, are fitted
‘diagonally-opposed’ for efficient water circulation within the Boiler Unit.
Fit the Front Plate
Offer the vertically recessed rope seals to the leading edges of the Non-Boiler/Boiler Unit (the top
edge of the Top Plate should be about 50mm above the top edge of the Non-Boiler/Boiler Unit) and
allow the Front Plate to slide down until the catches engage with the pins located on the Non-
Boiler/Boiler Unit.
To ensure that the Front Plate has been securely located place a woodblock on the top edge of the
Front Plate and apply a sharp tap with a lump hammer to the woodblock.
 Loading...