Do you have a question about the Brother CB3-B917 and is the answer not in the manual?
Explains warning and caution symbols and their significance for safe operation.
Details crucial safety precautions related to environmental conditions, electrical safety, and installation.
Describes the warning labels attached to the machine and the importance of adhering to their instructions.
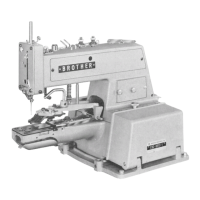
Identifies and illustrates the primary components of the BM-917B sewing machine for user reference.
Presents technical details and features of the BM-917B, including stitch forms and speed.
Provides dimensions and specifications for a suitable sewing machine table, including hole placements.
Details motor specifications, pulley and V-belt selection, and installation of pulley covers for safety.
Guides through the installation process of the machine head, belt, button tray, and cotton stand.
Step-by-step instructions for mounting the sewing machine head onto the table securely.
Instructions for correctly installing the drive belt between the motor and the machine pulley.
Describes how to install the button tray onto the sewing machine bed for holding buttons.
Instructions for assembling and attaching the cotton stand to the sewing table.
Explains the importance and procedure for connecting the ground wire for electrical safety.
Details the lubrication process, specifying oil and application points for the sewing machine.
Outlines the procedure for testing the sewing machine's basic functionality after installation.
Instructions on manually rotating the machine pulley for adjustments and checks, with safety precautions.
Covers essential steps before starting sewing, including needle installation and threading.
Step-by-step guide for correctly installing the sewing needle, ensuring proper orientation.
Detailed instructions on how to thread the sewing machine, including precautions for different thread types.
Explains how to adjust the thread take-up lever for optimal thread tension and stitch quality.
Guides on setting vertical and transverse feed for button sewing based on button hole spacing.
Instructions on how to correctly position and secure buttons in the clamp for sewing.
Details how to set the desired number of stitches for button sewing operations.
Covers the process of actual sewing, including checking needle drop and starting the machine.
Procedure to verify the needle's position relative to button thread holes before sewing.
Step-by-step guide to starting and performing the sewing operation on a button.
Explains adjustments for main, sub, and auxiliary thread tensions for optimal stitch formation.
How to adjust the main thread tension using the tension nut for desired tightness.
Procedure to adjust the timing of the sub tension discs for correct thread release.
How to set the opening amount of the thread presser tension for smooth thread feeding.
Instructions for adjusting the auxiliary thread tension using the tension nut.
Guide to adjusting the rotor for proper thread take-up amount based on stitch requirements.
How to adjust the presser arm pressure to prevent material slippage.
Daily cleaning procedures to maintain machine performance and longevity, including lubrication.
Details on lubricating the sewing machine, specifying oil and application points.
Instructions on how to clean the eye guard using a soft cloth, avoiding solvents.
Guidance on checking the needle for bends or breaks and replacing if necessary.
Provides comprehensive guidance on standard adjustments for optimal machine operation and stitch quality.
Step-by-step instructions for setting the correct needle bar height for proper stitch formation.
Guide to synchronizing the needle and looper for correct stitch cycling.
How to set the optimal clearance between the needle and looper tip.
Instructions for adjusting the needle guide to ensure proper needle path.
Details longitudinal and transverse adjustments for the thread handler.
How to adjust the clearance between the machine pulley and clutch plate.
Instructions for adjusting the brake mechanism to control machine stopping.
How to set the correct lift amount for the button clamp.
Guides on adjusting the transverse and vertical positions of the button opener.
Instructions for adjusting the fixed and movable knives for thread trimming.
Provides safety precautions and procedures for replacing parts on the sewing machine.
Detailed instructions for removing and installing the presser arm, including adjustments.
Instructions for replacing the feed plate and ensuring correct needle drop positions.
Guide to replacing the button clamp assembly and setting it for button sewing.
Lists common problems, their possible causes, and suggested solutions for the sewing machine.
Addresses issues with broken crossover stitches, including thread tension and handler clearance.
Explains causes and solutions for thread fraying at the final stitch.
Discusses thread fraying at stitch joints and potential causes like thread tension.
Covers various causes for thread breakage, including timing, clearance, and pressure issues.
Addresses problems with loose thread tightening and its causes.
Explains why thread might remain in a loop at crossover stitch joints.
Discusses thread looping issues on odd stitches and their remedies.
Addresses issues with thread end winding on the first stitch.
Solutions for loose stitch joints, involving thread take-up and presser tension.
Troubleshoots intermittent thread tightening issues by checking thread path.
Covers causes for skipped stitches at the beginning of sewing, like needle installation or timing.
Addresses final stitch skipping issues after material removal.
Explains why thread might wind onto the looper when the machine stops.
Discusses thread remaining on the material top at the first stitch.
Addresses buttons popping out of the clamp during sewing start.
Troubleshoots causes for broken needles, including button size and feed plate alignment.
Discusses issues with incorrect thread trimming, like blunt knives.
Solutions for buttons not dropping correctly at the stop position.
Addresses loud machine sounds during stopping, related to speed or brake force.
Troubleshoots why the machine stops prematurely, related to speed or brake force.
| Brand | Brother |
|---|---|
| Model | CB3-B917 |
| Category | Sewing Machine |
| Language | English |