45 / EN
Washing Machine / User’s Manual
2 Installation
RefertothenearestAuthorisedServiceAgentforinstallation
oftheproduct.Tomaketheproductreadyforuse,review
theinformationintheusermanualandmakesurethatthe
electricity,tapwatersupplyandwaterdrainagesystemsare
appropriatebeforecallingtheAuthorizedServiceAgent.If
theyarenot,callaqualifiedtechnicianandplumbertohave
anynecessaryarrangementscarriedout.
C
Preparationofthelocationandelectrical,tapwaterand
wastewaterinstallationsattheplaceofinstallationis
undercustomer'sresponsibility.
Makesurethatthewaterinletanddischargehoses
aswellasthepowercablearenotfolded,pinchedor
crushedwhilepushingtheproductintoitsplaceafter
installation or cleaning procedures.
B
warning: Installationandelectricalconnectionsof
theproductmustbecarriedoutbytheAuthorized
ServiceAgent.Manufacturershallnotbeheldliablefor
damagesthatmayarisefromprocedurescarriedoutby
unauthorizedpersons.
A
warning: Priortoinstallation,visuallycheckiftheproduct
hasanydefectsonit.Ifso,donothaveitinstalled.
Damagedproductscauserisksforyoursafety.
2.1 Appropriate installation location
• Placethemachineonarigidfloor.Donotplaceitona
longpilerugorsimilarsurfaces.
• Totalweightofthewashingmachineandthedryer-with
fullload-whentheyareplacedontopofeachother
reachestoapprox.180kilograms.Placetheproduct
onasolidandflatfloorthathassufficientloadcarrying
capacity!
• Donotplacetheproductonthepowercable.
• Donotinstalltheproductatplaceswheretemperature
mayfallbelow0ºC.
• Placetheproductatleast1cmawayfromtheedgesof
otherfurniture.
2.2 Removing packaging reinforcement
Tiltthemachinebackwardstoremovethepackaging
reinforcement.Removethepackagingreinforcementby
pullingtheribbon.
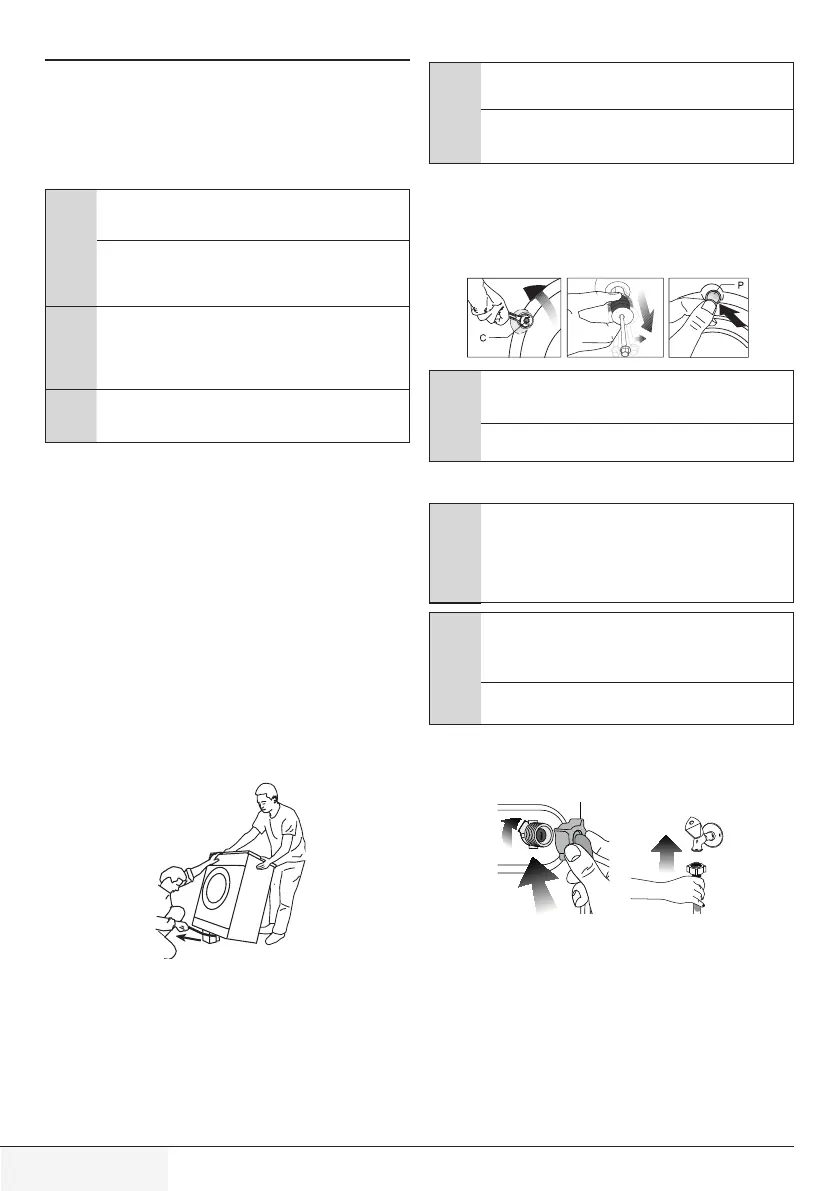
2.3 Removing the transportation locks
A
warning: Donotremovethetransportationlocksbefore
takingoutthepackagingreinforcement.
warning: Removethetransportationsafetyboltsbefore
operatingthewashingmachine!Otherwise,theproduct
willbedamaged.
1.Loosenalltheboltswithasuitablespanneruntilthey
rotatefreely
(C).
2.Removetransportationsafetyboltsbyturningthem
gently.
3.AttachtheplasticcoverssuppliedintheUserManualbag
intotheholesontherearpanel.
(P)
C
Keepthetransportationsafetyboltsinasafeplaceto
reusewhenthewashingmachineneedstobemoved
againinthefuture.
Nevermovetheproductwithoutthetransportationsafety
boltsproperlyfixedinplace!
2.4 Connecting water supply
C
Thewatersupplypressurerequiredtoruntheproductis
between1to10bars(0.1–1MPa).Itisnecessaryto
have10–80litersofwaterflowingfromthefullyopen
tapinoneminutetohaveyourmachinerunsmoothly.
Attachapressurereducingvalveifwaterpressureis
higher.
A
warning: Modelswithasinglewaterinletshouldnotbe
connectedtothehotwatertap.Insuchacasethelaundry
willgetdamagedortheproductwillswitchtoprotection
modeandwillnotoperate.
warning: Donotuseoldorusedwaterinlethosesonthe
newproduct.Itmaycausestainsonyourlaundry.
Tightenallhosenutsbyhand.Neveruseatoolwhen
tighteningthenuts.
Openthetapscompletelyaftermakingthehose
connectiontocheckforwaterleaksattheconnection
points.Ifanyleaksoccur,turnoffthetapandremovethe
nut.Retightenthenutcarefullyaftercheckingtheseal.To
preventwaterleakagesanddamagescausedbythem,
keepthetapsclosedwhenthemachineisnotinuse.