The document is an installation manual for the "Pursuit TM Pocket Billiard Table" by Brunswick Billiards. It provides detailed, step-by-step instructions for assembling the table, including the base frame, legs, slate, bed cloth, aprons, pocket buckets, and rails. The manual emphasizes careful handling of components to prevent damage and ensures proper assembly and leveling for optimal play.
Function Description:
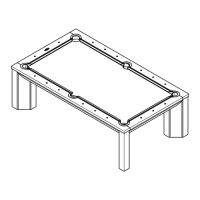
The Brunswick Pursuit TM Pocket Billiard Table is a recreational device designed for playing billiards. Its primary function is to provide a stable, level, and properly clothed playing surface for the game. The table is assembled from several key components: a base frame, four legs, three slate sections, bed cloth, side and end aprons, pocket buckets, and a rail assembly with cushions. The detailed installation process ensures that the table meets specific structural and playability standards, such as precise leveling of the slate and proper tensioning of the bed cloth, which are crucial for accurate ball roll and consistent gameplay.
Important Technical Specifications (Derived from Installation Steps):
- Fasteners:
- Base Frame Assembly: (8) 1/2-13UNC X 3-1/2 Hex Bolts, (8) 1/2 Ext. Tooth Lock Washers, (8) Flat Washers.
- Leg Mounting Brackets (Initial): (4) 3/8-16UNC x 2-3/4 Hex Bolts, (4) 3/8 Ext. Tooth Lock Washers, (4) 3/8 Flat Washers.
- Leg Mounting Brackets (Final): (8) 3/8-16UNC x 1 Hex Bolts, (8) 3/8 Ext. Tooth Lock Washers, (8) 3/8 Flat Washers.
- Leg Assembly to Brackets: (4) 3/8-16UNC Hex Nuts, (4) 3/8 Ext. Tooth Lock Washers, (4) 3/8 Flat Washers per leg assembly.
- Slate Sections: (12) #14 X 2-1/2 Flat Head Screws. Pilot drill 5/32" diameter holes.
- Apron Panels: (4) 1/4-20UNC x 1-1/2 Hex Bolts, (4) 1/4 Ext. Tooth Lock Washers, (4) 1/4 Flat Washers per panel.
- Side Pocket Leather Buckets: (7) #8 x 1/2 Pan Head Screws per bucket.
- Rail Assembly (Frame Connection): (4) 5/16-18UNC X 4 Threaded Rods, (8) Flat Washers, (8) 5/16 Ext. Tooth Lock Washers, (8) 5/16-18UNC Hex Nuts.
- Rail Connector Plates: (16) #10 X 3/4 Truss Head Screws.
- Rail to Slate Connection: (18) 3/8-16UNC X 2-3/4 Threaded Rods (threaded into rails), (3) Domed Washers, (3) 3/16UNC Hex Nuts per end of rail assembly, and remaining for side rails.
- Slate: Composed of three sections, requiring precise leveling and joint filling.
- Bed Cloth: Nap-oriented, requiring specific stretching and stapling techniques.
- Pockets: Includes side and corner pockets, with leather buckets.
- Bed Spots: Self-adhesive, for placement at head and/or foot end.
Usage Features (Implied by Installation and Design):
- Precision Leveling: The table is designed for precise leveling using shims under the legs and by adjusting slate sections, ensuring a perfectly flat playing surface essential for fair gameplay.
- Durable Construction: The use of various bolts, washers, and threaded rods throughout the assembly indicates a robust and stable structure designed to withstand the forces of play.
- Optimal Playability: The instructions for bed cloth application, including nap direction, precise stretching, and cushioning at pocket cutouts, are critical for achieving the desired ball roll and longevity of the cloth. The filling of slate joints ensures a smooth, uninterrupted playing surface.
- Modular Design: The table is assembled from distinct components (frame, legs, slate, rails, etc.), allowing for easier transport and assembly in various locations.
- Aesthetic Integration: The apron panels, which include the "Brunswick" brand logo, are attached to enhance the table's appearance and integrate with the leg posts.
Maintenance Features (Implied by Installation and Design):
- Slate Joint Filling: The instruction to fill slate joints with "rock hard putty or slate joint wax" and scrape excess material away suggests a method for maintaining a smooth playing surface and potentially for future repairs if joints become uneven.
- Bed Cloth Replacement: The detailed steps for attaching the bed cloth imply that it is a replaceable component. The specific techniques for stretching and stapling would be followed for re-clothing the table in the future. The cushioning strips at pocket cutouts are designed to extend the life of the bed cloth, reducing wear in high-stress areas.
- Rail Cloth Replacement: Similar to the bed cloth, the rail cloth is a replaceable component, with specific instructions for attachment, trimming, and stapling to ensure proper cushion performance.
- Structural Adjustments: The ability to loosen and re-tighten fasteners during leveling and squaring of the frame and rails suggests that minor adjustments could be made over time to maintain the table's structural integrity and levelness.
- Pocket Maintenance: The attachment of pocket buckets with screws suggests they are removable for cleaning or replacement.
- Cleaning: The note "Before attaching the billiard cloth, clean slate thoroughly" highlights the importance of keeping the playing surface clean, which is a fundamental maintenance practice for billiard tables.
- Damage Prevention: The manual repeatedly emphasizes careful handling and the use of floor protection, indicating that proper care during assembly and use is crucial for the table's longevity. This also implies that components are designed to be handled and assembled without specialized heavy machinery, but rather with careful manual labor.