Do you have a question about the BSi OGCare and is the answer not in the manual?
Introduction and thank you for choosing the OGCare BGMS.
Specifies the OGCare BGMS is for quantitative glucose measurement in whole blood for diabetic patients and healthcare professionals.
System requires acclimation to operating temperature (10-40°C) for 20 minutes before use.
Avoid dust, collisions, direct sunlight, humidity; use soft cloth; do not use corrosive products.
Use immediately after retrieval, keep vial closed, use dry hands, check expiration, store in cool/dry environment.
Ensure the code number on the meter matches the code on the test strip vial before testing.
Be sure to check the glucose measurement unit on the meter before the test.
Read manual carefully, handle meter/strips at same temperature, keep away from children, disinfect parts for blood collection.
Ensure operating temperature of 10-40°C for accurate results; do not reuse test strips.
Healthcare professionals must wear gloves and follow facility policies for infection control.
Use recognized procedures for contaminated materials, practice safety policy, use capillary blood, avoid air bubbles.
Identifies the Display, 'M' Button, 'C' Button, and Test strip slot on the front of the meter.
Identifies the USB port, Battery lid, and Serial number on the back of the meter.
Instructions on using OGCare Test Strips with the meter and checking expiration/opening dates.
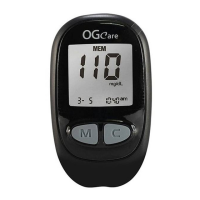
Details the meaning of various symbols and numbers displayed on the OGCare meter screen.
Wash hands with soap and water, dry thoroughly, or use an alcoholic cotton cloth for finger cleaning.
Steps 1-3: Remove lancet cap, insert lancet, twist protective disk, and replace lancing device cap.
Steps 4-6: Insert test strip to turn on meter, check code match, wait for blood symbol.
Compare meter code with test strip vial code; contact customer service if they don't match.
Steps 7-9: Select puncture depth, activate lancing device, hold against finger, press release button, gently squeeze finger.
Step 10: Put blood on the test strip, wait for beep, result appears after five seconds.
Notifies that an 'Er 4' message indicates insufficient blood sample.
Caution: Do not drop blood directly on strip end; fill sample channel. Listen for beep indicating enough blood.
Steps 11-12: Result appears after countdown; meter turns off automatically after removing strip.
Notice: If results are abnormal, retest with a new strip and refer to troubleshooting.
Never reuse lancets; do not use if cap is loose; dispose properly; store away from children.
Use 'M' or 'C' buttons to flag post-meal or control solution results; marks toggle when pressed.
Notice: 14-day average results do not include test results with the control solution mark.
Steps 1-4: Write result in logbook, use ejector to remove strip, meter turns off, handle used strip carefully.
Contact professional before AST; results may differ during rapid glucose changes; avoid if pregnant or glucose is unstable.
Use fingertip samples if blood sugar is low, symptoms are unclear, results don't match feeling, or during illness/stress.
Caution: Do not change treatment based on one result; never ignore symptoms; consult professional if results don't match feeling.
Choose fleshy area away from bone, veins, hair; massage or warm site if needed for blood flow.
Choose fleshy area on palm below thumb/pinky, away from veins/lines. Wait longer for blood, avoid squeezing site.
Notice: Wait longer for blood, avoid squeezing; do not use sample if it smears due to hair or lines.
Steps 1-2: Press 'M' button for 3 seconds to enter setup mode; 'SEt' will be displayed.
Steps 3-4: Use 'C' button to set month/date, 'M' button to move to next setting.
Step 5: Set time format (AM/PM or 24-hour) using 'C' button, then 'M' button.
Steps 6-7: Use 'C' button to set hour/minute, 'M' button to move to next setting.
Steps 8: Set year (stands for 2011) and move to beeper on/off mode.
Step 9: Set unit (mg/dL or mmol/L); cannot be changed. Consult Customer Service if needed.
Caution: Incorrect unit can lead to misinterpretation and incorrect treatment. Consult healthcare professional.
Step 10: Set beeper to 'On' (default) or 'Off' using 'C' button, then 'M' button to proceed.
Steps 1-3: Turn on meter, display 'SEt', press 'M' until 'dEL' appears briefly.
Steps 4-6: Select 'NO' or 'YES' to keep or delete results using 'C' button, press 'M' to confirm. Meter turns off.
Steps 1-2: Press 'M' button to turn on meter, displays date/time, then shows last 14 days average result.
Steps 3-4: Press 'C' to see most recent result, press 'C' again for previous results.
Step 5: Press 'M' button to turn off the meter. Meter auto-turns off after 100 seconds if no action.
Requires OGCare Link Software and Cable to transfer results to a computer for reports.
Perform control tests when opening new strips, after extreme conditions, if results are questionable, or to check accuracy.
Steps 1-3: Insert strip, check code match, shake solution, apply to strip, wait for confirmation window to fill.
Step 4: Mark control solution tests with 'Control Solution Mark'; they are not included in averages.
Caution: If results are consistently outside the range, the system may be faulty. Contact Customer Service.
Compare results to acceptable ranges (Level 1 & 2) on the test strip vial label; ranges vary by batch.
Steps 1-2: Insert Check Strip to test meter function; 'OK' message confirms meter works. Contact service if 'OK' is not displayed.
Ensure meter is off. Wipe surface with a damp soft cloth using isopropyl alcohol or diluted bleach. Avoid moisture in slots.
Steps 1-2: Replace battery when low indicator appears. Stored results remain, but date/time need resetting.
Explains error codes Er1 (used/damaged strip), Er2 (sample before symbol), Er3 (temp issue), Er4 (insufficient sample).
Explains error codes Er5 (wrong strip), Er6 (internal problem), Hi (high result), Lo (low result).
Provides solutions for meter not working, abnormal results, thermometer mark, and inserting issues.
Details product name, model, calibration, sample volume, result range, test time, power, memory, display, temp, humidity, dimensions, weight.
Three-year warranty from purchase date, covers defects in material/workmanship, ceases on incorrect use or damage.
Explains symbols like Keep Away from Sunlight, Warning, Manufacturer, Lot, IVD, Reference Manual, etc.
Manufacturer's responsibility for EMC info; user must ensure compatible environment; avoid static discharge and strong radiation.
Dispose of meter according to local regulations after removing battery due to infection risk.
Form for recording name, address, age, sex, tel, purchase date, place, and serial number.
Lists available supplies like control solutions, check strips, connecting cable, and software.
| Blood Sample | Capillary whole blood |
|---|---|
| Sample Size | 0.5 µL |
| Measuring Time | 5 seconds |
| Measuring Range | 20-600 mg/dL |
| Battery | 2 x AAA batteries |
| Battery Life | Approximately 1000 tests |
| Operating Humidity | 10 - 90% RH |
| Sample Volume | 0.5 µL |
| Measurement Time | 5 seconds |
| Operating Temperature | 10°C - 40°C |
| Operating Conditions | 10°C - 40°C, 10% - 90% RH |
| Automatic Shut-off | 2 minutes after last action |