Do you have a question about the BT OMEGA and is the answer not in the manual?
Essential safety rules for operating and handling the paintball marker.
List of all components and accessories provided with the marker.
Technical details, caliber, power source, and materials of the BT Omega marker.
Step-by-step instructions for properly installing the marker's barrel.
Instructions for attaching the feed elbow and loader system to the marker.
Procedures for safely connecting the air cylinder and loading paintballs.
Instructions on how to adjust the marker's stock length for user comfort.
Detailed steps for safely operating and firing the paintball marker.
How to set and check the marker's firing velocity using a chronograph.
Steps to safely remove paintballs and depressurize the marker.
Process for safely detaching the air cylinder from the marker.
Guide for cleaning the marker's barrel and breech for optimal performance.
Instructions on lubricating critical O-rings for smooth operation.
Best practices for storing and transporting the marker safely.
General advice and precautions for disassembling the marker safely.
Steps to remove barrel, elbow, magazine, receiver, stock, and bolt components.
General instructions for reassembling the marker after disassembly.
Details about warranty activation, purchase receipt, and registration.
Exclusions and limitations of the manufacturer's warranty coverage.
Crucial safety warnings and precautions for paintball guns.
This document is the owner's manual for the BT Omega paintball marker, a semi-automatic paintball gun designed for recreational and competitive use. The manual provides comprehensive instructions on the safe handling, operation, maintenance, and troubleshooting of the device, emphasizing safety as a paramount concern.
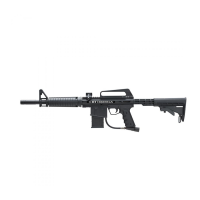
The BT Omega is a .68 caliber semi-automatic paintball marker powered by CO2 or compressed air (HP Output). Its primary function is to propel paintballs at targets, making it suitable for paintball sports. The marker features a mechanical action, meaning its firing mechanism relies on physical components rather than electronic ones. A key design element is its removable barrel system, which allows users to interchange barrels to suit different playing conditions. The standard barrel is mirror-honed with a step-bore and porting, and has a length of 13¾ inches, contributing to accuracy and performance. The marker's main body is constructed from aluminum, ensuring durability while keeping the device relatively lightweight.
Safe Marker Handling: The manual stresses the importance of safe handling, advising users to treat every marker as if it were loaded, never look down the barrel, keep the marker in "Safe Mode" until ready to shoot, and keep fingers off the trigger. It also mandates the use of a barrel blocking device when not shooting and recommends storing the marker unloaded and degassed in a secure place. Eye, face, and ear protection meeting ASTM standard F1776 are required for anyone within range. Velocity must always be measured before play, with a strict limit of 91.44 meters (300 feet-per-second).
Barrel Installation: To install the barrel, users must ensure the marker is degassed, the hopper is removed, and no paintballs are in the feed port or breech, and the marker is in "Safe Mode." The threaded end of the barrel is then placed into the front opening of the marker body and turned clockwise until it stops, without overtightening. A barrel-blocking device, such as a barrel plug, must then be installed to prevent accidental discharge.
Slide-Away™ Feed Elbow and Loader Installation: The Slide-Away™ feed elbow is installed by pressing and holding a retention button on its side, then sliding it onto the front of the picatinny rail. It must be aligned with the feed hole on the right side receiver and checked to ensure it is locked in place. For loader installation, the Slide-Away™ elbow and loader should be free of debris. The elbow is positioned on the marker's receiver, and a 3/16" Allen wrench is used to loosen the clamping screw on the elbow. The loader is then pressed into the elbow's opening until it stops, aligned with the lid pointing to the rear and parallel to the marker. The clamping screw is then tightened until snug.
Air Cylinder Installation: Before installing an air cylinder, users must ensure they and anyone within range are wearing paintball-specific eye protection. All screws must be tightened, and no parts should be loose. A barrel plug or blocking device must be in place, and no paintballs should be in the marker. The marker should be set to "Safe Mode." To pressurize, the marker is cocked by pulling the cocking knob back until it clicks. The air cylinder adapter, located at the base of the pistol grip, is then pointed upwards while the muzzle is in a safe direction. The threaded cylinder valve end is inserted into the adapter and twisted clockwise until it stops, charging the marker. The manual warns that compressed air, nitrogen, and CO2 cylinders can be dangerous if misused and should only be handled by qualified technicians.
Loading Paintballs: The marker must be in "Safe Mode," and eye protection worn by all within range. Quality .68 caliber, water-soluble paintballs are loaded into the hopper, leaving room for movement.
Stock Adjustment: The stock's length can be adjusted by pushing up the adjustment lever and pulling or pushing the stock to the desired position.
Firing the Marker: With the marker pointed in a safe direction and eye protection worn, the empty loader is placed and securely mounted. The marker is cocked, and the air cylinder applied. Paintballs are loaded into the hopper. The barrel plug is removed, and the safety is set to "Fire." The marker is aimed at the target, and the trigger is pulled with a smooth squeezing motion.
Velocity Adjustment: Before playing, the marker's velocity must be checked using a chronograph, ensuring it does not exceed 300 feet-per-second. With eye protection on and the barrel-blocking device removed, the marker is set to "Fire Mode." A 5/32" Allen wrench is used to turn the velocity adjuster screw (on the left side of the marker) inward (clockwise) to reduce velocity or outward (counterclockwise) to increase it. The manual explicitly states not to remove the velocity adjustment screw.
Unloading the Marker: Eye protection is required. The barrel-blocking device must be installed, and the marker set to "Safe Mode." The loader clamping screw is loosened with a 3/16" Allen wrench. While holding the hopper, the marker is inverted to remove the loader and all paintballs. With the marker pointed in a safe direction, the barrel-blocking device is removed. The trigger is pulled several times to ensure no paintballs remain in the chamber or barrel. The barrel-blocking device is re-installed, and the marker is set to "Safe Mode."
Removing Air Cylinder: The barrel-blocking device must be installed, and the marker set to "Safe Mode." Pointing the marker in a safe direction, the cylinder is turned counter-clockwise about 3/4 of a turn to close the cylinder valve. The safety is disengaged (set to "Fire"), and the trigger is pulled repeatedly until all CO2 or air is expelled and the marker fails to re-cock. The cylinder is then unscrewed from the marker.
Cleaning Barrel and Breech: To maintain accuracy, the barrel and breech should be kept clean. A BT battle swab can be used to clean the inside of the barrel. Warm water can also be used to clean out paint or dirt before using the swab, especially if the barrel has been removed. To clean the breech and detent area, the marker is cocked, and the battle swab is inserted into the barrel adapter. If the breech is heavily covered in paint, disassembly may be necessary.
Lubricating Front and Rear Bolt O-Rings: Accessing the front and rear bolts requires removing the left-side receiver. Once removed, the bolts are cleaned, and their O-rings inspected for damage or wear, replacing if needed. One drop of premium marker oil is applied to each O-ring on both bolts. Any residue inside the receiver halves is cleaned with a rag or paper towel before reassembly.
Disassembly/Reassembly: Before any maintenance, all paintballs and air sources must be removed, a barrel-blocking device installed, and the marker unloaded, degassed, and un-cocked. Disassembly tips include working in a clean area and carefully separating the shell to avoid losing parts. Instructions are provided for removing the barrel (counter-clockwise), Slide-Away™ Elbow (press retention button and slide forward), and magazine (press two locking tabs and pull down). For full internal access, the barrel, Slide-Away™ Elbow, and magazine must be removed. The marker must be in the un-cocked (forward) position before separating the body. The bolt handle cover is removed, and the two ASA screws are loosened. The marker is laid flat with the name plate facing up, and the seven receiver screws are removed. The name plate receiver is then lifted off, noting that the stock may spring out due to tension. The trigger assembly lifts out as a single unit and is not recommended for further disassembly. The stock, spring guide, bumper, and spring are lifted out of the right-side receiver. The bumper O-ring, spring, and spring guide are removed. The rear bolt, cocking handle, and linkage arm are removed by rotating the rear bolt counter-clockwise, then removing the linkage arm, bolt handle, and sliding the rear bolt rearward. The barrel adapter is lifted away (with the barrel if installed), and the ball detent is lifted out, noting its position. The front bolt is slid forward and off the power tube. Reassembly reverses these steps, with light oil applied to all O-rings and sliding parts. All parts and O-rings must be free of debris, nicks, and scratches, and all screws tightened securely.
Storage and Transportation: The marker must be free of all paint and propellant when stored. It should be kept in a cool, dry place, away from children. It must not be attached to a propellant source during transport. Users must observe all local, state, and federal laws regarding paintball marker transportation. The manual emphasizes never carrying the marker uncased in public to avoid confusion with firearms and recommends using a suitable marker case or its original box.
| Material | Aluminum |
|---|---|
| Barrel Length | 14 inches |
| Type | Paintball marker |
| Caliber | 0.68 |
| Air Source | CO2 |
| Manufacturer | BT |