EasyManua.ls Logo

Bullet tools EZ Shear 120 User Manual

Default Icon
2 pages
To Next Page IconTo Next Page
Page #1 background imageLoading...
Page #1 background image
Tools needed: #2 & #3 Phillips head screwdrivers and a 1/2” (13mm) socket or wrench.
IMPORTANT! Start all screws BY HAND when assembling your shear. This will help avoid cross-threading.
1. ATTACH R AILS
2. ATTACH TAIL
Quick Start Guide
for EZ Shear Models #120, #126
3. ATTACH TABLE
A. Attach front of table to base, using Item D screws.
Tighten with #3 Phillips.
B. Attach back of table to tail using Item E screws.
Tighten with #2 Phillips.
4. AT TACH HAN D LE
Insert handle into slot. Insert Item F screws
and tighten with 1/2” (13mm) wrench.
5. ATTACH FENCE
Align fence with one of two hole sets on the table: at 90° or at 45°.
Use Item C screws with Item G wingnuts to fasten securely.
5
Item C
Item G
Item E
A. (4) #14 x 3” PH Phillips Self-Tapping Screws
B. (6) M6 x 25mm PH Phillips Machine Screws
C. (5) M6 x 16mm FH Phillips Machine Screws
1. Power Assembly
1a. Safety Lock pin
2. Handle Assembly
3. Fence
4. Table
The Hardware Kit is used in multiple models. Your Shear may not use all of the items listed.
5. Tail
6. Rails x 2
7. Hone Stone
8. Hardware Kit
D. (4) #10 x 1 FH Phillips Self Tapping Screws
E. (2) M8 x 50mm Hex Bolts
F. (2) M6 Wing Nuts
In the Box: In the Hardware Kit:
2
1
Item F
4
Tail
Power Assembly
Item D
3B
3A
Attach rails to Power Assembly base using
Item A screws.
Attach tail to rails using Item C screws.
Make sure holes in tail are facing up.
ASSEMBLING YOUR SHEAR
Question and Answer IconNeed help?

Do you have a question about the Bullet tools EZ Shear 120 and is the answer not in the manual?

Bullet tools EZ Shear 120 Specifications

General IconGeneral
BrandBullet tools
ModelEZ Shear 120
CategoryPower Tool
LanguageEnglish

Summary

Assembling Your EZ Shear

Attach Rails to Power Assembly

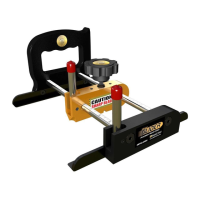
Connect the rails to the Power Assembly base using Item A screws.

Attach Tail to Rails

Secure the tail to the rails using Item C screws, ensuring holes face upwards.

Attach Table to Base and Tail

Fasten the table to the base with Item D screws and to the tail with Item E screws.

Attach Handle Assembly

Insert the handle into the slot and tighten with Item F screws using a 1/2" wrench.

Attach Fence

Align the fence to the table at 90° or 45° and secure with Item C screws and Item G wingnuts.

Using Your EZ Shear

Engage Safety Lock and Lift Handle

Pull the Safety Lock pin while gently pushing the handle down, then lift the handle.

Position Product and Initiate Cut

Place the product on the table and lower the handle until the blade contacts the material.

Complete Cut

Push the handle down fully until the material is completely severed.

Material Usage Warning

Do not use on high pressure laminate or solid wood to prevent machine damage.

Related product manuals