EasyManua.ls Logo

Bullet tools Vinyl Glider - User Manual

Bullet tools Vinyl Glider
2 pages
Print Icon
To Next Page IconTo Next Page
Loading...
A
B
D
C
E
1. Retract blade by turning depth knob counterclockwise. You can stop when blade is fully retracted into the receiver.
Continue to rotate knob if you would like to remove it completely.
2. Unlock guide fence by lifting latch lever .
3. Slide guide fence to the widest position.
4. Place the Bullet Vinyl Glider over an LVP plank.
a. Set the LVP plank onto the handle side runner.
5. Slide guide fence up to the plank
a. Set the LVP plank onto the fence side runner.
b. Vinyl plank should be captured on both sides.
6. Lock guide fence by pressing down on latch lever .
7. Unlock blade receiver by lifting latch lever .
8. Slide blade receiver to the desired position (the right side is calibrated to the scale).
9. Lock blade receiver by pressing down the receiver latch lever .
10. Extend blade by turning knob clockwise. Blade should cut into LVT by about 1/16” (1.5mm).
11. Press firmly down on knob and slide glider along the full length of your vinyl plank.
a. If needed, extend blade further and slide the glider back along the vinyl plank.
12. Slide the glider off the end of the plank.
13. Flex the vinyl plank up, then down - to snap it along the line.
A
A
A
B
B
B
B
D
D
D
E
E
C
C
ALWAYS OPERATE OVER A
SOLID AND SECURE SURFACE
(such as a concrete or wood oor)
#BT92-2095
TM
The
PATENT PENDING
PATENT PENDING
Operation
Question and Answer IconNeed help?

Do you have a question about the Bullet tools Vinyl Glider and is the answer not in the manual?

Summary

Vinyl Glider Operation Guide

Operating the Vinyl Glider

Step-by-step instructions for using the Vinyl Glider to cut LVP planks, including blade retraction, fence adjustment, and plank placement.

Vinyl Glider Blade Management

Blade Change Procedure

Detailed steps for safely removing and replacing the blade cartridge, including handling axle pins and spacers.

Maintenance Recommendations

Guidance on applying grease to slide shafts and cleaning glue residue with solvents for optimal tool performance.

Overview

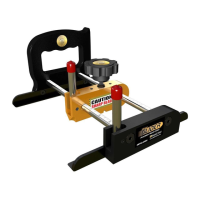
The Bullet Vinyl Glider (model #BT92-2095) is a precision plank cutter designed for efficiently and accurately cutting Luxury Vinyl Plank (LVP) and Luxury Vinyl Tile (LVT) flooring. It is a manual tool that provides a clean, straight cut without the need for power tools, making it suitable for use on job sites or in workshops.

Function Description:

The primary function of the Vinyl Glider is to score vinyl planks, allowing them to be snapped cleanly along the scored line. This process involves securing the vinyl plank, setting the desired cut position, extending a blade to score the material, and then manually snapping the plank. The device is designed to be operated over a solid and secure surface, such as a concrete or wood floor, to ensure stability and accuracy during use.

Important Technical Specifications:

While specific dimensions and weight are not provided in the manual, the device features a robust construction with a guide fence, blade receiver, and a depth knob for blade adjustment. The blade extends approximately 1/16" (1.5mm) into LVT for scoring. The design incorporates a handle-side runner and a fence-side runner to securely hold the vinyl plank during the cutting process. The blade cartridge is designed for easy replacement, and the system uses an axle pin to hold the blade and spacers in place.

Usage Features:

Setup and Adjustment:

  1. Blade Retraction: To begin, the blade is retracted by turning the depth knob (A) counterclockwise. The blade can be fully retracted into the receiver or removed completely by continuing to rotate the knob.
  2. Guide Fence Adjustment: The guide fence (B) is unlocked by lifting the latch lever (C). It is then slid to its widest position to accommodate the plank.
  3. Plank Placement: The Bullet Vinyl Glider is placed over an LVP plank, with the plank set onto the handle-side runner.
  4. Securing the Plank: The guide fence (B) is slid up to the plank, and the plank is set onto the fence-side runner. This ensures the vinyl plank is captured securely on both sides.
  5. Locking the Guide Fence: The guide fence (B) is locked in place by pressing down on the latch lever (C).
  6. Blade Receiver Adjustment: The blade receiver (D) is unlocked by lifting its latch lever (E). It is then slid to the desired cut position, with the right side calibrated to a scale for precise measurement.
  7. Locking the Blade Receiver: The blade receiver (D) is locked by pressing down its latch lever (E).
  8. Blade Extension: The blade is extended by turning the depth knob (A) clockwise until it cuts into the LVT by approximately 1/16" (1.5mm).

Cutting Process:

  1. Scoring the Plank: With the blade extended, the user presses firmly down on the depth knob (A) and slides the glider along the full length of the vinyl plank. If necessary, the blade can be extended further, and the glider slid back along the plank to ensure a complete score.
  2. Removing the Glider: After scoring, the glider is slid off the end of the plank.
  3. Snapping the Plank: The scored vinyl plank is then flexed up and down to snap it cleanly along the scored line.

Blade Change:

  1. Extend Blade Cartridge: The blade cartridge (F) is fully extended by turning the handle knob (K) clockwise until it stops. It's important not to force the knob further.
  2. Remove Axle Pin: A pen or small screwdriver is used to push the axle pin (G) out of the blade cartridge.
  3. Remove Old Blade: The blade (H) and spacers (J) are slid out of the blade cartridge (F). The old blade is discarded.
  4. Install New Blade: A new blade is placed onto the axle pin (G), sandwiched between the two spacers (J).
  5. Lubricate: A thin film of grease is applied to the small steps on the sides of the spacers (J) and to the axle pin (G).
  6. Reinsert Blade Assembly: The blade (H) and spacers (J) are slid back into the blade cartridge (F), and the axle pin (G) is centered.

Maintenance Features:

  1. Lubrication: For easier adjustment and smooth operation, it is recommended to apply grease or Teflon spray (such as Bullet Tools Slick Shot™) to the slide shafts at the start of each workday.
  2. Cleaning: All glue residues should be cleaned from the runners and blade cartridge using mineral spirits or a similar solvent before storing the device. This helps maintain the tool's performance and longevity.

The Bullet Vinyl Glider is designed for tradesmen seeking a reliable, non-powered solution for cutting vinyl flooring, emphasizing precision, ease of use, and straightforward maintenance.

Bullet tools Vinyl Glider Specifications

General IconGeneral
BrandBullet tools
ModelVinyl Glider
CategoryPower Tool
LanguageEnglish

Related product manuals