7
CLOCK SETTING
Press this button to set clock time. The Clock icon on remote
controller blinks. Within 5 seconds, press “+” or “- ” button to set
clock time. With each press of the “+” or “- ” buttons, the clock
time increases or decreases by 1 minute. To quickly adjust the time
setting, press and hold “+” or “- ” button for 2 seconds.
Release the button when you have reached the desired time setting.
Press the “CLOCK” button to confirm the time, and clock icon
stops blinking.
NOTE: Clock time adopts 24 - hour mode. A 12- hour format is
not available.
SLEEP MODE:
The unit aut om atic ally a djus t s room temper ature dur i ng your slee p
time . This sl i ght change in tem perature wil l not affec t your comfort
leve l due to the na t ura l effe cts that sleeping has on the body, howe ver
it saves on ene rgy consumpt ion and lowe rs your ele ctri c bill.
The unit has four Sleep Modes to select from. Press the SLEEP
button to select Sleep 1, Sleep 2, Sleep 3, Sleep 4 modes or Cancel.
The SLEEP icon appears.
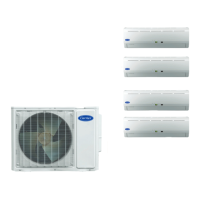
TRADITIONAL MODE - SLEEP
1
In Traditional Mode the unit slowly relaxes the room set
temperaturebyupto4_F until Sleep Mode is cancelled.
Cooling Mode
Heating Mode
Fig. 11 - Cooling and Heating Modes
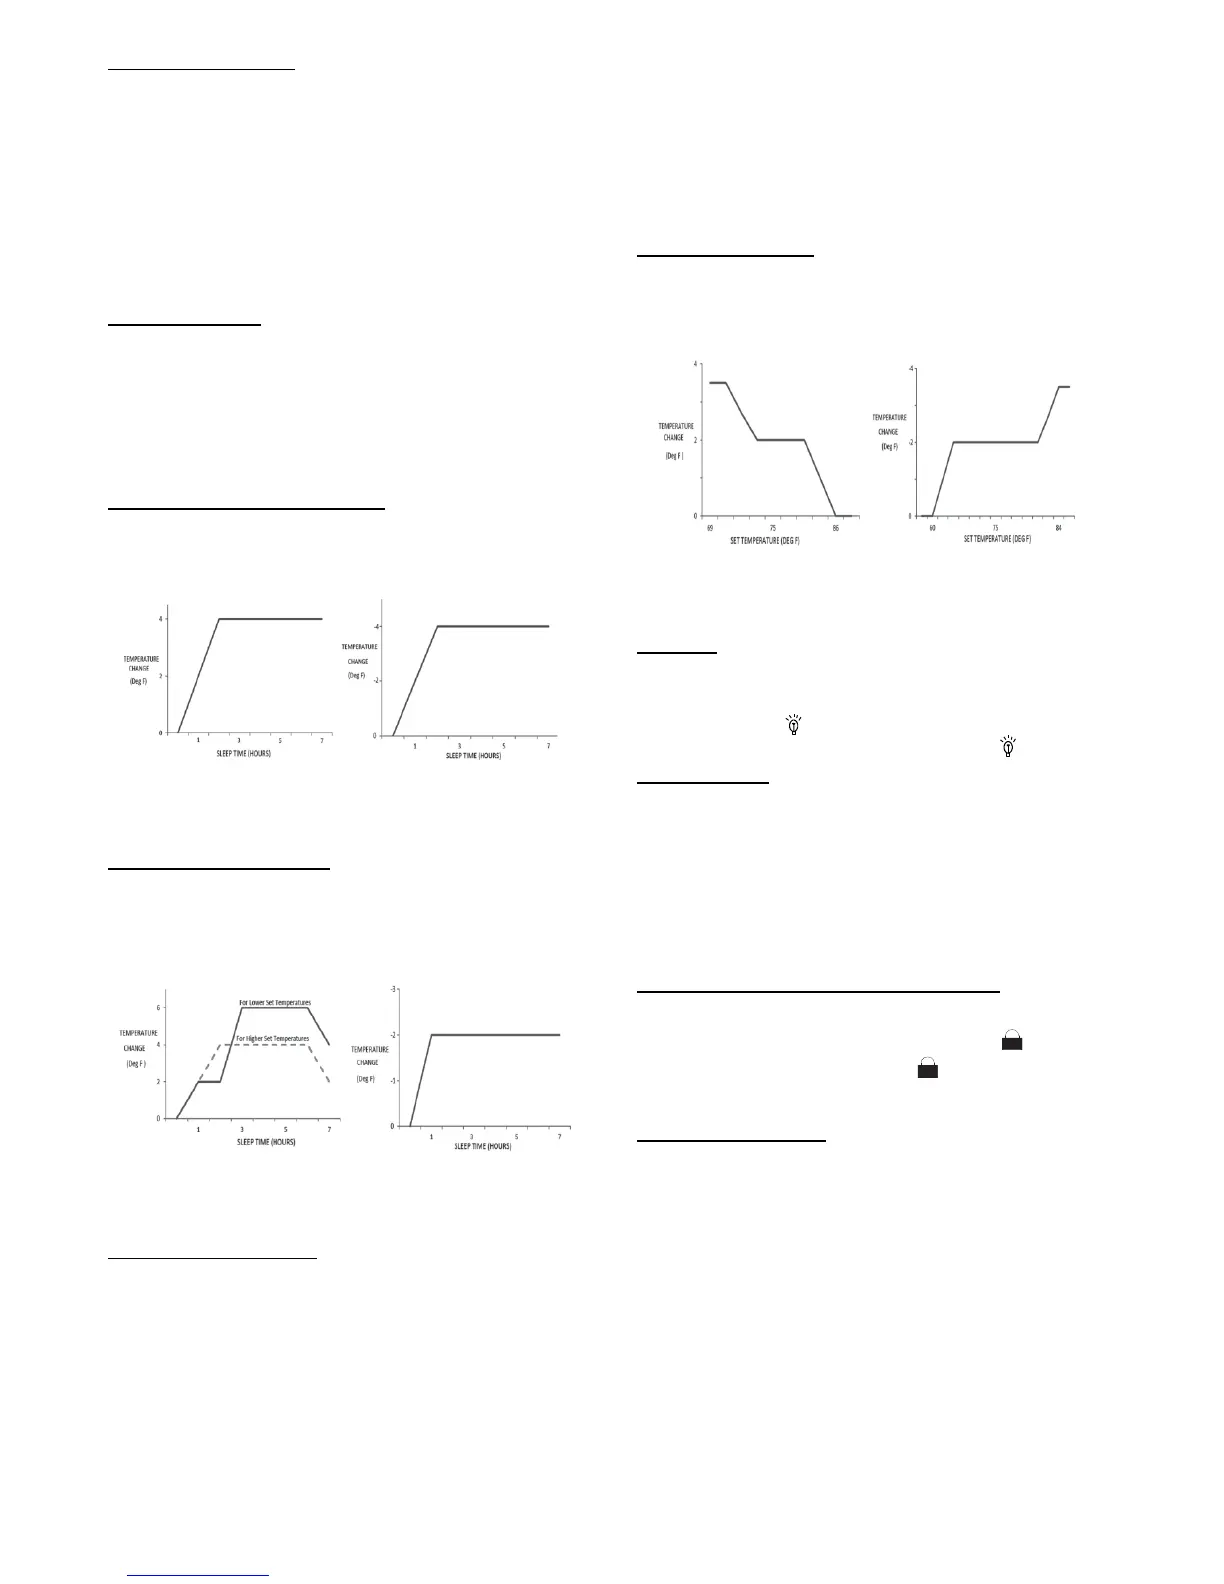
EXPERT MODE - S LEEP
2
In Expert Mode the unit adjusts the room set temperature at a rate
based on the starting set temperature value. Sleep Mode continues
until cancelled.
Cooling Mode Heating Mode
Fig. 12 - Cooling and Heating Modes
DIY MODE S LEEP 3
You are required to enter eight (8) room set point values for eight
(8) hours of run time. The last room set point value is maintained
until the sleep mode is cancelled.
In Sleep Mode 3, press the “Prog” button to enter the setup mode.
The remot e cont r oll er displays “1:00” in the ti m e loc ation. Us e the “+”
and “- ” buttons to sel ec t the desire d room s et point for the firs t hour
of run ti m e. Then pres s t he “Prog” button to save the set point.
Repeat this sequence for the eight (8) room set point values. After
all eight (8) values have been entered, the remote controller
automatically reverts to standard time and temperature display, and
the Sleep 3 Mode starts.
At any time, you may press the “ON/OFF,” “Mode,” “Timer,”
“Sleep” or “Turbo” buttons to cancel the Sleep 3 Mode.
NOTE: During this procedure, if no button is pressed within 10
seconds, the remote controller automatically exits the sleep
curve setting and r esumes the original display. If the ON/OFF,
MODE, TIMER, SLEEP, COOLING o r HEATING button is
pressed during the setting or inquiry procedure, the remote
controller exits the sleep curve setting.
SIESTA MODE 4:
In Siesta Mode the unit automatically changes the room
temperature every 30 minutes based on the room temperature
setting. The Sleep Mode continues until cancelled.
Cooling Mode Heating Mode
Fig. 13 - Siesta Mode
NOTE: Sleep function can not be set in AUTO mode.
LIGHT:
This function allows the user to turn the display ON or OFF on
the front panel.
Press the light icon
to turn the indoor unit front panel ON or
OFF. The remote control displays the Light Icon
.
WIFI Button:
Press and hold this button for three seconds to turn WIFI function
on or off. See the “Operation of Smart Control” section for more
information.
Only the set point temperature appears on the front panel and on
the remote controller.
COMBINATION BUTTONS
Combination of “+” and “- ” Buttons:
Press “+” and “- ” buttons simultaneously for 8 seconds to lock or
unlock the keypad. If the remote control is locked,
is displayed.
In this case, pressing any button,
blinks three times to
acknowledge the keypad is locked. Repeat the process to unlock
the remote controller.
46
_F Heating Functions:
Under the heating mode, press the “TEMP” and “CLOCK” buttons
simultaneously to start the 46_F heating function. When this
function starts, the “$” and 46_F icons appear on the remote
controller, and the air conditioner maintains the heating status.
Press the “TEMP” and “CLOCK” buttons simultaneously again to
exit the 46_F heating function.
NOTE: Under the 46_F heating function, the fan speed
defaults to the auto speed and it can not be adjusted.
Under the 46_F heating function, the set temperature can
not be adjusted. Press the TURBO button and the remote
controller will not send the signal. The Sleep function and the
46_F heating function can not operate at the same time. If the
46_F heating function has been set under the Cooling mode,
press the Sleep button to cancel the 46_F heating function. If
the Sleep function was set under the Cooling mode, the 46_F
heating function cancels the Sleep function.
 Loading...