EasyManua.ls Logo

Campingaz DH Classic WLD 4 Series User Manual

Campingaz DH Classic WLD 4 Series
27 pages
To Next Page IconTo Next Page
Page #1 background imageLoading...
Page #1 background image
4 Series DH Classic WLD
X 2
4010062085 (ECN20067355-F)
FR Instructions de montage
GB Assembly instructions
DE Montageanleitung
NL Montage-instructies
IT Istruzioni per il montaggio
ES Instrucciones de montaje
PT Instruções de montagem
NO Monteringsinstrukser
DK Monteringsvejledning
SE Monteringsanvisningar
FI Kokoamisohjeet
PL Instrukcjamontażu
CZ Návodkmontáži
SI Navodilazamontažo
SK Návodnamontáž
HU Összeszerelési utasítás
HR Upute za montiranje
RO Instrucţiunidemontaj
BG Указаниязамонтаж
TR Montaj
GR Οδηγίεςσυναρμολόγησης
APPLICATION DES GAZ • 219, Route de Brignais - BP 55 • 69563 Saint Genis Laval - France
Question and Answer IconNeed help?

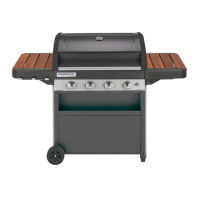
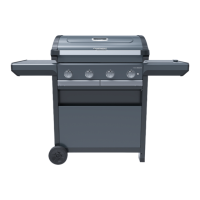
Do you have a question about the Campingaz DH Classic WLD 4 Series and is the answer not in the manual?

Campingaz DH Classic WLD 4 Series Specifications

General IconGeneral
BrandCampingaz
ModelDH Classic WLD 4 Series
CategoryGrill
LanguageEnglish

Summary

Step 01: Base Frame Assembly

Connect Legs and Supports

Attaching vertical legs to bottom supports using screws, ensuring correct orientation and spacing.

Steps 02 & 03: Wheels and Lower Structure

Install Wheels

Mount wheels onto frame points using axles and securing pins.

Assemble Lower Frame

Connect lower frame elements to form the grill base structure.

Steps 04 & 05: Frame and Support Assembly

Secure Frame to Wheel Base

Attach main frame to the base structure including wheels.

Install Side Supports

Mount vertical side support structures onto the main frame.

Steps 06A & 06B: Attaching Side Panels

Attach First Side Panel

Fix the initial side panel to the frame assembly using screws.

Attach Second Side Panel

Attach the second side panel to the opposite side of the frame.

Steps 06C & 07: Additional Panel and Bracket

Mount Additional Side Panel

Secure another side panel to the frame assembly.

Install Mounting Bracket

Attach a specific bracket to the frame for later components.

Step 08A: Attaching Front Panel

Mount Front Panel

Fix the front panel to the base structure of the grill.

Steps 08C & 09: Body and Top Component Assembly

Attach Rear Body Components

Install rear-facing structural or decorative components onto the grill body.

Secure Top Component

Attach a component to the upper section of the grill structure.

Step 10: Burner Assembly

Assemble Burner Unit

Connect burner tubes and associated parts to form the main burner assembly.

Step 11: Mounting Burner Assembly

Integrate Burner System

Install the assembled burner unit into the main grill body.

Step 12: Gas Line Connection

Connect Gas Hoses

Connect gas supply lines to the burner assembly and control valves.

Steps 13 & 14: Heat Deflectors and Side Panels

Install Heat Deflectors

Mount heat deflector plates above the burners.

Attach Side Panels

Fix side panels to the main grill structure.

Steps 15 & 16: Side Shields and Internal Components

Mount Side Shields

Attach protective shields to the sides of the grill.

Assemble Internal Components

Put together internal grill parts, possibly related to the firebox or drip tray.

Steps 17A & 17B: Side Shelf Assembly

Initial Side Shelf Attachment

Begin attaching the side shelves to the grill body.

Folding Side Shelves

Demonstrate how to fold down or adjust the side shelves.

Step 17C & Option 1: Side Shelf Configuration

Secure Side Shelves with Lock

Finalize side shelf attachment, possibly with a locking mechanism.

Option 1: Standard Shelf Placement

Illustrate one method of setting up the side shelves.

Option 2 & Step 18: Warming Rack Installation

Option 2: Alternative Shelf Setup

Show a different configuration for the side shelves.

Install Warming Racks

Place the warming racks onto their designated positions on the grill.

Steps 19A & 19B: Heat Shield Installation

Attach Lower Heat Shields

Install heat shields onto the lower part of the grill body.

Mount Inner Heat Shields

Fix heat shields to the inner structure, likely around the burners.

Steps 19C & 20: Heat Shields and Component

Secure Upper Heat Shields

Attach the final heat shields to the upper sections of the grill.

Attach Component with Warning

Install a component while highlighting a safety warning.

Steps 21 & 22: Racks and Grates Placement

Install Warming Racks

Place the secondary warming racks onto the grill.

Place Cooking Grates

Position the main cooking grates into the grill.

Gas Cylinder Safety Precautions

Prohibit Cylinder Under Grill

Warning against placing the gas cylinder beneath the barbecue for safety reasons.

Steps 24 & 25: Lid and Internal Components

Attach Grill Lid

Mount the main lid onto the grill body.

Install Internal Fixtures

Fix internal parts or brackets within the grill.

Step 26: Warming Rack Refinement

Final Warming Rack Adjustment

Attach warming racks with specific measurements for precise positioning.

Gas Cylinder Dimension and Placement Limits

Maximum Cylinder Height Restriction

Specify the maximum height (H < 70 cm) for gas cylinders used with the grill.

Related product manuals