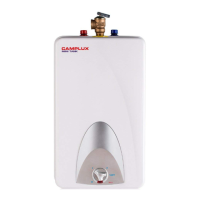
The Camplux Mini Tank Water Heater is an electric point-of-use appliance designed to provide hot water for various applications, including handwashing in residential, commercial, or industrial environments. These compact water heaters are lightweight and suitable for installation in tight spaces like under-counters, showers, or filling tubs. The device is designed for easy wall mounting and can be installed under a sink.
Technical Specifications:
The Camplux Mini Tank Water Heaters are available in four models: ME10, ME25, ME40, and ME60, offering different capacities and power ratings to suit various needs.
| Model |
Capacity (Gallons) |
Voltage (VAC) |
Power at 120 VAC (Watts) |
Max. Water Pressure (PSI) |
Weight (empty) (LBS.) |
Amperage (Amps) |
Phases |
| ME10 |
1.3 |
120 |
1440 |
150 |
12.1 |
12 |
1 |
| ME25 |
2.5 |
120 |
1440 |
150 |
14.4 |
12 |
1 |
| ME40 |
4.0 |
120 |
1440 |
150 |
18.2 |
12 |
1 |
| ME60 |
6.0 |
120 |
1440 |
150 |
25.4 |
12 |
1 |
The pressure vessel (water tank) is welded and made of glass-lined steel, equipped with an anode rod for corrosion protection. The water heater includes a thermostat and a high-limit temperature switch. A temperature pressure relief valve is supplied with the unit.
Dimensions:
The dimensions of the water heater vary by model:
| Model |
A (Inch) |
B (Inch) |
C (Inch) |
| ME10 |
12 1/2" |
11" |
10" |
| ME25 |
14 1/2" |
11 3/4" |
10 3/8" |
| ME40 |
19 1/4" |
11 3/4" |
10 3/8" |
| ME60 |
18" |
15 3/4" |
15 1/2" |
Usage Features:
- Temperature Adjustment: The water heater is equipped with an adjustable thermostat that allows users to set the desired water temperature. The red indicator lamp remains illuminated while the water is being heated.
- Point-of-Use Application: Designed for point-of-use installations, these heaters minimize heat loss and provide hot water quickly where it's needed.
- Freeze Protection: The device includes a freeze protection feature. When the water temperature is not being used for an extended period, users can either unplug and drain the water heater or turn the thermostat knob to the snowflake position to guard against freezing.
- Electrical Connection: The water heater requires a dedicated 120V/AC receptacle and must be grounded. It is equipped with an overheat limiting device with a manual reset.
- Water Connections: The cold water inlet pipe is marked with a blue ring, and the hot water outlet pipe is marked with a red ring. It is crucial to connect these correctly to prevent corrosion and ensure proper function.
- Temperature & Pressure Relief Valve: A T/P valve is supplied with the unit and must be installed in an opening provided and marked for this purpose. The valve helps prevent excessive pressure buildup in the water heater.
Maintenance Features:
- Draining and Removing Water Heater: To drain the water heater, users must unplug it, open a hot water faucet to let hot water run out, allow water to flow until water is no longer hot, turn off the cold water supply, and then disconnect the water heater from both the hot and cold water connections. If possible, siphon out remaining water. Finally, detach the water heater from the wall and tilt it to drain any remaining water.
- Removing the Heating Element: To remove the heating element, unplug the water heater, remove the cover, remove all line wires from the heating element, unscrew the heating element retaining nuts, and then remove the element.
- Descaling the Heating Element: Scale deposits can affect the heating capability of the element. Heavy scale can even cause the element to burn out. To descale, remove the heating element, soak it in white vinegar or other descaling solution, and rinse well with fresh water. For manual descaling, use a non-metallic brush similar to a toothbrush to brush the residue from the element. Avoid damaging the surface of the element.
- Replacing the Heating Element: To replace the heating element, unplug and drain the water heater, remove the heating element noting original positions of all connections, install the new element with a gasket, and tighten retaining nuts and make the wire connections to their original locations.
- Changing the Thermostat: To change the thermostat, unplug the water heater, drain and remove the water heater, remove six screws retaining the bottom panel, and remove the panel. Then, remove the thermostat knob and unscrew two retaining screws. It may be necessary to pry the knob off of the thermostat spindle. Remove the front panel. Disconnect the push-pull wire connectors on the thermostat noting which connector goes to which terminal. Terminals are marked. Remove the thermostat probe from the well. Install the new thermostat, attach wires, and tighten screws.
- Resetting the High Limit Switch: The high limit safety shut-off switch will automatically shut off the water heater when water temperatures exceed 140°F (60°C). Power is automatically turned off to the heating element. To reset the high limit switch, first allow the water heater to cool down, then depress the small red button in the center of the junction box, and replace the bottom panel and place the water heater back into service. A lower temperature setting saves energy and reduces the risk of scalding.
- Troubleshooting: The manual provides troubleshooting steps for common issues such as the water heater not getting hot, the indicator light not on, water being too hot, water not hot enough, and water leaking. For example, if the water is not getting hot, users should check the power supply, ensure the reset button is pushed in, and verify the indicator light. If the indicator light is illuminated but water temperature does not get hot, it could indicate a plumbing crossover or a shut-off cold water supply.
Important Safety Instructions:
- Grounding: The water heater must be grounded. Connect only to properly grounded outlets.
- Installation: Installation must be done in accordance with provided instructions and local codes. Do not use an extension cord.
- Supervision: Children or individuals with reduced physical, sensory, or mental capabilities should be supervised if they operate the water heater.
- Damage: Do not operate the water heater if it has a damaged cord or plug, or if it has been damaged or dropped.
- Service: This water heater should be serviced only by qualified service personnel.
- Surge Protectors: Do not use surge protectors or multi-outlet adaptors with this water heater.
- Scalding Risk: The thermostat is factory set to 125°F (52°C) or lower to reduce the risk of scalding injury. The recommended starting setpoint is 125°F (52°C). Higher temperatures increase the risk of scalding.
- Hydrogen Gas: Hydrogen gas builds up in a hot water system when it is not used for a long period (two weeks or more). Hydrogen gas is extremely flammable. If the hot water system has not been used for two weeks or more, open a hot water faucet for several minutes at the kitchen sink before using any electrical appliance connected to the hot water system. Do not smoke or have an open flame or other ignition source near the faucet while it is open.
- Manual Review: Installers should review the contents of this manual with the owner upon completion of the installation, and the manual should remain with the owner and placed in a location close to the water heater.
The Camplux Mini Tank Water Heater is designed for ease of use and maintenance, providing a reliable source of hot water for various applications while emphasizing safety through detailed instructions and warnings.