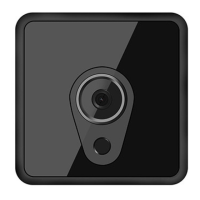
The Smart Life Camera S1 is a compact and versatile camera designed for various monitoring needs, offering both AP (Access Point) and IP (Internet Protocol) connection modes for flexible usage. It is equipped with several indicators and ports for easy operation and connectivity.
Function Description:
The Smart Life Camera S1 serves as a monitoring device capable of recording video, taking photos, and detecting motion. It offers three main working modes: Full Time Video, Photo Mode, and Motion Detection Mode.
- Full Time Video Mode: In this mode, the camera continuously records video. When operating in AP mode, the blue indicator flashes slowly, while in IP mode, the red indicator flashes slowly. Pressing the confirmation button (K1) once transitions the camera into Full Time Video Standby Mode, where the blue indicator remains on (AP mode) or the red indicator remains on (IP mode).
- Photo Mode: From Full Time Video Standby Mode, pressing the mode button (K2) once activates Photo Standby Mode. In AP mode, the blue indicator flashes three times quickly and then stays on; in IP mode, the red indicator flashes three times quickly and then stays on. Pressing K1 once initiates photo capture, taking one photo every 15 seconds, with the blue or red indicator flashing once depending on the connection mode. Pressing K1 again returns the camera to Photo Standby Mode.
- Motion Detection Mode: From Photo Standby Mode, pressing K2 once activates Motion Detection Standby Mode, indicated by both red and blue indicators staying on. When motion is detected, the camera starts recording automatically. In AP mode, the blue indicator stays on and the red indicator flashes slowly; in IP mode, the red indicator stays on and the blue indicator flashes slowly.
The camera supports both AP and IP connection modes.
- AP Connection Mode: This mode allows the camera to connect directly to a smartphone's Wi-Fi for short-distance preview images. This is useful for local monitoring without an internet connection.
- IP Connection Mode: This mode connects the camera to a router, enabling unlimited distance preview images and remote access via the internet.
The device can be added to the iCookyCam APP through several methods:
- IP Connection Mode Setup: After initialization, users switch on Wi-Fi/WLAN on their mobile device, select the camera's Wi-Fi network (e.g., "iCooky_*****"), and enter the default password "12345678". Then, within the iCookyCam APP, they select "Not been connected to the router," input the device password "ok123456," and choose to connect to a router, providing the router's Wi-Fi password.
- AP Connection Mode Setup: If only AP connections are needed, users select "No" when prompted "Connect to the router?" during the setup process in the APP.
- Manual Addition (Lan Search): If the camera is already connected to the internet in IP remote mode, it can be added to another user's APP by selecting "Been connected to the router" in the APP and performing a "Lan Search." This automatically finds cameras on the same Wi-Fi network.
- QR Code Scanning: The APP can generate a QR code for an already added camera. This QR code can then be scanned by another phone to add the camera, requiring the correct device password.
- Manual Input: Users can manually input the device UID and password into the "Add Device" interface.
Important Technical Specifications:
- Memory Card Support: Micro SD Card, Class10 or above recommended. Maximum support 64GB. The memory card must be formatted before use. Hot-swapping is not supported; the camera must be turned off before inserting or removing the card.
- Power Supply: Connects to power supply via USB port.
- Battery Life: Takes approximately 2-3 hours for a full charge.
- Input Voltage: 5V=1A (requires a qualified charger).
- Wi-Fi Compatibility: Supports only 2.4G frequency Wi-Fi. 5G frequency Wi-Fi is not supported. SSID with special characters is not compatible. Wi-Fi encryption mode cannot be WEP mode, and the password cannot be empty.
- Operating Temperature: -5 °C to 50 °C.
- Indicators:
- Blue Indicator: Indicates AP Connection Mode, or flashes slowly in AP mode during Full Time Video.
- Red Indicator: Indicates IP Connection Mode, or flashes slowly in IP mode during Full Time Video.
- Yellow Indicator: Indicates USB connection with insufficient electricity (keeps on) or sufficient electricity (keeps off).
- Blue & Red Indicator Flashing Simultaneously: Indicates no memory card.
- Resolution Display: 720P.
Usage Features:
- Easy APP Download: Scan a QR code or search "iCookyCam" in the application market for Android or iOS.
- Power ON/OFF: Connect to power supply or long press confirmation button K1 for 3 seconds to power on. Long press K1 for 5 seconds to power off (not possible when USB power is connected).
- Mode Switching: Press K2 once to cycle through Full Time Video, Photo Mode, and Motion Detection Mode.
- AP Connection Range: The effective range of the camera's Wi-Fi signal in AP mode is within 10 meters.
- Password Management: Users are prompted to change the default camera password for personal privacy. A device password reset feature is available by long-pressing the confirmation button for 5 seconds while connected to USB power in standby mode.
- Real-time Interface: The APP provides a real-time viewing interface with options for video on/off, full screen, snapshot, image flip, resolution setting, and night vision on/off.
- Setting Interface: Allows users to change password, set recording mode (full time), configure event settings (for mobile detection), toggle device indicator on/off, view device information, synchronize time, adjust Wi-Fi settings, restore factory settings, and remove the device.
- Motion Detection: Automatically starts recording when an object moves.
- Time Synchronization: The camera can synchronize its time.
Maintenance Features:
- Memory Card Formatting: It is recommended to format the TF card before using and once every three months.
- Cleaning: Do not touch the camera lens and image sensor directly. Use a dry, soft fabric slightly moistened with alcohol to gently wipe clean.
- Environmental Considerations:
- Avoid direct sunlight, which can cause overexposure and reduce the life of the photosensitive sensor.
- Avoid extreme conditions such as moisture, dust, extreme cold, extreme heat, or strong electromagnetic radiation.
- Avoid heat accumulation; do not block ventilation near the camera.
- Troubleshooting:
- If red and blue indicators flash after power on, check if the memory card is inserted correctly and format it.
- If nothing happens after long-pressing the confirmation button, check the camera battery and ensure it's fully charged.
- If both indicators and camera show no reaction after pressing the confirmation button, try formatting the micro-SD card or using a pin to reset the camera.
- High temperature during operation, especially when IR LED is on, is considered normal and safe.
- If Wi-Fi connection fails, ensure the correct network and password are used, and try to be close to the wireless router. Wait patiently for IP connection (1-3 minutes).
- SSID with special characters, 5G networks, WEP encryption, and empty passwords are not compatible with the APP.
- Support: Contact
Support_Jayol@163.com for installation help or other questions. The company offers 24-hour support via WeChat or Email for software upgrades or other issues.