EasyManua.ls Logo

Canatura Flowermate - User Manual

Canatura Flowermate
14 pages
Print Icon
To Next Page IconTo Next Page
Loading...
Instructions for using the Flowermate Slick
Vaporizer
Flowermate Vaporizer Technology
Question and Answer IconNeed help?

Do you have a question about the Canatura Flowermate and is the answer not in the manual?

Overview

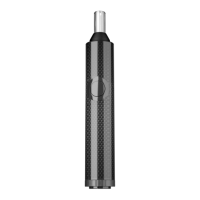
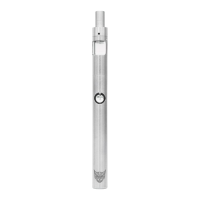
The Flowermate Slick Vaporizer is a sleek and slim dry vaporizer designed for ease of use and portability. It features a black ceramic heating chamber with a capacity of up to 0.4 grams of substance and a mouthpiece made of borosilicate glass. An insulated air duct ensures clean flavor and cool vapor. The device is powered by a replaceable 18650 2500 mAh high-current battery, accessible by unscrewing the bottom cover.

Technical Specifications:

  • Temperature Modes: Three preset temperatures: 196°C (Blue LED), 205°C (Green LED), and 215°C (Red LED). Each mode operates for five minutes.
  • Battery: 18650 2500 mAh high-current battery.
  • Charging: Micro USB charger with five pins. Charging voltage: 5 V, constant current. Charging current: 800 - 1000 mAh.
  • Chamber Capacity: Up to 0.4 grams of dry substance.
  • Mouthpiece: Borosilicate glass.
  • Included Accessories: Vaporizer of dry substances Slick, 18650 2500 mAh battery, chamber for concentrated substances with organic cotton insert, Micro USB cable, 5 stainless steel chamber filters, 5 filters for stainless steel mouthpiece, filling and loosening device, cleaning brush, stainless steel container, warranty information card, user manual.

Usage Features:

First Use Preparation:

  1. Unscrew the bottom cover and remove the insulator gasket, then screw the cover back on tightly.
  2. Remove the top cap and place it over the bottom cover to prevent loss.
  3. Remove the mouthpiece to access the heating chamber.
  4. Fill with dry substance or insert the concentrated substance chamber.
  5. Turn on the device by quickly pressing the power button five times.
  6. Set the temperature by quickly pressing the power button three times.

Turning On/Off:

  • Press the power button five times quickly to turn the device on or off. The device will vibrate twice.
  • Once filled, press and hold the power button to start the heating cycle.
  • The device vibrates for 2 seconds when the set temperature is reached.
  • After five minutes of use, the device vibrates for two seconds and enters sleep mode.

Filling with Dry Substance:

  1. Remove the top cap and place it on the bottom cover.
  2. Remove the mouthpiece to access the heating chamber.
  3. Chop the substance to a medium consistency and fill the included stainless steel container.
  4. Unscrew the lid of the container and fill to your desired volume.
  5. Close the lid and insert the container into the heating chamber.
  6. Close the chamber with the mouthpiece, turn on the device (five quick presses), and set the temperature (three quick presses).

Filling with Oily Substances:

  1. Remove the top cap and place it on the bottom cover.
  2. Remove the mouthpiece to access the heating chamber.
  3. Use the enclosed concentrated substance chamber.
  4. Place at least 5 drops (0.2 - 0.3 ml) of the substance on the camera pad and allow it to spread.
  5. Place the concentrated substance chamber in the heating chamber and attach the mouthpiece.
  6. Turn on the device (five quick presses) and set the desired temperature (three quick presses).
  7. The highest temperature is recommended for evaporating oily substances.

Filling with Concentrates:

  1. Use the included concentrate chamber.
  2. Unscrew the lid of the concentrate chamber and place the concentrate in the recess in the lid. The cotton acts as an absorbent swab.
  3. Place the concentrated substance chamber in the heating chamber with the lid facing down and attach the mouthpiece.
  4. Turn on the device (five quick presses) and set the desired temperature (three quick presses).
  5. Note: Do not fill the chamber while the unit is on.

Temperature Setting:

  • Press the power button three times within 1.5 seconds to cycle through temperature levels: 1 (Blue LED) -> 2 (Green LED) -> 3 (Red LED) -> 1 -> 2 -> 3.
  • The LED flashes every two seconds during heating and turns steady when the set temperature is reached.

Stopping Heating and Turning Off:

  • Press and hold the power button for two seconds to stop the heating process.
  • Quickly press the power button five times to turn off the device.

Battery Charging:

  • Plug the included USB cable into the device.
  • The LED indicator glows red during charging and turns green when complete.

Battery Removal and Replacement:

  1. Unscrew the battery cover on the bottom of the vaporizer.
  2. Remove, replace, or insert the battery. Note: The battery must be inserted with the positive contact facing forward.
  3. Screw on the battery compartment cover.

Maintenance Features:

Cleaning the Device:

  • Clean the unit after each use to prevent tar buildup.
  • The stainless steel container and concentrated substance chamber will be very hot after use; place them on a heat-resistant surface.
  • Clean the container and concentrated substance chamber with alcohol wipes. Ensure they are dry and any alcohol residue is burned off before use.
  • Clean the mouthpiece with alcohol wipes, warm water, or by soaking it in isopropyl alcohol. Rinse well and burn off any residual alcohol before use.

Safety Precautions:

  • Do not use the device while charging to prevent damage.
  • Do not leave the vaporizer charging overnight to prevent overheating.
  • Do not leave the charger plugged in unattended.
  • Do not charge the device on a carpet or rug.
  • Do not overcharge the battery or short-circuit its terminals.
  • Dispose of batteries properly; do not discard them in the trash.
  • Protection against reverse polarity: Incorrect battery insertion will not burn out the circuit, but there will be no LED indication.
  • Protection against overheating: If the ceramic heating chamber overheats severely, the device will stop heating. The LED indicator will turn red and blink six times.
  • Short circuit protection: In case of a short circuit, the device stops heating. The LED indicator turns red and flashes three times.
  • Thermal sensor short circuit protection: If the unit does not detect the thermal sensor or it shuts down, the unit stops heating. The LED light turns red and blinks six times.
  • Low battery protection: If the battery voltage drops below 3.3 V, the device stops working until recharged.
  • Avoid extreme environmental conditions (high temperatures, high humidity, liquids).
  • Do not use near naked flames or in direct sunlight.
  • Discontinue use if there is an unpleasant odor, deformation, overheating, or color loss. Unplug from the charger if charging.
  • Use only the adapter that comes with the device. Using a defective or unsuitable adapter may cause fire and voids the warranty.
  • The ceramic chamber and surrounding surfaces are very hot during operation; take precautions.
  • Recommended operating conditions: relative air dryness at 10 to 40 degrees Celsius.
  • Do not use at high temperatures, high humidity, strong magnetic or electric fields.
  • Do not attempt to repair or modify the device yourself.
  • Do not leave the device on or unattended when not in use.
  • Do not drop, crush, kink, puncture, or set on fire.
  • Do not heat in a microwave oven.
  • Do not scratch, paint, or insert foreign objects.
  • Do not place in microwave ovens, high-pressure chambers, or water.
  • Keep out of reach of children.

Warranty:

  • 1-year limited warranty covering electronics, ceramic heating chamber, and optional parts from the date of purchase.
  • The 18650 battery has a 90-day warranty.
  • Flowermate Technology Ltd. reserves the right to correct defects, replace with an equivalent product, or reimburse the purchase price.
  • Refunds are only available for products purchased directly from Flowermate.com.
  • The warranty does not cover accidental damage, improper use, external forces, modifications without written permission, or cosmetic damage.
  • The warranty is valid only for the first purchaser and is not transferable.

Canatura Flowermate Specifications

General IconGeneral
BrandCanatura
ModelFlowermate
CategoryVaporizers
LanguageEnglish

Related product manuals