EN
9
3. PRACTI
CAL TIPS
WA
RNING: when sorting laundry, make
sure:
- have el
iminated metallic objects such as
hair clips, pins, coins, from laundry;
- t
o have buttoned pillow cases, closed
zips, tied loose belts and long robe
ribbons;
- to
have removed rollers, hooks or clips
from curtains;
- t
o have carefully read clothing washing
labels;
- t
o have removed any persistent stains
using specific detergents.
When w
ashing rugs, bedcovers or other
heavy clothing, we recommend you avoid
the spinning cycle.
To w
as
h wool, make sure the item can be
machine washed. Check the fabric label.
A gui
de environmentally friendly and
economic use of your appliance.
Maxi
mise The Load Size
Ac
hieve the best use of energy, water,
detergent and time by using the
recommended maximum load size.
Save up to 50% energy by washing a full
load instead of 2 half loads.
Do you need t
o pre-wash?
For heav
ily soiled laundry only!
SAVE detergent, time, water and
between 5 to 15% energy consumption
by NOT selecting Prewash for slight to
normally soiled laundry.
dri
ed in stains in water before washing to
Foll
owing is a quick guide with tips and
recommendations on detergent use at the
various temperatures. In any case, always
read the instructions on the detergent for
correct use and doses.
Load t
ips
He
lpful suggestions for the user
When w
ashing heavily soiled whites,
we recommend using cotton
programs of 60°C or above and a
normal washing powder (heavy duty)
that contains bleaching agents that at
Option 2
the position of the plinth is set
back more
than 55 mm from
the front of the furniture.
Note: co
mponents not supplied
-hinges
-supports
-door stop
Firstly , slide the dryer into an
opening of
the size indicated in
the diagram (figure 7).
Note: As
soon as the hinges
are fixed on the furniture is not
possible to slide IN/OUT the dryer.
Fix t
he door to the furniture with
standard hinges and supports (not
supplied) and s top the door with a
std hook (not supplied) (figure 8).
Now it’s possible t
o fix the hinges
to the door of the furniture.
Use the N° 4 mount caps (G)
to cover all the holes on the
front panel of the dryer.
GENERAL
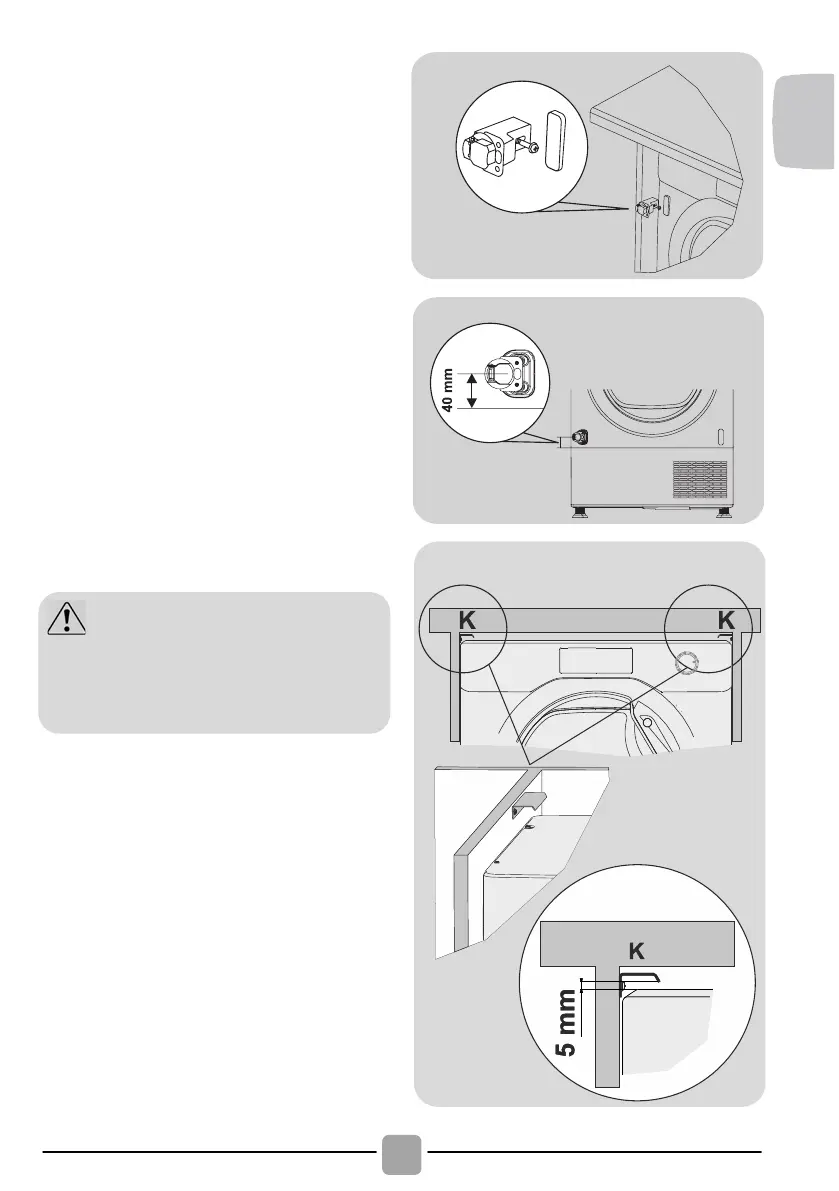
If the distance from the top of
of the dryer
and the Top of the
furniture is more than 10 mm ,
to
(figure 10).
Figure 9:
Pay attention to posi
tion
the bottom hinge 40 mm above
the kick plate in order to
facilitate its removal (figure 9).
Option 2
the position of the plinth is set
back more
than 55 mm from
the front of the furniture.
Note: components not supplied
-hinges
-supports
-door stop
Firstly ,
slide the dryer into an
opening of the size indicated in
the diagram (figure 7).
Note:
As soon as the hinges are
fixed on
the furniture it is not
possible to slide the dryer
in and out.
Fix t
he door to the furniture with
standard hinges and supports (not
supplied) and stop the door with a
std hook (not supplied) (figure 8).
Now it’s possible t
o fix the hinges
to the door of the furniture.
Use the
N° 4 mount caps (G)
to cover all the holes on the
front panel of the dryer
.
GENERAL
of the dryer
and the top of the
furniture is more
than 10 mm,
possible tilting (figure 10).
Pay attention to posi
tion
the bottom hinge 40 mm above
the kick plate in order to
facilitate its removal (figure 9).
(QYLURQPHQWDO,VVXHV
$OO SDFNDJLQJ
PDWHULDOV XVHG DUH
HQYLURQPHQWDOO\IULHQGO\ DQG UHF\FODEOH
3OHDVHKHOSGLVSRVHRIWKHSDFNDJLQJYLD
HQYLURQPHQWDOO\IULHQGO\ PHDQV <RXU
ORFDOFRXQFLOZLOOEHDEOHWRJLYH\RXGHWDLOV
RIFXUUHQWPHDQVRIGLVSRVDO
7RHQVXUHVDIHW\ZKHQGLVSRVLQJRIDQROG
WXPEOH GU\HU GLVFRQQHFW WKH PDLQV SOXJ
IURPWKHVRFNHWFXWWKHPDLQVSRZHUFDEOH
DQGGHVWUR\WKLVWRJHWKHUZLWKWKHSOXJ7R
SUHYHQW FKLOGUHQ VKXWWLQJ WKHPVHOYHV LQ
WKHPDFKLQHEUHDNWKHGRRUKLQJHVRUWKH
GRRUORFN
(XURSHDQ'LU
HFWLYH(8
7KLV
DSSOLDQFHLVPDUNHGDFFRUGLQJ
WRWKH(XURSHDQGLUHFWLYH(8
RQ:DVWH(OHFWULFDODQG(OHFWURQLF
(TXLSPHQW:(((
:((( FRQWDLQV ERWK SROOXWLQJ VXEVWDQFHV
ZKLFK FDQ FDXVH QHJDWLYH FRQVHTXHQFHV IRU
WKHHQYLURQPHQWDQGEDVLFFRPSRQHQWVZKLFK
FDQEHUHXVHG,WLVLPSRUWDQWWRKDYH:(((
VXEMHFWHG WR VSHFLILF WUHDWPHQWV LQ RUGHU WR
UHPRYHDQGGLVSRVHSURSHUO\DOOSROOXWDQWVDQG
UHFRYHUDQGUHF\FOHDOOPDWHULDOV
,QGLYLGXDOV FDQ SOD\ DQ LPSRUWDQW UROH LQ
HQVXULQJ WKDW :((( GRHV QRW EHFRPH DQ
HQYLURQPHQWDO LVVXH LW LV HVVHQWLDO WR IROORZ
VRPHEDVLFUXOHV
:((( VKRXOG QRW EH WUHDWHG DV KRXVHKROG
ZDVWH
:(((VKRXOGEHKDQGHGRYHUWRWKHUHOHYDQW
FROOHFWLRQSRLQWVPDQDJHGE\WKHPXQLFLSDOLW\RU
E\UHJLVWHUHGFRPSDQLHV,QPDQ\FRXQWULHVIRU
ODUJH:(((KRPHFROOHFWLRQFRXOGEHSUHVHQW
,Q PDQ\ FRXQWULHV ZKHQ \RX EX\ D QHZ
DSSOLDQFHWKHROGRQHPD\EHUHWXUQHGWRWKH
UHWDLOHUZKRKDVWRFROOHFWLWIUHHRIFKDUJHRQD
RQHWRRQHEDVLVDVORQJDVWKHHTXLSPHQWLVRI
WKHVXSSOLHGHTXLSPHQW
Ɣ
Ɣ
Ɣ
DSSOLDQFH
PXVWEHRIWKHVDPHW\SH
H[WHQVLRQOHDGV
<
RXPD\EHFKDUJHGIRUDVHUYLFH
FDOOLIDSUREOHPZLWK\RXUPDFKLQHLV
FDXVHGE\LQFRUUHFWLQVWDOODWLRQ
2QFH
LQ
VKRXOG
HQVXUH
PDFKLQH
&RQWDLQV IOXRULQDWHG
JUHHQKRXVH
JDVHV
+HUPHWLFDOO\VHDOHG
*:3
7XPEOH
GU\HUV DUH VXSSOLHG WR RSHUDWH DW D
YROWDJH
RI 9 +] VLQJOH SKDVH
&KHFN
WKDWWKHVXSSO\FLUFXLWLVUDWHGWRDWOHDVW
$
7KLV
DSSOLDQFHPXVWEHHDUWKHG
-
Figure 8:
If the
distance between the top
fix the N° 2 L metal brackets (K)
to the furniture sides
, to avoid
Figure 1
0:
 Loading...