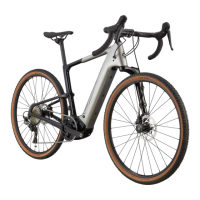
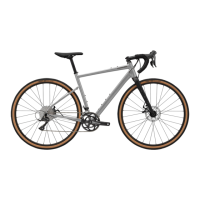
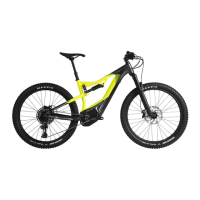
The Cannondale Topstone Neo w/ Lefty is an electric gravel bike designed for versatile riding, combining the assistance of an e-bike motor with the rugged capabilities of a gravel bike and the unique Lefty suspension fork. This Quick Start Guide provides essential information for setting up and performing initial checks on your new bike, ensuring a safe and enjoyable first ride.
Function Description:
The Topstone Neo w/ Lefty is an e-bike, meaning it incorporates an electric motor to provide pedal assistance, making climbs easier and extending the range of your rides. It's built for gravel riding, which involves tackling a variety of surfaces beyond paved roads, such as dirt, gravel, and light trails. The "Lefty" in its name refers to Cannondale's distinctive single-sided suspension fork, which offers unique handling characteristics and often provides a smooth ride over rough terrain. This bike is intended for active sport use, offering a blend of performance and comfort for adventurous cyclists.
Usage Features:
The setup process for your Topstone Neo w/ Lefty is designed to be straightforward, allowing you to assemble your bike at home. The guide outlines four major steps: installing the handlebars, installing the front wheel, installing the pedals, and performing pre-ride checks.
-
Getting Your Bike Ready for Assembly:
- Unboxing: Begin by carefully opening the box using a flat-head screwdriver, Phillips-head screwdriver, box cutter, or scissors.
- Initial Inspection: Before assembling, review the pre-ride checklist and Assembly Instruction Guide. Confirm that a builder has completed the checklist.
- Removing the Bike: Gently lift the bike out of the box and set it on top of the box, ensuring the attached wheel faces upwards.
- Front Wheel Removal: Remove the front wheel by carefully detaching zip ties or Velcro, then remove all packaging from the wheel and set it aside.
- Handlebar Positioning: Gently let the handlebar hang from the frame. Lift and rotate the bike, lowering it back into the box with the fork overhanging the side. The front fork should rest over the edge of the box.
- Accessory Box: Locate the small box inside, which contains essential assembly parts, necessary tools (torque wrench, Allen keys, pedal wrench), component documentation, and manuals.
- Documentation: Locate and remove the warranty card and set it aside with the owner's manual. It is crucial to read the owner's manual before your first ride.
- Packaging Removal: Remove all additional packaging from the bike, including any from the rear.
- E-bike Charger: Remove the e-bike charger from the larger bicycle box and set it aside for later use.
-
Step 1: Install Your Handlebars:
- Loosen Stem Bolts: Use the included hex wrench to loosen and remove the bolts and faceplate from the stem. Keep these parts together to avoid losing them.
- Position Handlebar: Place the handlebar into the stem. Verify that the brake hoses and shift cables wrap cleanly around the frame without kinks.
- Reattach Faceplate: Loosely reattach the faceplate to the stem, ensuring an even gap between the stem and faceplate by not tightening one bolt more than another.
- Center and Roll Bars: Center the handlebar in the stem using the markings on the bar. Roll the bars back into a comfortable riding position.
- Hand-tighten Bolts: Hand-tighten the stem bolts using the 4mm hex wrench, maintaining an even gap between the stem body and faceplate at both the top and bottom. Full tightening will occur during pre-ride checks.
-
Step 2: Install Your Front Wheel:
- Remove Brake Pad Spacer: Carefully remove the disc brake pad spacer from the front caliper. Avoid pulling the front brake lever when the pad spacer or disc brake rotor is not in the caliper.
- Remove Brake Caliper: To install the front wheel, the brake caliper must be removed. Locate the Stop Lock lever in front of the caliper (in the 'closed' position, indicated by a lock icon). Flip the lever open to expose the unlock symbol, then remove the brake caliper from the Lefty Oliver caliper mount.
- Mount Front Wheel: Slide the Lefty front wheel onto the Lefty Oliver hub axle.
- Tighten Wheel: Use the included 5mm hex wrench to begin tightening the wheel onto the Lefty hub axle. Firmly tighten the front wheel onto the Lefty Oliver; the wrench should leave an imprint in your hand to ensure it's secure.
- Reinstall Brake Caliper: Install the front brake by first locating the pins on the caliper and guiding them onto the Lefty Oliver caliper mount. Ensure the brake rotor is centered between the brake pads.
- Lock Caliper: Lock the brake caliper into place by closing the Stop Lock lever.
- Remove Bike from Box: Carefully lift and remove the bike from the box.
-
Step 3: Install Your Pedals:
- Identify Pedals: Pedals are left- and right-specific. Locate the 'R' (right) and 'L' (left) markings on the pedal spindles before installation.
- Apply Grease: Locate the bag of grease and carefully apply it to the threaded portion of the pedal spindle.
- Install Right Pedal: Insert the right pedal (marked with R) into the right/drive side crank arm and tighten it with your fingers.
- Install Left Pedal: Repeat the process for the left pedal (marked with L). Note that both pedals tighten in the direction of the front wheel.
- Firmly Tighten: Tighten both pedals down very firmly using the pedal wrench.
Maintenance Features (Pre-Ride Checks):
After assembly, several pre-ride checks are essential to ensure the bike is safe and ready to ride.
-
Reflectors:
- Front Reflector: Ensure the front reflector points straight ahead, perpendicular to the ground.
- Rear Reflector: The rear reflector must point straight back.
- Wheel Reflectors: Gently pull the wheel reflectors toward the rim to ensure they are braced by the spokes.
-
Seat Height:
- Adjustment: Adjust the seat height by loosening the seatpost collar.
- Positioning: Standing next to the bike, position the saddle so it is the same height as your hip.
- Alignment: Align the saddle with the frame and tighten the seatpost clamp.
- Riding Posture: When riding, you should have a slight bend in your knee when the pedal is at the bottom of its rotation.
-
Torque Bolts:
- Stem Bolts: Select the correct bit for the stem bolts and install it into the torque wrench. Look for torque specification markings on the front and back of the stem, as well as the seatpost. If these markings are absent, torque all stem, seatpost, and seat collar bolts to 7 Nm.
- Tighten Stem Bolts: Tighten the stem bolts in an 'X' pattern, ensuring the gap is even between the stem and faceplate at all four bolts.
- Twist Check: Secure the front wheel between your legs and turn the handlebar. If the handlebar and wheel move independently, the stem bolts are not tight enough. Use the torque wrench and correct bit to properly torque the bolts.
- Handlebar Rotation Check: Attempt to rotate the handlebar forward and backward in the stem. If it moves, the stem faceplate bolts are not tight enough. Use the torque wrench and correct bit to torque the faceplate bolts to specification, using the same “X” pattern as before.
- Seat Tilt Check: Grab the front and rear of the seat and attempt to tilt it on the seat post head. It should not move.
-
Wheel Engagement:
- Lefty Front Wheel: Confirm the Lefty front wheel is secure. Reinstall the 5mm hex wrench and ensure the bolt is very tight—enough to definitely leave a mark in your hand.
-
Brake Check:
- Engagement: Confirm the front and rear brakes engage when the levers are squeezed.
- Clearance: The brake lever and handlebar should not come into contact when the brakes are fully engaged.
-
Tire Pressure:
- Inflation: Inflate the tires to the manufacturer's recommended tire pressure, which is marked on the tire sidewall.
-
Charging (E-bike Specific):
- Unbox Charger: Unbox the e-bike charger and remove any additional packaging.
- Read Instructions: Read the instructions included with the charger, then assemble the charger.
- Power Off Bike: Prior to charging, confirm your e-bike is powered off and is propped up against a stable surface or wall in a dry place.
- Open Charge Port: Open the charge port, located near the head tube at the front of the bike.
- Insert Charging Cord: Carefully insert the charging cord into the charge port, taking care to properly align the cord and port contacts.
- Confirm Charging: A charging icon will appear on the handlebar display to confirm that the bike is charging.
This guide emphasizes the importance of safety, noting that bicycling is an active sport with inherent risks. It strongly recommends reading the complete Charge Bicycle Owner's manual for detailed safety information. Once assembled and checked, you are encouraged to tag #ridecannondale in your social media posts to share your new bike experience.