Do you have a question about the Canon Elura 65 and is the answer not in the manual?
Install software from CD-ROM before connecting camcorder to computer.
Do not expose product to rain or moisture; use recommended accessories only.
Unauthorized recording of copyrighted material may infringe on rights.
Follow instructions for operation, cleaning, accessories, and avoiding fields/moisture.
Operate adapter from specified source; use polarized plug correctly.
Disconnect during lightning; avoid overloading outlets.
Do not service yourself; use specified replacement parts.
Explains symbols, page references, and notations used throughout the manual.
Details all items supplied with the camcorder package.
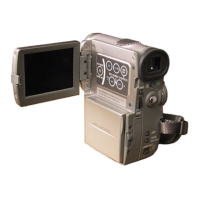
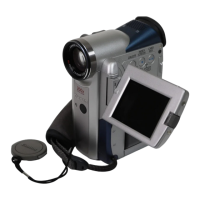
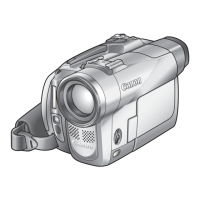
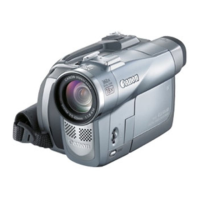
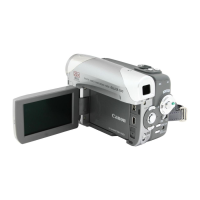
Diagram identifying key buttons, ports, and components of the camcorder.
Diagram and list of buttons on the wireless remote controller and their functions.
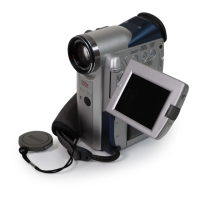
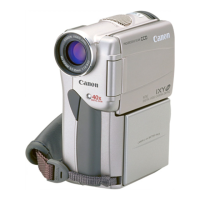
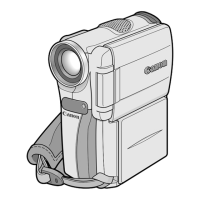
Identifies external parts like viewfinder, strap mounts, and lens.
Details terminals for MIC, USB, DV, S-video, and indicators.
Detailed breakdown of each button on the wireless controller and its function.
Instructions for attaching the battery pack and charging it via the power adapter.
Steps to connect the camcorder to a household power outlet using the adapter.
Interpreting the charge indicator lights for battery status.
Approximate times for charging, recording, and playback with different battery packs.
Step-by-step guide for inserting and removing MiniDV cassettes.
Procedure for installing the lithium battery to retain settings when power is off.
Instructions for adjusting the dioptric adjustment lever for clear viewfinder images.
How to attach the lens cap and adjust the camcorder's grip belt.
Guide on how to attach and adjust the shoulder strap for carrying.
Instructions for screwing the WA-34 Wide Attachment onto the lens filter thread.
Steps for opening the battery cover and inserting AA batteries into the wireless controller.
Procedure to select the correct time zone and adjust for daylight saving time.
Guide to selecting the correct time zone from the provided world map and list.
How to enable or disable the date and time display on the screen during recording.
Step-by-step instructions for recording video and audio onto a tape.
Instructions on how to rotate the LCD panel for better viewing angles.
Tips on sound recording quality and notes about LCD screen pixel performance.
Explanation of indicators like time code, remaining tape, battery charge, and recording reminders.
How to review the last few seconds of recording in record pause mode.
Using buttons to search for specific points on the tape for recording.
How to use the zoom lever for optical zooming between wide and telephoto.
Instructions for selecting digital zoom levels and notes on its usage.
Tips on gripping the camcorder and using support for stable shots.
Advice on positioning yourself relative to the sun for outdoor recording.
Steps for setting mode, opening panel, rewinding, and starting playback.
Explanation of functions like playback pause, fast forward, rewind, frame advance, and slow playback.
How to adjust the volume using the SET dial for speaker or headphone output.
Instructions for connecting the camcorder to a TV using the AV terminal for playback.
Guide for connecting the camcorder using an S-Video cable for playback.
Selecting output channels for stereo sound or bilingual audio options.
Procedure for navigating menus, selecting submenus, items, and options using the SET dial.
Table detailing submenus, menu items, setting options, and corresponding page numbers.
Settings for WL. REMOTE, BEEP, T.ZONE/DST, D/TIME SET.
Adjusting S-UP SOUND, SHTR SOUND, OPER. SOUND, SELF-T SOUND.
Menu options for REC MODE, AV/PHONES, OUTPUT CH, AUDIO DUB.
Menu options for IMG QUALITY, MOVIE SIZE, FILE NOS., BRIGHTNESS.
Settings for SHUTTER, D. ZOOM, WHITE BAL., FLASH, AF AST LAMP, ND, NIGHT MODE, SKIN DETAIL, REVIEW.
Options for IMG QUALITY, IMAGE SIZE, MOVIE SIZE, FILE NOS., BRIGHTNESS.
Settings for WL. REMOTE, BEEP, T.ZONE/DST, D/TIME SET, S-UP SOUND, SHTR SOUND.
Details the automatic mode for simple point-and-shoot recording.
Descriptions of specific AE modes like Auto, Sports, Portrait, Spotlight, Sand & Snow, Low Light.
Table showing which functions are available in different recording modes.
Instructions for selecting a Program AE mode and notes on their behavior.
Details on using the camcorder in dark conditions with different night modes.
Notes on image quality, autofocus, digital zoom, and program AE when using night modes.
How to soften skin imperfections for a more flattering appearance in close-ups.
How to lock exposure in changing lighting conditions to maintain brightness.
How to adjust brightness manually when exposure is locked using the SET dial.
Tips for manual focusing when autofocus may not work well.
How to set focus for faraway subjects like mountains or fireworks.
Instructions for selecting AUTO, SET, INDOOR, or OUTDOOR white balance presets.
Guidance on using auto vs. custom white balance and when to reset it.
How to manually adjust shutter speed for capturing fast-moving subjects.
Information on auto slow shutter and guidelines for high shutter speeds.
How to set and use the self-timer for recording movies and still images.
How to cancel the self-timer before or after countdown begins.
Explanation of SP (Standard Play) and LP (Long Play) modes and their implications.
Selecting between 16-bit for higher quality and 12-bit for multi-track recording.
How to use or disable the wind screen feature to reduce wind noise.
Instructions for connecting headphones and adjusting volume, including VCR Setup.
Guidance on attaching and using external microphones with the camcorder.
Explanation of fade and wipe effects for scene transitions.
Details on corner wipe, jump, and flip effects for creative editing.
Descriptions and examples of puzzle, zigzag, beam, and tide digital video effects.
Explanation of effects like Art, Black & White, Sepia, Mosaic, Ball, Cube, Wave, Color Masking, Mirror.
How to capture and display multiple images simultaneously.
Table showing which digital effects are available in different operating modes.
Instructions for activating and deactivating fade-in and fade-out effects.
Procedure for selecting and activating effects like Black & White.
Cases where multi-image screen cannot be used and how to cancel it.
Cases where digital effects cannot be used and notes on image quality.
How to magnify playback images and adjust the view area using the zoom lever and SET dial.
How to choose which data (date, time, camera data) to display with the data code.
How to enable the display of date and time for 6 seconds after playback starts.
How to locate the end of the last recorded scene on the tape.
How to mark a point on tape and return to it later using the wireless controller.
How to use the date search function to find content recorded on specific dates.
Personalizing startup image and sounds for startup, shutter, operation, and self-timer.
How to change the camcorder's display and menu language.
Selecting from different date format options for display.
Adjusting remote sensor modes to prevent interference or turning it off.
How to turn off operational beeps for power on/off, shutter, and self-timer.
Instructions for enabling 16:9 widescreen recording and its implications.
How to disable image stabilizer, e.g., when using a tripod.
How to prevent the camcorder from automatically starting the demonstration mode.
Guide to setting flash modes: AUTO, RED-EYE, FLASH ON, FLASH OFF.
Important precautions regarding flash firing, range, and limitations.
Information on how the AF-assist lamp works and when to turn it off.
Instructions for connecting camcorder to VCR or digital device for copying.
Notes on potential quality differences when copying to VCR or digital devices.
How to record video/TV programs from VCR, TV, or analog camcorder.
Procedure for recording from digital devices via DV terminal for high-quality dubbing.
Diagram and instructions for connecting camcorder, VCR, and computer for analog-to-digital signal conversion.
How to enable the AV-+DV OUT setting in VCR SETUP for analog-digital conversion.
How to connect external audio devices or microphones for audio dubbing.
Step-by-step guide to start and perform audio dubbing using the wireless controller.
How to select STEREO 1, STEREO 2, or adjust mix balance for added sound.
Instructions for connecting the camcorder to a computer using a DV (IEEE1394) cable.
Step-by-step guide for inserting and removing memory cards from the camcorder.
How to select image quality: Superfine, Fine, or Normal.
Choosing between 1280x960 and 640x480 pixel resolutions.
Choosing between 320x240 and 160x120 pixel resolutions for movie recording.
Choosing between consecutive file numbering or resetting it for new memory cards.
Steps to capture still images directly to a memory card from tape or devices.
How to record Motion JPEG movies onto a memory card.
Recording still images to memory card while recording a movie on tape.
Notes on 16:9 format compression, data code reflection, and image size.
How to display a captured still image for 2-10 seconds after recording.
Options for protecting or erasing images during review via FILE OPER. menu.
Steps to record Motion JPEG movies onto a memory card.
Instructions for connecting the camcorder to a computer using a USB cable.
Instructions for connecting the camcorder to a computer using a DV cable.
Ensuring the camcorder is correctly connected and recognized by the computer.
Using the Audio Tuning Wizard to set up speakers and microphone for DV Messenger.
Selecting the camcorder and confirming its display in the tuning wizard.
Steps to launch the DV Messenger application.
Procedure for initiating a videoconference by inviting a contact.
How to accept an incoming videoconference request.
Steps to disconnect from DV Messenger and close the application.
Instructions for cleaning video heads using a cleaning cassette to ensure picture quality.
Factors that can lead to video heads becoming dirty, such as environment and tape quality.
Details of Canon's limited warranty for digital video equipment in the United States.
Details of Canon Canada's limited warranty for digital video equipment in Canada.
Contact details for Canon U.S.A., Canon Canada, and Canon Hongkong.
Information on using the WA-34 Wide Attachment at maximum wide-angle and zoom effects.
Symptoms like mosaic or distorted sound indicating dirty video heads.
How to clean video heads and what to do if symptoms reappear.