C
Connie HendrixSep 1, 2025
What to do if my Canon LEGRIA HV40 Camcorder switches off by itself?
- CCorey NobleSep 1, 2025
If your Canon Camcorder switches off by itself, the battery pack may be exhausted. Replace or charge the battery pack.
What to do if my Canon LEGRIA HV40 Camcorder switches off by itself?
If your Canon Camcorder switches off by itself, the battery pack may be exhausted. Replace or charge the battery pack.
What to do if “REMOVE THE CASSETTE” appears on the screen of my Canon LEGRIA HV40?
If the message “REMOVE THE CASSETTE” appears on the screen of your Canon Camcorder, remove the cassette and reinsert it.
What does it mean when ' ' flashes on the screen of my Canon LEGRIA HV40?
If you see ' ' flashing on the screen of your Canon Camcorder, it could mean that the battery pack is exhausted. In this case, replace or charge the battery pack.
What to do if my Canon LEGRIA HV40 Camcorder buttons will not work?
If the buttons on your Canon Camcorder are not working, first ensure that the camcorder is turned on. Also, make sure that a cassette is loaded.
How to fix Canon LEGRIA HV40 sound if it is distorted?
If the sound is distorted on your Canon Camcorder, especially when recording near loud sounds like fireworks or concerts, try manually adjusting the audio recording level or setting [MIC ATT.] to [ON].
What does it mean if the CHARGE indicator flashes rapidly on my Canon Camcorder?
The CHARGE indicator might be flashing rapidly (about twice per second) because charging has stopped due to a faulty compact power adapter or battery pack.
Why is there video noise on my Canon LEGRIA HV40 Camcorder TV screen?
If video noise appears on the TV screen when using your Canon Camcorder, especially in a room with a TV, keep a distance between the compact power adapter and the power or antenna cables of the TV.
Why is there video noise on my Canon LEGRIA HV40 screen?
If video noise appears on your Canon Camcorder screen, especially when using it in a room with a plasma TV, try increasing the distance between the camcorder and the plasma TV.
Why does my Canon Camcorder battery pack not charge?
Your Canon Camcorder battery might not charge for several reasons. Ensure the charging temperature is between 0 °C and 40 °C. If the battery is too hot from use, allow it to cool below 40 °C before charging. If the issue persists, the battery pack may be damaged, so try using a different one.
What to do if my Canon LEGRIA HV40 is not focusing?
If your Canon Camcorder will not focus, try these steps: 1. Focus manually if autofocus is not working on the subject. 2. Adjust the viewfinder with the dioptric adjustment lever if you are using it. 3. Clean the lens with a soft lens-cleaning cloth if the lens is dirty. 4. If using an optional Wide-converter or Tele-converter, set [AF MODE] to [NORMAL AF].
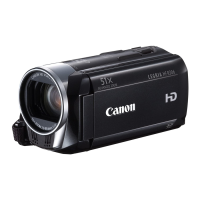
| Effective Pixels | 2.96 Megapixels |
|---|---|
| Optical Zoom | 10x |
| Digital Zoom | 200x |
| Lens | Canon HD Video Lens |
| LCD Screen Size | 2.7 inches |
| Storage Media | Mini DV Tape |
| Sensor Type | CMOS |
| Video Resolution | 1920 x 1080 |
| Image Stabilization | Optical |
| Viewfinder | Color |
| Microphone | Stereo |
| Interface | HDMI, USB 2.0, Component, Composite, FireWire |
| Battery | Lithium-ion |
| Focal Length | 6.1-61mm (35mm equivalent: 43.5-435mm) |
Safety guidelines and warnings for using the camcorder.
Details on operating the camcorder's joystick controller and its guide.
Explains the different modes (Camera, Playback) and their functions.
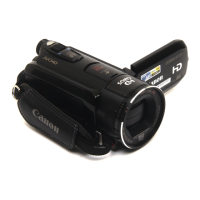
Identifies all parts, buttons, and terminals on the camcorder.
Initial steps for setting up the camcorder, including power and charging.
Step-by-step instructions for loading and unloading video cassettes.
Instructions for handling miniSD cards with the camcorder.
Basic physical setup, including the grip belt and viewfinder adjustment.
Guide on navigating the camcorder's FUNC. and Setup menus.
Initial configuration options such as language and time.
Step-by-step guide to starting and managing movie recordings.
Instructions for capturing still photographs with the camcorder.
How to use the optical and digital zoom features.
How to play back recorded video and still images.
Steps for viewing recorded video footage on tape.
Navigating and displaying captured still images.
Overview of available menu settings and their functions.
Details on accessing and using the FUNC. menu.
Explains various recording modes like AE and special scenes.
Detailed configuration and customization options for the camcorder.
Setting video standards (HDV/DV) and aspect ratios.
Function to delete all still images from the memory card.
Prepares memory cards for use by formatting them.
Configures video output settings for playback.
Selects the video standard for playback output.
Sets video specifications for component output.
Sets the video standard for DV output connections.
Explains automatic and scene-specific modes for optimal shooting.
Controlling exposure manually or using automatic backlight compensation.
How to focus manually when autofocus is not optimal.
How to delete unwanted still photos.
Formatting memory cards for first use or to erase all data.
How to connect the camcorder to televisions and VCRs.
How to establish a connection between the camcorder and a PC.
Moving video files from the camcorder to a computer.
Copying photos directly via USB.
How to print still images directly from the camcorder.
Solutions for common problems encountered with the camcorder.
Important safety and care instructions for the camcorder.
Detailed technical specifications of the camcorder.