EasyManua.ls Logo

Canon RC-IP100 - User Manual

Canon RC-IP100
20 pages
Print Icon
To Next Page IconTo Next Page
Loading...
Remote Camera Controller
User Manual
Make sure to read through this User Manual before using the product.
ENGLISH

Questions and Answers

Summary

Main Features and Precautions

Main Features Overview

Details the key capabilities and functionalities of the RC-IP100 controller.

Safety and Usage Precautions

Provides essential safety and usage guidelines to prevent damage or malfunction.

Name of Parts

Front Panel Components

Identifies all buttons, knobs, levers, and the touch panel on the front of the unit.

Rear Panel Connections

Details the various terminals, switches, and indicators on the rear of the unit.

Camera Operation Interface

Operation Screen Layout

Explains the layout and key elements of the controller's main operation screen.

Camera and Preset Selection Management

Covers selection of camera groups, numbers, and presets for controlling specific cameras.

Initial Setup and Camera Operation

Preparations for Operation

Guides through the initial setup, IP address configuration, and camera registration.

Selecting and Operating Cameras

Details how to select cameras and perform PTZ, zoom, and focus operations.

Function Customization and Presets

Assigning Functions to Controls

Details how to assign specific functions to buttons and knobs.

Selecting a Camera Preset

Explains the process of selecting a registered camera preset.

Registering a Camera Preset

Guides on how to save current camera settings as a preset.

Deleting a Registered Preset

Details how to remove a previously registered camera preset.

Advanced Camera Function Adjustment

Adjusting Camera Functions

Describes how to adjust various camera settings using different control methods.

Tracing Camera Operations

Details recording and playing back camera movements for replication.

System Setup and Menu Navigation

System Setup Flow

Outlines the sequential steps for setting up the system and cameras.

Basic Operations of Menu Screen

Explains access to the settings menu for video, network, and unit functions.

Menu Screen Flow and Customization

Menu Screen Navigation Flow

Illustrates navigation through VIEW, CAMERA/PRESET, and CAMERA CONTROL screens.

Deleting and Customizing Settings

Explains how to delete presets/traces and customize button functions.

Detailed Settings Configuration

Settings Menu Screen Details

Details various settings screens like Video, Network, and Function.

System Setup Procedures

Guides on switching video outputs and configuring camera settings via menus.

Network and Tally Configuration

Network Settings Management

Details camera registration and controller network configuration.

Tally Control Interface Configuration

Configures tally terminal pins for input/output signals using setting switches.

Troubleshooting and Specifications

Troubleshooting Common Issues

Provides solutions for common operational problems, such as power issues.

Third-party Software Information

Information regarding licensing terms for included third-party software modules.

System Specifications

Lists power, mass, temperature, and humidity requirements.

Overview

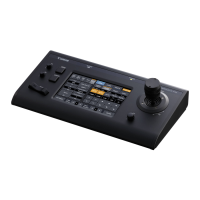
The Canon RC-IP100 is a Remote Camera Controller designed for efficient and versatile control of multiple remote cameras. This unit is specifically built for indoor use and offers a range of features to enhance camera operation and management.

Function Description

The RC-IP100 serves as a central control unit for managing up to 100 remote camera units. It facilitates various camera operations, including pan, tilt, zoom (PTZ), and focus adjustments, as well as more advanced camera function settings. The controller supports both IP camera and serial camera connections, allowing for flexible integration into different setups.

A key function is the ability to register and recall "presets," which are saved shooting positions and settings for individual cameras. This allows operators to quickly switch between predefined camera configurations. The device also includes a "tracing" function, enabling the recording and playback of camera operations. This feature is particularly useful for replicating complex camera movements or sequences at a later time.

The RC-IP100 provides comprehensive control over camera video output, allowing users to switch video outputs on or off for all cameras, specific camera groups, or individual cameras. It also offers access to the camera's internal settings menu, enabling fine-tuning of various parameters like white balance, gain, shutter, iris, and more, directly from the controller's interface.

For network management, the controller allows configuration of its own IP address and provides a system for registering connected cameras, either automatically for IP cameras or manually for both IP and serial cameras. The tally control interface is another important function, supporting tally input and output for camera numbers 1 to 5 within camera group 1, which is crucial for live production environments to indicate which camera is live.

Usage Features

The RC-IP100 is designed for simple and intuitive operation, primarily through its full-color LCD touch panel. The touch panel's versatile screen configuration makes navigation and control straightforward.

Physical controls further enhance usability. The unit features a control lever for smooth pan/tilt operations, allowing for precise camera movements. The speed of pan/tilt operations can be adjusted using the F1, F2, and F4 knobs, and the movement speed changes dynamically based on the tilt angle of the lever. A zoom lever enables adjustment of the field of view, with zoom speed varying based on how far the lever is pushed. The F3 knob can also be assigned for zoom control, offering an alternative method.

The controller includes customizable buttons (USER1, USER2) and knobs (F1, F2, F3, F4) to which various functions can be assigned. This customization allows operators to tailor the interface to their specific workflow, improving efficiency. For example, the F1 knob can be assigned to "Focus" and the USER1 button to "Focus Mode," enabling quick switching between AF and MF and precise manual focus adjustments. The F4 knob can also be assigned to "Focus/One Shot AF" for automatic focusing.

The "Function Group Buttons" allow for the assignment of preconfigured function combinations to a single button or knob, simplifying complex adjustments. For instance, tapping the "White Balance" button can assign white balance mode and calibration functions to the USER1 button and F2 knob, respectively.

The menu system is logically structured, with distinct screens for viewing, storing, deleting, and accessing camera and controller settings. The "SETTINGS" menu provides access to system configurations, including video output control, menu control for connected cameras, function settings for the controller itself (such as touch screen volume, brightness, and power save options), network settings, and touch screen calibration.

The RC-IP100 supports the registration of up to 100 cameras, organized into 10 camera groups, with up to 10 cameras per group. This hierarchical organization aids in managing large camera setups. The tally light status (PGM for red, PST for green) is displayed on the camera number buttons, providing visual feedback on the live status of each camera. Disconnected cameras are clearly indicated by a specific icon.

For energy saving, the unit can be set to enter a power save mode after a configurable duration of inactivity, reducing power consumption when not in use.

Maintenance Features

Maintenance of the RC-IP100 is straightforward, focusing on proper handling and cleaning to ensure longevity and optimal performance.

Before performing any maintenance, it is crucial to turn off the power to the unit. For general cleaning, the device should be wiped with a soft cloth. It is important to avoid using thinner or benzene, as these substances can melt or tarnish the surface of the unit. For more stubborn stains, a cloth dipped in a neutral detergent diluted with water, followed by wiping with a dry cloth, is recommended.

The device is designed for indoor use, and precautions are outlined to prevent malfunctions or failures. Users are advised to avoid placing the unit in extreme hot or cold environments (outside the 0 °C to 40 °C operating temperature range), in locations with humidity outside the 20%RH to 90%RH range (to prevent condensation), near strong magnetic fields, radio waves, excessive dust and sand, moisture-prone areas, or places subject to radiation, X-rays, salt attack, corrosive gases, smoke, vapor, strong vibrations, or unstable surfaces. Specifically, it should not be left in a parked car under direct sunlight or near a heater for extended periods. Protecting the unit from dust penetration is also emphasized when used in sandy environments.

The touch panel surface should be handled with care, avoiding rubbing or pressing with knives or sharp objects. Excessive force should not be applied to the unit, and it should not be lifted by holding the control lever.

The wire clamp provided with the unit is a maintenance feature designed to prevent the AC adapter cable from accidentally falling out, ensuring a stable power connection.

For system restoration, the controller offers a "Default Setting" function to restore its default settings and a "Default Setting User" function to initialize assigned button functions. Settings can also be backed up to and restored from a USB drive, facilitating easy configuration transfer or recovery.

When disposing of the product, users are instructed to follow applicable laws, regulations, and local ordinances to ensure environmentally responsible disposal.

Canon RC-IP100 Specifications

General IconGeneral
Typeprinter
Colorwhite
Paper Sizecredit card (2.13"x 3.39"), 4" x 6", 4"x 8", 5"x7", 8"x 10", letter, legal, u.s. #10 envelopes, photo stickers
Print Resolution Colorup to 9600 x 2400
Cartridgespgi-35 pigment black, cli-36 cmyk color
Number Of Cartridges2
Internal Memoryno
Memory Cardyes
Networkwireless
Connectivitypictbridge, usb 2.0
OS Compatibility2000, xp or vista, mac os v10.2.8 to v10.5.x
Mobile Devices Connectionno
Weight and Dimensions IconWeight and Dimensions
Depth10.5 inches
Height2.4 inches
Width12.7 inches
Net Weight4.4 pounds

Related product manuals