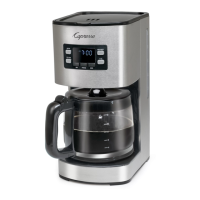
Before First Use
After unpacking your coffee maker clean all the loose parts with warm water and
make yourself familiar with the different functions. After reading these instructions,
clean the internal parts of the machine by making two carafes using only water,
without any ground coffee inside the filter.
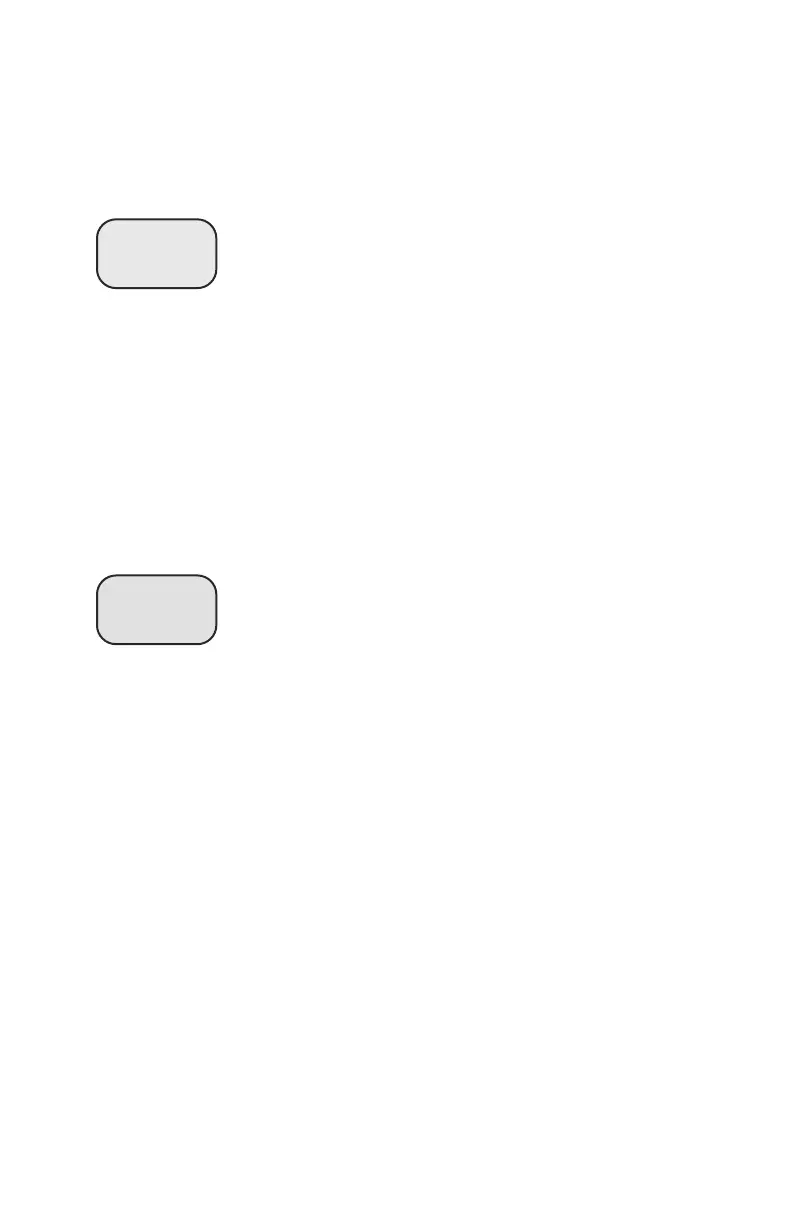
Setting the Clock
1. When you plug the coffee maker into the outlet the LCD will
display "AM12:00" and flash. All indicator lights will be off.
2. Press the HOUR or MIN button to advance the time. The
word CLOCK will be shown in the upper right corner of the
display. (Fig. 3).
3. Push and hold the HOUR button. The hours will advance. The display will
show AM and PM. When the correct hour is displayed release the button
and push and hold the MIN button to set the minutes.
Attention: You must change the clock when the time changes (Standard
Time, Daylight Savings Time).
4. After a few seconds the CLOCK text will disappear from the screen and the
time will be set.
Automatic Start Function
If you want the coffee maker to start brewing at a preset time automatically, set
the automatic start function as follows:
1. Press PROG button and the word TIMER will be shown in
the upper left corner of the display and the numbers will
start to blink. (Fig. 4).
2. Set the delayed starting time by pressing HOUR and MIN
button repetitively until the desired time is displayed.
After 3 seconds, the numbers will stop blinking and the
clock will revert back to the actual time. The delayed start time is now set.
3. Press AUTO button so the green indicator light illuminates. You may check
the automatic start time by pressing PROG button.
Note: You may cancel the automatic start function by pressing ON/OFF. If
you want to change the automatic start time, follow the steps above to reset.
When the time is due the indicator of AUTO will go out, while the indicator
light for ON/OFF will illuminate red and the unit will start brewing.
Using Your Coffee Maker
Coffee makers produce very hot water. If you follow the sequence as described
below you will avoid possible accidents which might cause severe injuries and burns.
1. Remove carafe from machine and fill carafe with desired amount of water.
Note: Water will be absorbed during brewing process. The brewed coffee will
be slightly less than markings on carafe.
2. Open the water container lid (Fig. 1, A) and fill the water tank (Fig. 1, E)
with water. Caution: The water level should not exceed MAX level
marked on the water level indicator on the side of the machine. If you fill
too much water into the water tank the carafe may overflow with hot coffee.
3. Make sure the filter holder (Fig. 1, D) sits firmly in the filter holder housing. Then
place the GoldTone filter (Fig. 1, C) into the filter holder and ensure it fits correctly.
Note: A flat bottom paper filter can also be used instead of the GoldTone filter.
Do not use a filter paper inside a GoldTone filter.
5
Fig. 3
7:10
8:45
CLOCK
Fig. 4
TIMER
AM
AM