Multi Sound
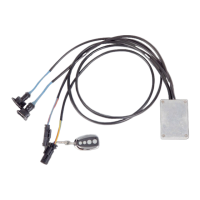
Exhaust systems with several valves are able to generate more than two dierent sounds. For these special systems
the multi sound mode was developed. The quieter electric valve is thereby connected to the plug-1, the louder valve
to plug-2.
The
key operation of a multi sound system is almost identical to that of a normal exhaust system. Select the appropri-
ate mode with button 1, 2 or 4.
Additionally, you can choose whether each mode is to be set as Sound-1 or Sound-2. Press and hold button 1 for about
two seconds to select Sound-1. Press and hold button 2 for about two seconds to select Sound-2. On the radio‘s display
appears a short a notice, if the frequency of the internal radio transmitter is properly set.
Training the RC Key Fob
The key fob being part of the scope of supply was already linked with the control device (training) at the factory. A
training is required for new or additional key fobs. It is possible to link up to 7 key fobs to the control box. Key fobs no
longer used can be erased. The switch for teaching and erasing is unvisible in the lower le corner of the case (see the
blue dot in the image of the controller) and must be operated with a magnet.
Erase all key fobs
Key fobs cannot be erased separately. In order to erase all key fobs hold the magnet for 10 seconds on the housing were
the hidden magnetic switch is located (see the blue dot in the image of the controller). The RC light goes on. Please wait
at least 10 seconds before removing the magnet. The RC light flashes until all key fobs are erased.
Adding a new key fob
For training a new key fob, shortly hold the magnet on the blue dot‘s position. The RC light keeps on illuminating. Press
briefly button 1 on the key fob. The RC light goes dark. Press button 1 again. The RC light flashes until the new key fob
has been stored. The key fob is now ready for use.
Participation in road traffic always requires full attention of the drivers. The controller CES-3 with its many
functions is to use only, if the traffic situation allows it.
Advices for mounting:
1. The Solenoid-Valve develops heat. Mount it in a spot where the influence of heat isn‘t damaging anything.
2. Do not place the solenoid valve inside the airbox, otherwise contaminated air will get into the system.
3. Place the controller in a dry place to prevent moisture entering the case.
4. Solenoid and controller must not be placed within spitting distance, because the solenoid‘s magnetic field could
influence the controller (the key-fobs are added and deleted with help of a magnetism).
5. Controller with German TUEV certificate will be delivered with an implemented „City-Mode“ (in the city the
controller automatically invokes the cruise mode and closes the valves).
6. Connect the controller to ignition current, instead of permanent current.
7. Make sure that the antenna cable (black) and the ground cable (black) are positioned as far apart as possible and
connected.
8. The small ventilation hole on the backside of the controller must stay clear (if glue or tape is used, don‘t cover it).
Capristo Automotive GmbH - Kalmecke 5 - D 59846 Sundern Germany
9
 Loading...