EasyManua.ls Logo

Carl Goldberg Products ULTIMATE BIPLANE User Manual

Carl Goldberg Products ULTIMATE BIPLANE
47 pages
To Next Page IconTo Next Page
Page #1 background imageLoading...
Page #1 background image
ULTIMATE
The
BIPLANE
CARL GOLDBERG PRODUCTS, LTD.
WARNING
While this aircraft is an excellent first choice for novice pilots, a radio-controlled model is not a toy and is not intended for
persons under 16 years old. Keep this kit out of the reach of younger children, as it contains parts that could be dangerous.
A radio-controlled model is capable of causing serious bodily injury and property damage. It is the buyer’s responsibility to
build this kit correctly and to properly install the motor, radio, and all other equipment. Test and fly the finished model only in
the presence and with the assistance of another experienced R/C flyer. the model must always be operated and flown using
great care and common sense, as well as in accordance with the Safety Code of the Academy of Model Aeronautics (5151
Memorial Drive, Muncie, IN 47302), 1-800-435-9262). We suggest you join the AMA and become properly insured prior to
flying this model. Also, consult with the AMA or your local hobby dealer to find an experienced instructor in your area. Per
the Federal Communications Commission, you are required to use only those radio frequencies specified “for Model
Aircraft”.
PT #2033 4/03
©Copyright 1986 Carl Goldberg Products Ltd.
Question and Answer IconNeed help?

Do you have a question about the Carl Goldberg Products ULTIMATE BIPLANE and is the answer not in the manual?

Carl Goldberg Products ULTIMATE BIPLANE Specifications

General IconGeneral
CategoryToy
TypeRC Airplane
ManufacturerCarl Goldberg Products
Radio4-channel
ConstructionBalsa
Skill LevelIntermediate

Summary

Instructions

Introduction to the Ultimate Biplane

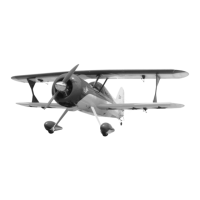
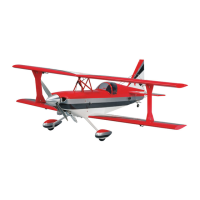
Overview of the aircraft's origin and design by Gordon Price.

Kit Construction Overview

Details the state-of-the-art biplane design and its easy-to-build kit.

Kit Components and Features

Highlights the 'slot-tab' construction, warp-free wings, and included parts.

WARNING

Safety Precautions for Model Operation

Crucial safety information regarding age limits, handling, and operation of RC models.

INTRODUCTION

How to Read the Plans

Guidance on interpreting the full-size plans and understanding notations.

Identifying Parts

Information on how to identify and group various wooden parts and hardware.

How to Use the Plans

Instructions on assembling components directly over the plans.

PARTS IDENTIFICATION

Wood Parts List

Details specific dimensions and quantities of wood parts required for the model.

About the Wood in the Kit

Explanation of the quality and characteristics of the wood materials supplied.

HORIZONTAL STABILIZER CONSTRUCTION

Parts Needed for Horizontal Stabilizer

Lists the specific balsa wood pieces and center platform required.

Construction Steps for Horizontal Stabilizer

Step-by-step guide for building the horizontal stabilizer.

ELEVATOR CONSTRUCTION

Parts Needed for Elevator Halves

Lists the required balsa, plywood, and gussets for the elevator halves.

Elevator Construction Steps

Guidance on laminating horn mounts and shaping elevator halves.

VERTICAL FIN CONSTRUCTION

Parts Needed for Vertical Fin

Lists the balsa wood pieces required for the vertical fin assembly.

Vertical Fin Construction Steps

Steps for cutting, fitting, and gluing the fin base, LE, and ribs.

RUDDER CONSTRUCTION

Parts Needed for Rudder

Lists the balsa wood and plywood components for the rudder.

Rudder Construction Steps

Guidance on laminating rudder assemblies and attaching perimeter sticks.

ROUNDING & HINGES

Parts Needed for Rounding and Hinges

Lists hinges, rounding tools, and bevel tools required for finishing.

Hinge Location Marking and Slotting

Instructions for marking hinge points and creating slots on control surfaces.

Scribing Centerlines and Testing Hinges

Surface Alignment and Sanding Tools

Checking surface alignment and preparing sanding tools.

Rounding and Beveling Edges

Finishing Sanding and Part Separation

Final sanding of components and separating them for further assembly.

CONSTRUCTING THE TOP AND BOTTOM WING

Parts List for Top and Bottom Wings

Comprehensive list of all parts needed for both wings.

Wing Construction Sequence Overview

Explains the process for building both wings using the same plan.

Wing Construction Steps

Preparing the Wing Plan and Spars

Laying out the wing plan, covering with wax paper, and preparing spars.

Drilling Ribs and Installing Spars

Drilling holes in ribs and mounting spars according to the plan.

Rib Placement and Wing Alignment

Installing Wing Joiners and Spars

Fitting wing joiners and spars, ensuring correct alignment over the plan.

Wing Joiner and Shear Web Installation

Leading Edge Sheeting Installation

Applying the leading edge sheets, ensuring proper fit and alignment.

Wing Sheeting and Centerline Cutting

Trailing Edge Sheeting and Rib Gluing

Applying trailing edge sheeting and gluing it to the ribs.

Completing the Second Wing Half

Aileron Linkage Installation

Instructions for installing the aileron linkage system.

Aileron Coupler Assembly and Pushrods

Installing Threaded Pushrods

Connecting pushrods to belcranks and securing them.

Capstrips and Center Sheeting

Wing Support Tab Removal and Plate Installation

Removing wing support tabs and installing plywood plates.

Filler Block and Leading Edge Sheeting

Center Section and Trailing Edge Sheeting

Applying center section and trailing edge sheeting.

Wing Plate and Eyelet Installation

Wing Hold Down Wire Preparation

Preparing the wing hold-down wire mechanism.

Remaining Leading and Trailing Edge Sheeting

Inboard Trailing Edge Parts

Cutting and fitting the inboard trailing edge components.

Trailing Edge Parts Gluing and Wing Wrapping

Hinge Location Marking and Aileron Angling

Marking hinge locations and preparing aileron angles.

Hinging Ailerons and Beveling

Connecting Aileron Servo and Pushrods

Connecting the aileron servo to the pushrod system.

CONSTRUCTING THE FUSELAGE

Parts List for Fuselage Construction

Lists all plywood, balsa, and hardware parts for the fuselage.

Fuselage Frame Assembly Overview

Initial steps for assembling the fuselage frame using balsa parts.

Firewall Preparation and Assembly

Engine Mount and Firewall Preparation

Preparing the firewall and positioning the engine mount.

Engine Mounting to Firewall

Drilling and Blind Nut Installation

Drilling holes and installing blind nuts for engine mounting.

Wing Saddle Doubler and Former Attachment

Landing Gear Tripler Installation

Attaching landing gear triplers to the wing saddle doublers.

Fuselage Side Taping and Bottom Sheet

Fuselage Alignment and Gluing

Aligning fuselage sides, top, bottom, and formers for gluing.

Firewall and Wing Mount Block Installation

Landing Gear Block Installation

Gluing the landing gear block to the fuselage assembly.

Attaching Bottom Wing to Fuselage

Wing Mounting Hole Drilling and Blind Nut Insertion

Drilling wing mounting holes and inserting blind nuts.

Top Former and Stringer Installation

Fuselage Side Sheet Attachment

Attaching the die-cut balsa front side sheets to the fuselage.

Fuselage Sheeting and Glue Application

Vertical Fin and Stabilizer Attachment

Installing the vertical fin and horizontal stabilizer.

Turtledeck Installation and Seam Filling

Final Fuselage Sanding and Preparation for Covering

Sanding all seams and joints for a smooth surface before covering.

CONSTRUCTING THE INTERPLANE STRUT

Parts Needed for Interplane Struts

Lists the plywood frames, doublers, and sticks for struts.

Interplane Strut Assembly Steps

Guidance on gluing doublers and sticks to the strut frames.

ALIGNING THE WINGS

Bolting Cabanes and Diagonal Struts

Attaching the wing support structures (cabanes and struts).

Checking Wing Alignment and Warping

Ensuring correct wing alignment and checking for warps.

LANDING GEAR SKIRTS

Landing Gear Skirt Alignment and Gluing

Aligning and gluing the plywood skirts to the landing gear wire.

Control Horn and Pushrod Attachment

Attaching control horns and pushrods to the ailerons.

ASSEMBLING THE WHEEL PANTS

Wheel Pant Cleaning and Trimming

Cleaning and trimming wheel pant halves for a smooth finish.

Wheel Pant Assembly and Painting

Assembling wheel pant halves, filling seams, and painting.

TAIL WHEEL BRACKET ASSEMBLY

Wheel Pant and Collar Installation

Mounting the wheel pants, collars, and wheels onto the landing gear axle.

Fuel Tank Installation

Securing the fuel tank platform, tank, and rubberband.

ASSEMBLING THE ENGINE COWL

Cowl Half Cutting and Preparation

Cutting and preparing the cowl halves for assembly.

Air Intake and Opening Cutting

Cutting air intake openings, spinner ring, and prop shaft opening.

Cowl Seam Gluing and Filler Application

Cowl Mounting and Engine Securing

Mounting the cowl and securing the engine to the firewall.

INSTALL THE CANOPY

Canopy Preparation and Gluing

Trimming, sanding, and gluing the canopy to the fuselage.

RUDDER CABLES

Rudder Cable System Explanation

Explains the 'pull/pull' system for rudder actuation.

CONTROL SURFACE TRAVELS

Setting Gentle and Aerobatic Controls

Guidance on setting control surface deflections for different flight modes.

Radio Setup Recommendations

Advice on dual rate settings and control travel adjustments.

OPTIONAL INSTALLATION

Individual Aileron Servo Mounting System

Illustrates a method for mounting individual servos for ailerons in the wing.

TUNED PIPE INSTALLATION

Tuned Pipe Shrouding and Airflow

Purpose of shrouding the tuned pipe for airflow and protection.

ADVANCED AEROBATICS TECHNIQUES

Knife-Edge Loop and Lomcevac Maneuvers

Descriptions of advanced flying maneuvers like the Knife-Edge Loop and Lomcevac.

TAKE-OFF AND LANDING PROCEDURES

Model Take-off and Landing Guidance

Instructions for safely taking off and landing the model aircraft.

Related product manuals