Fan
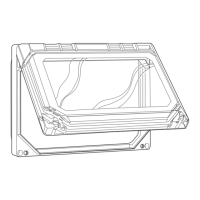
Adjustment (See Fig.
10)
Oil Charge
-
Compressors are factory charged with
oil as follows:
TOP OF FAN ORIFICE
I
FILL HOLE IN FAN HUB
,WITH PERMAGUM
OR
FAN BLADE
tlUB PLATE
COMPRESSOR
AMOUNT
pints (titers)
When additional oil or a complete charge is required,
use only Carrier-approved compressor oil:
Witco
Chemical Corp. . . . . . . . . . . . . . . . Suniso 3GS
Texaco, Inc. . . . . . . . . . . . . . . . . . . . . . Capella WF-32
Shrieve Chemical Co. . . . . . . . . Zero1 150 (Synthetic)
IMPORTANT: Do not use drained oil or use oil that
has been exposed to atmosphere. Refer to Carrier
Standard Service Techniques Manual, Chapter
I,
Refrigerants, for procedures to add or remove oil.
Fig. 10
-
Location of Prop
on
Motor Shaft
from Outside of Orifice Ring
Thermostatic Expansion Valve is factory set to
maintain 8
-
10
F (4.4
-
5.6 C) superheat of vapor leaving
cooler to control flow of liquid refrigerant to cooler.
Superheat can be reset but should be done only if
abso-
lutely necessary.
Cooler Head Bolt Tightening
GASKET PREPARATllON
-
When ruassemhhg, use
a?ew
gaskers.
Compressed asbestos
-
neoprene gaskets
(Carrier
:%%aterial
Specification
I&%00-24)
are to be
momentari/wv
dipped in
coswapressor
ail prior to assembly.
Gaskets are nut to be saaked in oil as gasket deterioration
results. Dips& gaskers are
111
be
xwkt
within
30
minutes
to prevent
der~rioration.
BOLT TORQUE
-
The following torques are to be
applied during the bolt tightening sequence described
below:
I
/
Z-in. diameter flange bolts . . . . . . . . . . . . 70
-
90 lb-ft
(95
-
122 N-m)
BOLT TIGHTEKING SEQUENCE (Fig.
1
I)
-
The fol-
lowing is a recommended bolt tightening sequence:
Step I
-
Tighten moderately (without torquing) all the
flange bolts in the sequence shown.
Step 2
-
Repeat Step 1, tightening the bolts to the
specified torque.
JcJ
Fig. 11
-
Tightening Sequence,
Cooler Head Bolts
ik@l
Line Solenoid Valve is interlocked with the
water temperature controller (WTC) to shut off the flow
of refrigerant to the cooler when the water temperature
controller is satisfied. It is located immediately upstream
of the thermostatic expansion valve. With single pump-
out control, the compressor continues to run after WTC
is satisfied and the refrigerant
flow
is shut off. This
causes pumpout of refrigerant from the cooler and sub-
sequent shutdown of the compressor on low-pressure
control. The compressor does not restart until WTC
again calls for cooling.
Moisture-Liquid Indicator
-
Clear flow of liquid
refrigerant indicates sufficient charge in system. Bubbles
indicate undercharged system or presence of
non-
condensables.
Moisture in the system, measured in parts
per million
(pm),
changes color of indicator: Green
-
moisture is below 45 ppm; chartreuse (caution)
-
45 to
130; yellow (wet)
-
above 130. Change filter drier at first
sign of moisture in the system.
IMPQRTA?X: Unit must be in operation at least
12
hours before moisture indicator can give an accurate
reading. With unit running, the indicating element
must be in contact with liquid refrigerant to give true
reading.
Filter Drier
-
Whenever the moisture-liquid indicator
shows presence of moisture, replace filter drier. Refer to
Carrier Standard Service Techniques Manual, Chapter
1,
Refrigerants, for details on servicing filter driers.
Liquid Shutoff/Charging Valve is located imme-
diately ahead of filter drier, provided with I/4-in. flare
connection for field charging.
11
 Loading...