The Cart-Tek Yellowstone is a golf trolley designed to assist golfers by carrying their golf bag and equipment around the course. This user manual, version 1.0, provides comprehensive instructions for assembly, operation, maintenance, and troubleshooting of the Yellowstone golf trolley.
Function Description:
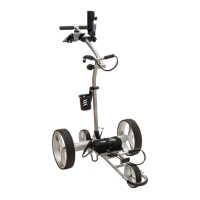
The Yellowstone golf trolley is an electric caddy that can be operated in both manual and remote-control modes. Its primary function is to transport a golf bag, reducing the physical strain on golfers. The trolley features a robust design with a main trolley frame, handle assembly, axle assembly, front wheel frame, and drive wheels. It includes an upper and lower bag rest to secure the golf bag, an umbrella holder, a scorecard and ball holder, and a drink holder for convenience. The remote control allows for hands-free operation, offering directional control, speed adjustment, and parking brake functionality. The trolley is equipped with an alignment system to ensure straight tracking and programmable settings for personalized preferences.
Important Technical Specifications:
- Battery: Lithium battery, supplied in a neoprene battery bag.
- Charger: Battery charger included.
- Remote Control: Optional remote control, powered by AAA batteries.
- Voltage: Caddy battery should read 29.3 Volts +/- 0.2V when fully charged.
- Remote Range: Up to 100 yards, depending on environmental conditions. Recommended operating range is 10-20 yards for best control and visibility.
- Remote Hibernation Timer: 120 seconds of inactivity will cause the caddy to stop.
- Remote Battery Life: Approximately 10-20 rounds of golf with fresh AAA batteries.
- Tracking Tolerance: Normal drift of 2 feet (left or right) over a 50-foot run on a perfectly flat fairway.
- Incline Capability: Designed for inclines, with the front wheel potentially lifting on steep inclines (over 25 degrees).
Usage Features:
- Assembly: The manual details the step-by-step assembly process, including installing the front wheel assembly, drive wheels (marked "L" for left and "R" for right), handle assembly, and anti-tip wheel. It emphasizes proper engagement of drive wheels onto the drive collar and securing the golf bag with bungees.
- Powering On: Place the battery in the tray, plug the cable into the caddy, and a solid blue LED indicates the caddy is on and in "ready" mode.
- Manual Mode:
- To engage: Turn the speed dial counter-clockwise to zero, then press and release the start/stop button.
- Speed adjustment: Rotate the speed dial clockwise to increase speed, counter-clockwise to decrease.
- Stopping: Turn the speed dial to zero, press the On/Off button on the handle, or press a "Stop" button on the remote.
- Resuming: Press the On/Off switch for the last set speed, or turn the speed dial to zero and then clockwise to the desired speed.
- Remote Control Mode:
- Turning On/Off: Press both blue left and right turn buttons simultaneously to turn on (LED flashes blue 3 times). Hold the Park button until the LED flashes red 3 times to turn off.
- Movement: Use directional buttons (forward, reverse, left, right).
- Steering: Quick pushes of left/right arrows adjust direction while moving forward. Holding left/right turns the caddy on itself when stopped.
- Speed: Press 'forward' to increase, 'reverse' to decrease.
- Stopping: Use the 'Stop' button for level ground.
- Parking Brake: For inclines, hit 'Stop', turn the caddy perpendicular to the hill, then hit 'Park'.
- Preset Speeds: The remote has preset speed buttons (1, 2, 3, 4).
- Programming Features:
- Store Personal Speeds: In remote mode, achieve desired speed, then press and hold the desired number button (e.g., #1) until the LED turns solid blue. While holding, press and hold the glide stop button until the blue LED turns off.
- Adjust Tracking: Enter "Program Mode" by pressing both speed 1 and speed 2 (green buttons) until the blue LED double flashes. The cart will move slowly. Press 'left' or 'right' buttons to adjust tracking (one foot per two presses in a 25-foot run).
- Adjust Turning Force: In "Program Mode," press 'reverse' to stop. Press 'forward' to increase turning force or 'reverse' to decrease. Hold the button until the LED turns solid then off for incremental adjustment.
- Reset to Factory Settings: In "Program Mode," press 'reverse' to stop. Then press numbers 1, 2, 3, 4, and the Parking Brake button.
Maintenance Features:
- Battery Maintenance:
- Charger LED: Solid green when not charging, solid red when charging. Solid green after a complete charge.
- Charging: Always recharge after every golf outing. Never leave the battery uncharged.
- Storage: Charge every 60-90 days during inactivity. Disconnect the charger after 1-2 days once charged.
- Disconnection: Unplug the battery from the caddy and charger when not in use.
- Cleaning: Never spray the caddy with flowing water. Wipe down with a wet/damp cloth.
- Wheel Bearings: Periodically spray front and anti-tip wheel bearings with a silicone-based lubricant (not WD-40).
- Remote Batteries: Replace AAA batteries if commands are missed. Keep fresh AAA batteries and a Philips screwdriver in your golf bag.
- Front Wheel Adjustment: If tracking issues persist after electronic adjustment, manually adjust the front wheel by loosening axle cap nuts (A) and using adjustment nuts (B) to move the axle slide forward or rearward.
- Bag Type: Cart bags are preferred for best performance. Lightweight stand or carry bags may require added weight towards the front of the caddy (e.g., extra golf balls, water bottle) to keep the front wheel grounded.
- Weight Distribution: Ensure the golf bag is balanced evenly side-to-side to prevent "tracking errors."
- Front Wheel Grounding: The front wheel should remain grounded during play, except on steep inclines (over 25 degrees). Avoid remote steering if the front wheel is off the ground.
- Steep Inclines: Use manual/trolley mode on steep inclines where the front wheel may lift.
- Reverse Movement: Do not pull the cart backwards while riding in a power cart.
- Parking Brake on Inclines: Do not use the 'parking brake' button when going down steep inclines. Instead, use the 'reverse' arrow to decrease speed. If stopping on a steep incline, turn the caddy perpendicular to the hill and then press the Park button.
Troubleshooting:
The manual provides solutions for common issues such as:
- No indicator LED on the handle (check battery engagement and charge).
- Remote not working (verify remote is on, restart caddy, replace remote batteries, re-pair remote).
- Battery charger not switching from red to green (ensure full plug-in, allow up to 6 hours for depleted batteries).
- Caddy not making 18 holes (verify full charge, 29.3 volts).
- Erratic steering (ensure wheels are fully engaged in drive collars).
- Caddy not moving (put in "free wheel" mode by pulling wheels out of drive collar and locking into groove on axle).
- Caddy not tracking straight (ensure wheels engaged, balance bag, reset to factory settings, adjust tracking electronically, manually adjust front wheel).
- Caddy stopping unexpectedly (120-second remote timer, check LED indicators for overload, standby, or low voltage, check remote batteries, environmental interference).
For further assistance, users are directed to contact Cart Tek directly via website, phone, or email for support in the USA and Canada.