1840-8
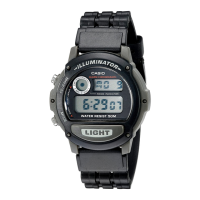
Date and Time Screen
Track Position Screen
Measurement
time
Longitude
Record
number
Measurement date
Record
number
Latitude
L
J
Press Jor H.
J
To recall track memory data
1. In any mode, press the MENU button to display the Menu Screen.
2. Use L and K to highlight TRACKS, and then press ● to display the
Tracks Screen.
3. Use L and K to scroll through the data in track memory.
4. Use H and J to switch between the two Track Memory Data Screens.
To clear track memory
1. While the Tracks Screen is on display,
press ●.
• You can perform this step while either the
Date and Time Screen or Track Position
Screen is on the display.
2. Use L and K to highlight YES (if you
really want to clear all data from the track
memory) or NO (if you want to exit the
clear operation without clearing
anything), and then press ●.
GPS Mode Settings
This section describes how to make various settings that affect GPS Mode
data. Most of these settings can be made once when initially setting up the
watch, and should never need changing.
Setting Your Area
The area setting lets the watch know where it is currently located. The watch
uses this information as a reference point for making GPS measurements.
You need to update this setting whenever you move from one geographic
area to another.
There are two ways to specify the area: by selecting a preset area or by
inputting area data.
To specify a preset area
1. In any mode, press the MENU button to
display the Menu Screen.
2. Use L and K to move the highlighting
to SET UP and then press ● to display
the Set Up Menu.
3. Use L and K to move the highlighting
to AREA and then press ● to display the
Area Menu.
4. Use L and K to move the highlighting
to SELECT and then press ● to display
the Area Selection Screen.
5. Use L and K to scroll through the area names on the screen until the
one you want is highlighted.
• See “AREA LIST” at the back of this manual for a full list of area names
and the area data connected with each name.
6. After highlighting the name of the area you want to specify, press ● to
register it and return to the Set Up Menu.
7. To exit the Set Up Menu, press MENU.
• Selecting an area automatically sets the appropriate latitude, longitude,
GMT differential and datum for that area.
To input area data
1. In any mode, press the MENU button to
display the Menu Screen.
2. Use L and K to move the highlighting
to SET UP and then press ● to display
the Set Up Menu.
3. Use L and K to move the highlighting
to AREA and then press ● to display the
Area Menu.
4. Use L and K to move the highlighting
to INPUT and then press ● to display the
Area Data Input Screen.
5. Input the latitude of the area and then press ● to move the cursor to the
longitude.
• See “To input the latitude”.
6. Input the longitude and then press ● to advance to the GMT Differential
Screen.
• See “To input the longitude”.
7. Input the GMT differential.
• The GMT differential is the time difference between the area whose data
you are setting and Greenwich Mean Time.
• You can input a GMT differential value in the range from –11.0 to +13.0, in
units of 0.5 hours.
• See “To change a numeric setting”.
8. After inputting the GMT differential, press ● to return to the Set Up Menu.
9. Press ● to display the DATUMS list, and set the datum for the area. Use
the procedure starting from step 4 under “To specify a datum”.
• See “Datums” for information about datums.
• Pressing MENU instead of ● in the above step exits the Set Up Menu.
Setting a Datum
The GPS constellation of satellites generates latitude and longitude positions
on the World Geodetic System 1984 (WGS 84) horizontal datum. Though
WGS 84 is the latest standard for the entire world, higher precision can be
obtained using a datum for a particular local area. Use the following
procedure to select the datum that is appropriate for the area where you are
taking GPS measurements with this watch.
• See “Datums” for more information about datums and how they affect GPS
measurements.
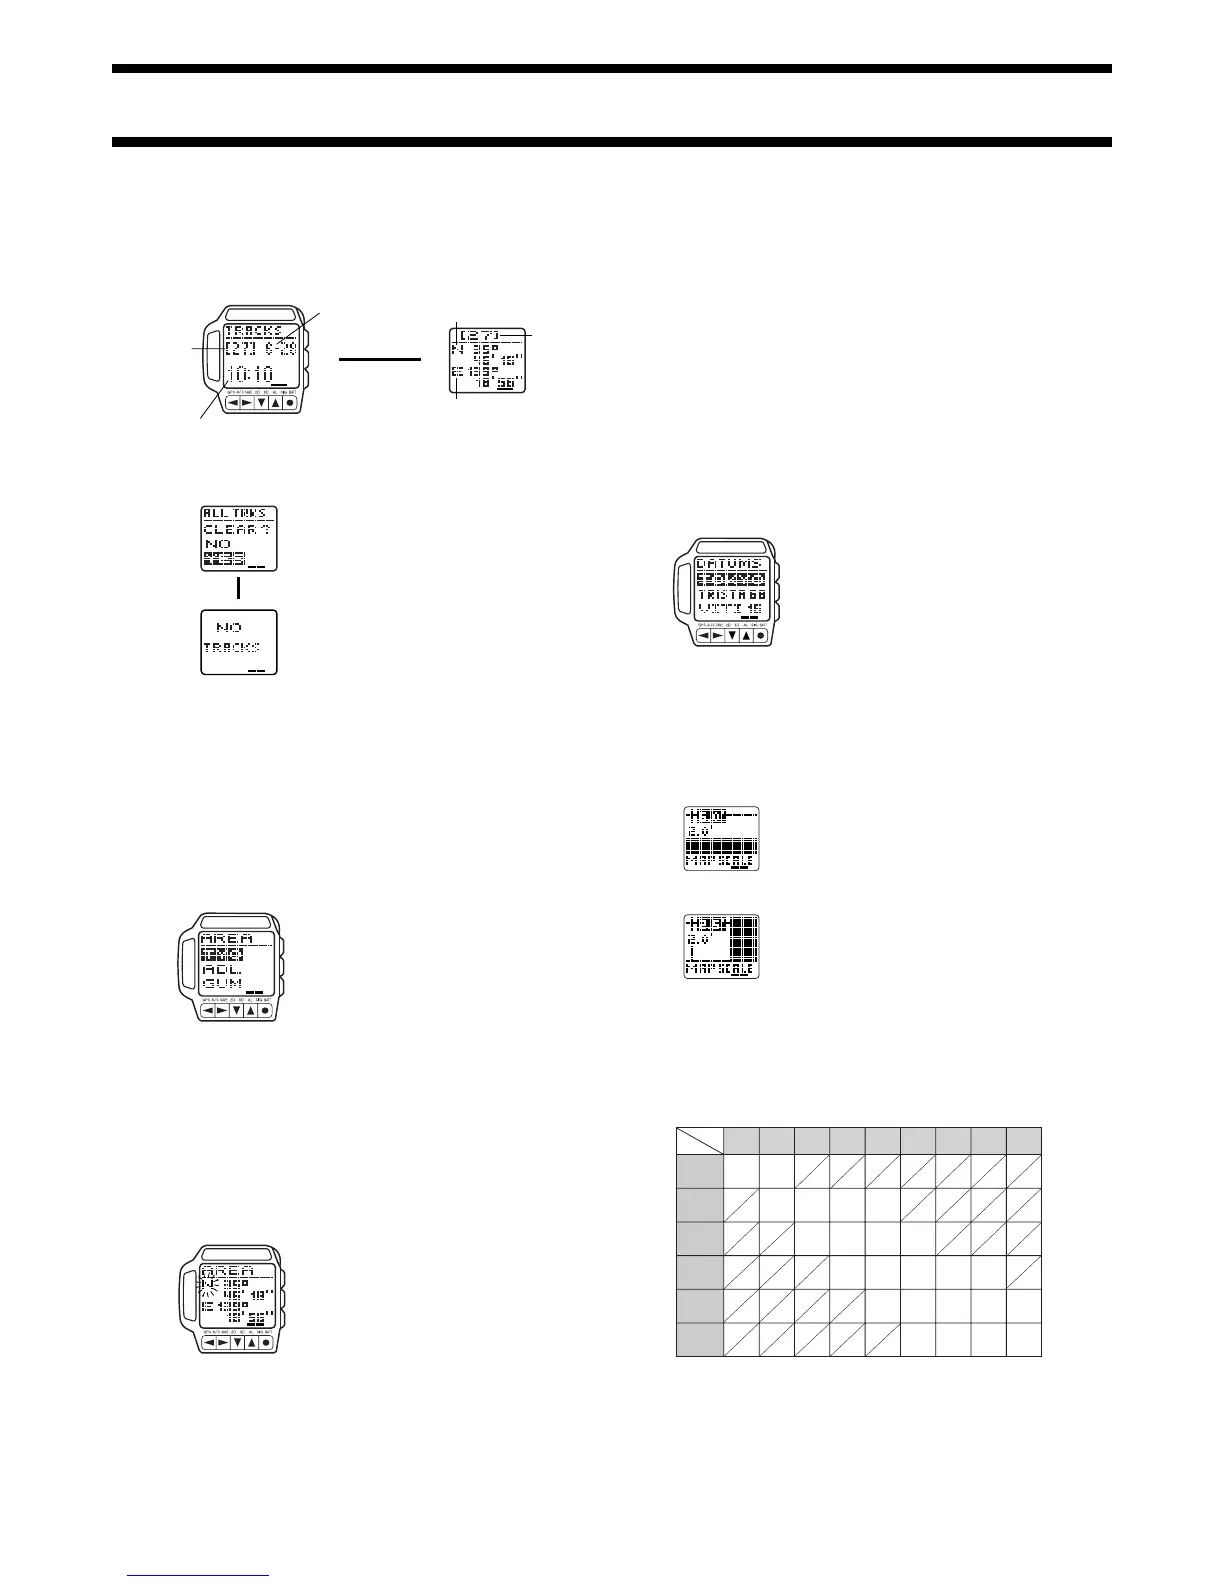
To specify a datum
1. In any mode, press the MENU button to
display the Menu Screen.
2. Use L and K to move the highlighting
to SET UP and then press ● to display
the Set Up Menu.
3. Use L and K to move the highlighting
to DATUMS and then press ● to display
the DATUMS list.
4. Use L and K to scroll through the
datum names on the screen until the one
you want is highlighted.
• See “DATUM LIST” at the back of this manual for a full list of datum names
and the applicable area for each.
5. After highlighting the name of the datum you want to specify, press ● to
register it and return to the Set Up Menu.
6. To exit the Set Up Menu, press MENU.
Map Scale Settings
You can change the map scale settings of
the watch so the screen represents one grid
cell of the map you are using. Because of
the physical size of the screen, its default
vertical-to-horizontal relationship is normally
1:2, meaning the cell is assumed to be twice
as wide as it is tall. Whenever you use the
procedure under “To set up the Map Screen
to match the gridlines of your map” to
change the longitude value, the watch
automatically adjusts the latitude value to
maintain a ratio of 1-to-2.
If you manually change the latitude value to
a vertical-to-horizontal ratio other than 1:2,
the unused portion of the screen is
automatically blacked out as shown in the
illustration nearby.
The following table shows all of the possible settings that can be made for the
map scale. The values along the top and left side indicate the latitude-to-
longitude ratio, while the dimension values inside the table indicate the screen
size in dots. The full screen size is 24 × 32 dots.
 Loading...