1840-1
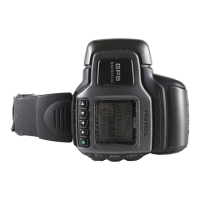
GENERAL GUIDE
Module No. 1840
Congratulations upon your selection of this CASIO watch. To get the most out
of your purchase, be sure to carefully read this manual and keep it on hand
for later reference when necessary.
About this manual
• Button operations are indicated using the letters shown in the illustration.
• Each section of this manual provides basic information you need to
perform operations in each mode. Further details and technical information
can also be found in the “REFERENCE” section.
Display Indicators
The following describes the indicators that
appear along the bottom of the display.
LIGHT
MENU
GPS
Indicator
GPS
AUTO
SAVE
2D
3D
ALM
SIG
BATT
Description
• Watch is in the GPS Mode.
• Flashes when the watch is performing a GPS measurement
operation.
Watch is in the GPS Auto or Continuous Mode.
Watch is in the GPS One-shot or Auto Mode.
Watch is performing a 2-dimensional GPS measurement (using
three satellites). This is the type of measurement normally used
in the Quick, One-Shot, and Auto Mode.
Watch is performing a 3-dimensional GPS measurement (using
four or more satellites), which provides better accuracy than
2D. This is the type of measurement used in the Continuous
Mode when data is obtained from four or more satellites.
Alarm is turned on.
Hourly Time Signal is turned on.
Battery power is low and battery needs to be replaced.
Precautions
• The measurement functions built into this watch are not intended for
use in taking measurements that require professional or industrial
precision. Values produced by this watch should be considered as
reasonably accurate representations only.
• Though a useful navigational tool, a GPS receiver should never be used as
a replacement for conventional map and compass techniques. Remember
that magnetic compasses can work at temperatures well below zero, have
no batteries, and are mechanically simple. They are easy to operate and
understand, and will operate almost anywhere. For these reasons, the
magnetic compass should still be your main navigation tool.
• CASIO COMPUTER CO., LTD. assumes no responsibility for any loss or
any claims by third parties that may arise through the use of this watch.
GETTING ACQUAINTED
• Use MENU and GPS to change between modes.
• In the GPS Mode, use L and K to change between screens.
• The watch beeps whenever you press a button to change to another mode
or screen.
Timekeeping Mode Alarm Mode
Menu Screen
Graphical Navigation
Screen
GPS Mode
Position Screen Plot Screen
Direction and Speed
Screen
Press L or K.
Press GPS.
Press L.
Press K.
Press GPS.
Press MENU.
Press GPS. Press MENU.
K
K
K
LL
L
• You cannot go from the Menu Screen to the GPS Mode after displaying the
Menu Screen from the Timekeeping Mode or Alarm Mode. To get to the
GPS Mode in this case, you have to press GPS to return to the
Timekeeping Mode (or Alarm Mode) and then press GPS again to enter the
GPS Mode.
Press GPS.