2050-2
M
A
B
C
ALM SIG
DIVETIME
P
Using the Dive Time Measurement Mode
1. Before diving/snorkeling, switch to the Dive
Time Measurement Mode by holding down
M for at least one second.
2. To start the dive time measurement operation,
press C.
3. To stop the measurement, hold down C for
at least one second (until the watch emits a
long beep).
4. To re-start timing from the dive time shown
on the display, press C.
• You can repeat steps 3 and 4 as many
times as you like.
5. To clear the Dive Time Measurement Mode,
stop the measurement operation (step 3,
above) and then hold down A until the watch
emits a beep.
Notes
• The P indicator appears in the dive start time (center) display to indicate
a p.m. time, but not in the current time (top) display.
• Timing of the surface interval starts whenever you hold down C to stop
the dive time measurement operation in step 3, above. This timing is
performed internally, and it is not indicated on the Dive Time Measurement
Mode screen. For details on how to view surface interval data, see
“Viewing Log Data”.
• Do not recall log data while a dive time measurement is stopped
and you plan to re-start it. If you do, the dive time to that point will be
stored into memory and the data will be cleared when you exit the Dive
Time Measurement Mode.
Viewing Log Data
1. Hold down M for at least one second to enter
the Timekeeping Mode from the Dive Time
Measurement Mode.
2. Hold down C to display the Log Data screen.
The Log Data screen remains visible as long
as you hold down C. When you release C,
the normal Timekeeping Mode screen
returns.
• The surface interval continues to be timed
until you re-start dive time measurement
or until the surface interval reaches 24
hours.
Clearing the Log Data Memory
Log data in memory is automatically replaced
by the newest measurement. Use the following
operation if you want to manually clear the log
data memory.
1. While in the Timekeeping Mode, hold down
C to display the Log Data screen.
2. While holding down C, press A to clear the
log data memory.
• At this time, the display clears so that no
data is shown.
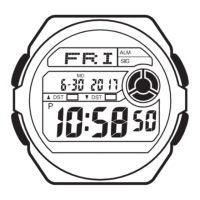
Dive time
(hours : minutes seconds)
Dive start time
Current time
M
A
B
C
LOG ALM SI G
DIVETIME
P
Dive start time
Surface interval
(hours : minutes)
Dive time
M
A
B
C
P
ALM SIG
P
Mode indicator
GMT differential
Time in indicated city
(or site)
Current time
City code
M
A
B
C
LOG ALM S IG
DIVETIME
WORLD TIME MODE
The World Time Mode shows the current time
in 26 cities and 9 diving sites (27 time zones)
around the world.
• The time settings of the Timekeeping Mode
and the World Time Mode are independent
from each other, so you must make separate
settings for each.
• Whenever you change the time setting for any
city (or site) in the World Time Mode, the
settings of all other cities are changed
accordingly.
• In the World Time Mode, the top line of the
display scrolls to show the city code and GMT
differential.
• A city code that corresponds to a diving site is
preceded by the symbol .
Viewing the Time in Another Zone
While in the World Time Mode, press C to scroll forward through the city
codes (time zones).
• For full information on city codes, see the “CITY CODE TABLE”.
• Pressing B while in the World Time Mode causes the current city code
and GMT differential to scroll across the display. It also turns on the
backlight.
Setting the World Time
1. In the World Time Mode, press C to scroll
through the city code and find the one you
want.
2. Hold down A until the hour digits of the world
time start to flash.
3. Press M to move the flashing in the following
sequence.
Hour Minutes
4. While hour or minutes is flashing, press C to increase the setting or B
to decrease it.
• When setting the world time using the 12-hour format, take care to set
the time correctly as a.m. (no indicator) or p.m. (P indicator).
5. Press A to return to the World Time screen.
Daylight Saving Time (DST)
Daylight Saving Time automatically advances the time setting by one hour
from Standard Time. You can make individual Daylight Saving Time settings
for each city code (time zone). Remember that not all countries or even
local areas use Daylight Saving Time.
To switch between Standard Time and Daylight Saving Time
1. In the World Time Mode, press C to display
the city code (time zone) whose standard
time/daylight saving time setting you want to
change.
2. Hold down B to toggle between Daylight
Saving Time (DST displayed) and Standard
Time (DST not displayed).
• The DST indicator is on the display
whenever you display a city code for which
daylight saving time is turned on.
M
A
B
C
P
ALM SIG
P
M
A
B
C
P
ALM SIG
DST
P
DST
M
A
B
C
ALM SIG
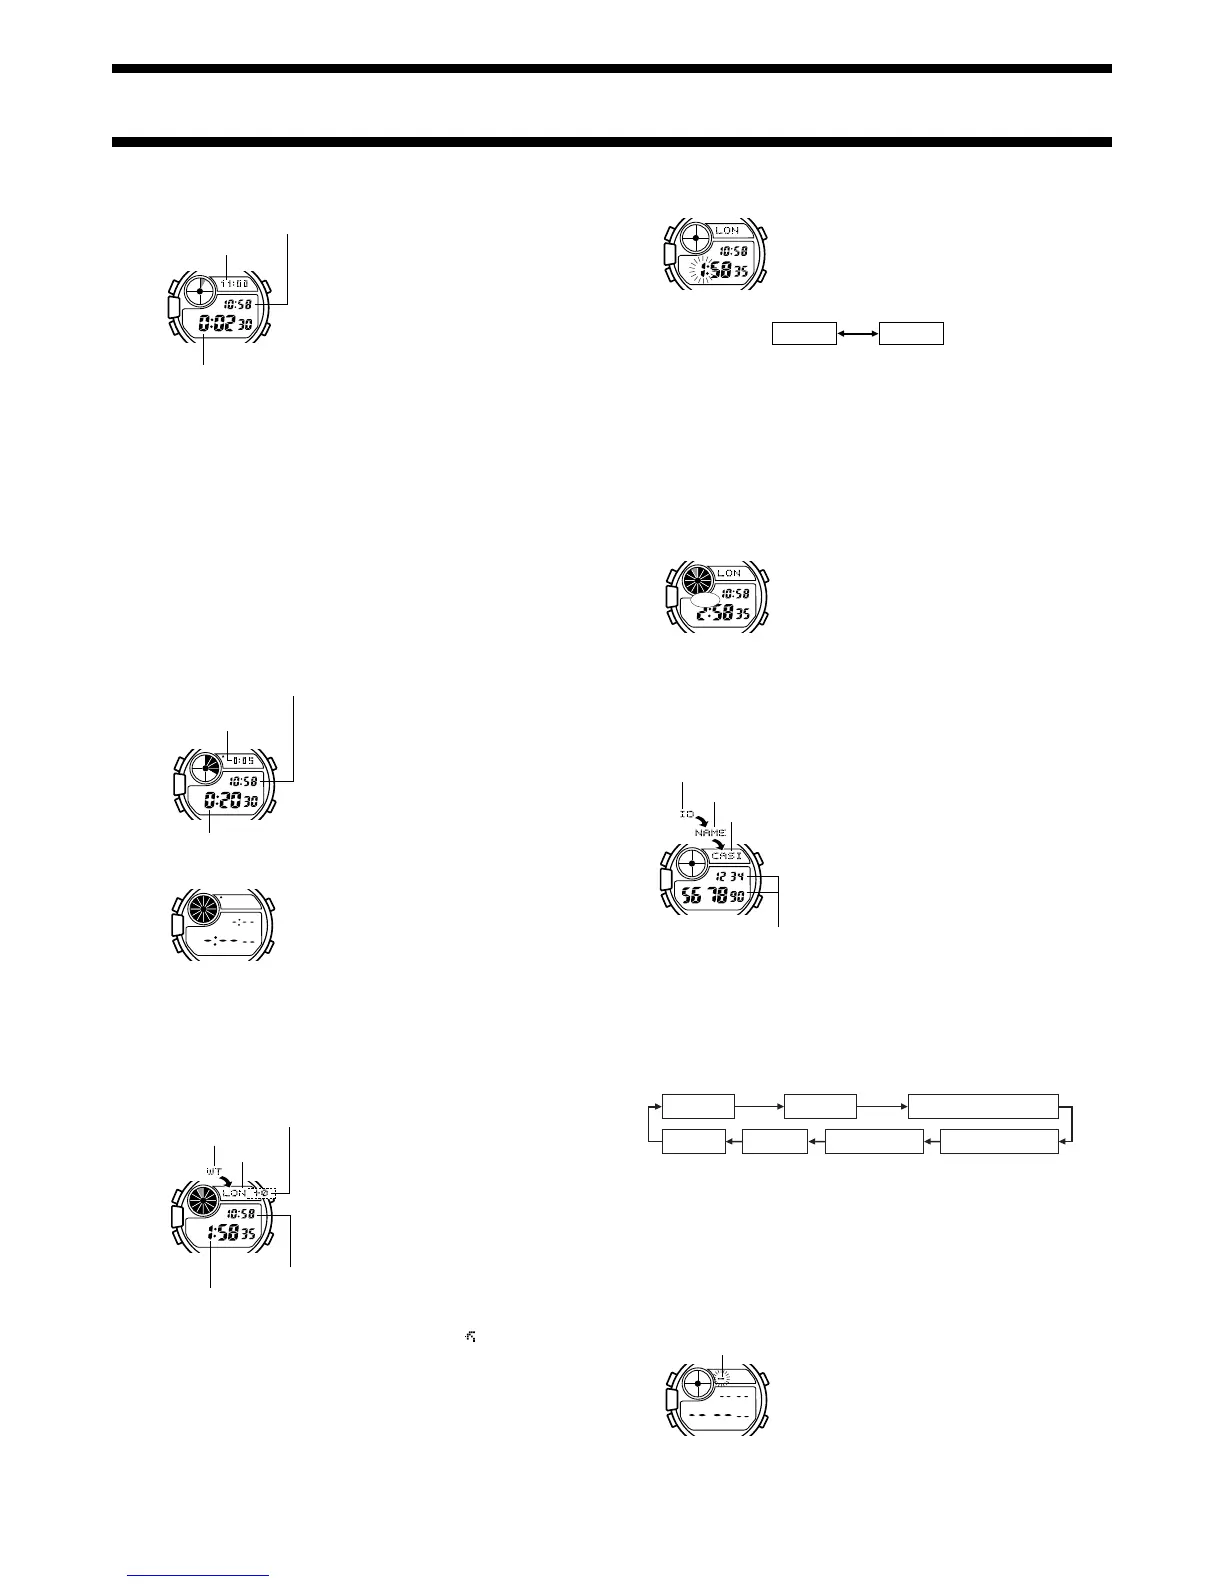
IDENTIFICATION MODE
With the Identification (ID) Mode, you can store
your name, SCUBA diver certificate number,
emergency contact number, passport number,
and blood type. There is also memory for five
general memo text records.
About Identification Mode Data
• The Identification Mode has five pre-
programmed data titles: NAME (name),
C CARD (SCUBA diver certificate number),
EMERGENCY NO. (emergency contact
number), BLOOD TYPE (blood type),
and PASSPORT (passport number).
• Except for
BLOOD TYPE, you can input 16 characters (letters,
numbers, symbols) in the text area and 10 digits in the number area.
• In the case of BLOOD TYPE, you can input a blood type (ABO)
and Rh factor.
Viewing Identification Mode Data
In the Identification Mode, each press of C scrolls through the data in the
sequence shown below.
• In the Text Area, the title alternates with the input text.
• No title is displayed in the text area of the new data screen, so you can
input your own title.
• User Data appears only if you have created your own title and input
data. This item is skipped if there is no user data in memory.
• The New Data screen does not appear if there is already data input for
all five of the user data entries.
Inputting Text and Numbers
The following procedure is the same for NAME, C CARD,
EMERGENCY NO., and PASSPORT, and your original data.
1. In the Identification Mode, display the title of
the data you want to input.
• Display the New Data screen when you
want to create your own title.
• The new data screen is the one that
contains no text or numbers.
2. Hold down A until the cursor appears in the
text area.
• If you do not want to input text into the text area, hold down M for at
least one second to move the cursor to the number area and jump to
step 7.
Text area
Mode indicator
Title
Number area
M
A
B
C
ALM SIG
Cursor
 Loading...