Selecting and Playing a Tone
E-16
1.
Refer to the separate “Appendix” to look up the
group(s) and numbers of the two tones
(UPPER 1 part tone and UPPER 2 part tone) you
want to use.
2.
Check to make sure that the @ and A
indicators are not on the display.
• If they are displayed, press the R-19 (SPLIT) button
and/or R-20 (LAYER) button to clear both indicators
from the display. When neither indicator is displayed,
the tone you select will become the UPPER 1 part tone.
3.
Use the TONE buttons and dial to select the
UPPER 1 part tone.
4.
Press the R-20 (LAYER) button.
• This causes the A indicator to appear on the
display. This indicates that the tone you select will
become the UPPER 2 part tone.
5.
Use the TONE buttons and dial to select the
UPPER 2 part tone.
6.
Play something on the keyboard to check how
the tones sound layered together.
7.
To cancel tone layering, press the R-20 (LAYER)
button again so the A indicator disappears
from the display.
1.
Refer to the separate “Appendix” to look up the
group(s) and numbers of the tones (UPPER 1
part tone and LOWER part tone) you want to
use.
2.
Check to make sure that the @ and A
indicators are not on the display.
• If they are displayed, press the R-19 (SPLIT) button
and/or R-20 (LAYER) button to clear both indicators
from the display. When neither indicator is displayed,
the tone you select will become the UPPER 1 part tone
3.
Use the TONE buttons and dial to select the
UPPER 1 part tone.
4.
Press the R-19 (SPLIT) button.
• This causes the @ indicator to appear on the
display. This indicates that the tone you select will
become the LOWER part tone.
5.
Use the TONE buttons and dial to select the
LOWER part tone.
6.
Play something on the left and right sides of the
keyboard to confirm that the tones are assigned
properly.
• You also can specify the keyboard split point, which is
the location where the keyboard splits between the left
range and right range. For details, see “To specify the
keyboard split point” (page E-17).
7.
To cancel keyboard split, press the R-19 (SPLIT)
button so the @ indicator disappears from
the display.
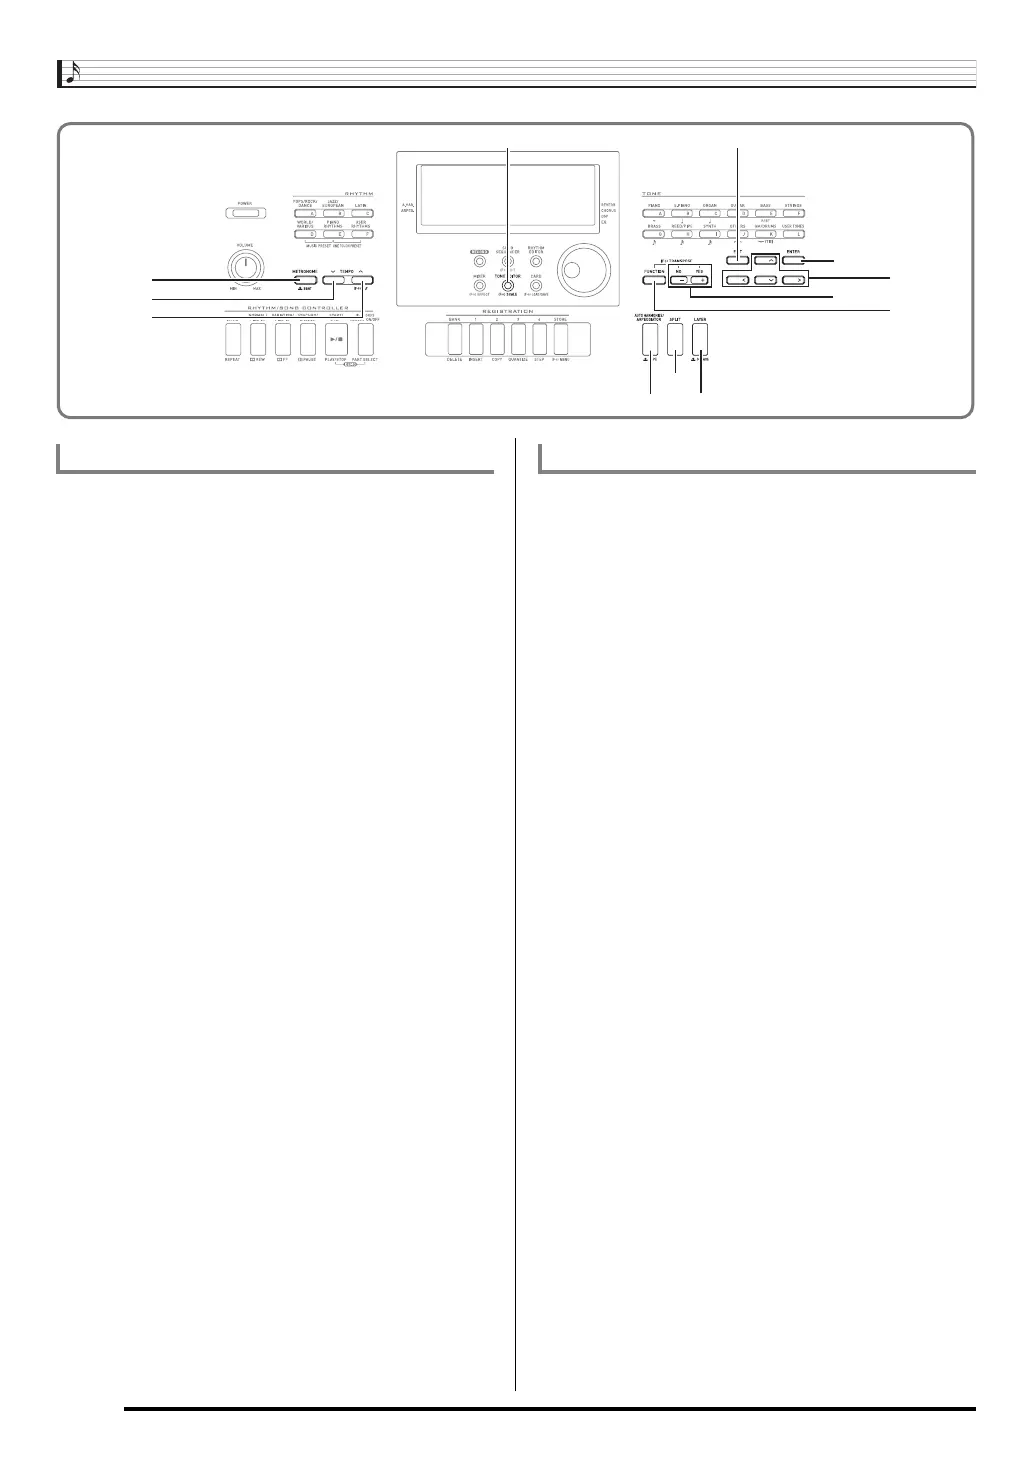
R-19R-19
R-20R-20
R-14R-14
L-9L-9
L-11L-11
L-10L-10
C-6C-6
R-18R-18
R-17R-17
R-13R-13
R-16R-16
R-15R-15
To layer two tones To split the keyboard between two tones
CTK6200_e.book 16 ページ 2011年12月27日 火曜日 午後8時20分