1312
Please refer to picture-06
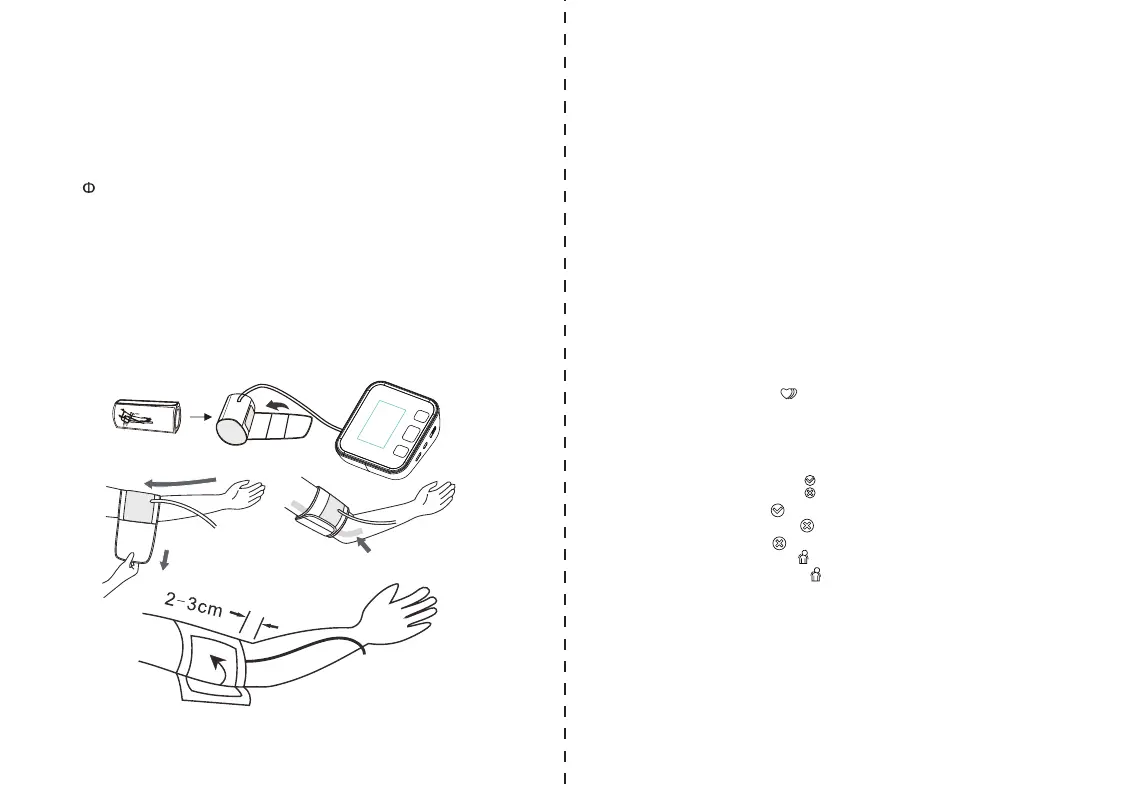
a) The cuff is pre-formed for easier use. Remove tight or bulky clothing from
your upper arm.
b) Wrap the cuff around your upper left arm. The rubber tube should be on
the inside of your arm extending downward to your hand. Make certain the
cuff lies approximately 0.8” to 1.2” (2 to 3 cm) above the elbow. Important!
The on the edge of the cuff (Artery Mark) must lie over the artery which
runs down the inner side of the arm.
c) To secure the cuff, wrap it around your arm and press the hook and loop
closure together.
d) There should be little free space between your arm and the cuff. You
should be able to fit 2 fingers between your arm and the cuff. Cuffs that don’t
fit properly result in false measurement values. Measure your arm
circumference if you are not sure of proper fit.
e) Lay your arm on a table (palm upward) so the cuff is at the same height as
your heart. Make sure the tube is not kinked.
f)Remain seated quietly for at least two minutes before you begin the
measurement.
5.3. Fitting the Cuff
Picture-06
5.4. Measure Procedure
Refer to picture-07
The monitor is designed to take measurements and store the measurement
values in memory for two people using User ID A and User ID B.
1. Sit comfortably in a chair with your feet flat on the floor.
2. Select your User ID (A or B).
Stretch your arm forward on the desk and keep relaxing, make sure the palm
of hand is upturned. Make sure arm is in correct position, to avoid body
movement. Sit still and do not talk or move during the measurement.
After the cuff has been appropriately positioned on the arm and connected
to the blood pressure monitor, the measurement can begin:
a) Press the Start/Stop button. The pump begins to inflate the cuff. In the
display, the increasing cuff pressure is continually displayed.
b) After automatically reaching an individual pressure, the pump stops and
the pressure slowly falls. The cuff pressure is displayed during the
measurement.
c) When the device has detected your pulse, the heart symbol in the display
begins to blink.
d) When the measurement has been concluded, the measured systolic and
diastolic blood pressure values, as well as the pulse will be displayed.
e) The appearance of this symbol signifies that an irregular heartbeat was
detected.This indicator is only a caution. It is important that you be relaxed,
remain still and do not talk during measurements.
f) The measurement results are displayed until you switch the device off. If no
button is pressed for 60 seconds, the device switches off automatically.
g) Cuff self-checking symbol ( )
The cuff correct symbol( ) will be displayed if the cuff position is correct,
otherwise the wrong symbol( ) will be displayed. Please check again the
cuff if the wrong symbol( ) is displayed.
h) Movement error symbol ( )
The Movement Error Symbol ( ) is displayed if you move your body during
the measurement. Please remove the cuff, and wait 2-3 minutes. Reapply the
cuff and take another measurement.
Patient Position:
1) Comfortably seated
2) Legs uncrossed
3) Feet flat on the floor
4) Back and arm supported
5) Middle of the CUFF at the level of the right atrium of the heart
NOTE: