EasyManua.ls Logo

Celestron 60LCM User Manual

Celestron 60LCM
4 pages
To Next Page IconTo Next Page
Page #1 background imageLoading...
Page #1 background image
6
0
&
8
0
L
C
M
T
e
l
e
s
c
o
p
e
s
1 2 3
4 5 6
7 8 9
Your LCM 60 & 80 telescopes
include: optical tube with StarPointer
finderscope attached, motorized
base, tripod, accessory tray, two
eyepieces (9 mm & 25 mm),
computerized hand control,
The Sky
®
CD, and owner’s manual
Place accessory tray on top of center
leg brace by lining up the grooves on
the tray to the post on the brace.
Thread the coupling screw into the
hole at the bottom of the motorized
base. Tighten screw to secure the
base to the tripod.
Assemble tripod by spreading the
legs out until the center leg brace is
fully extended.
Once grooves are aligned, turn
accessory tray until it snaps into
clips on each leg brace.
Loosen the altitude lock and rotate
the tube clamp so that the locking
screw is positioned on the top of the
base. Then tighten the altitude lock
by hand, but don’t over tighten.
Extend tripod legs 6 to 8 inches by
lifting the tripod leg locking lever and
pulling the leg to desired length and
snapping down the lever.
Place the motorized base on top of
the tripod making sure that the three
round feet rest on the round flat pads
on the inside of the tripod head.
Slide the optical tube dovetail into
the fork arm as shown.
Coupling screw
Quick Set-up Guide
60LCM
#22050
80LCM
#22051
Question and Answer IconNeed help?

Do you have a question about the Celestron 60LCM and is the answer not in the manual?

Celestron 60LCM Specifications

General IconGeneral
TypeRefractor
Lens coatingFully Multi Coated (FMC)
Magnification142 x
Altazimuth mountYes
Product colorSilver
Tripod materialAluminum

Summary

Quick Set-up Guide

Tripod Assembly

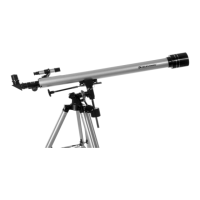
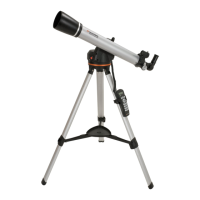
Assemble the tripod by spreading the legs and extending them to the desired length.

Accessory Tray Installation

Place and secure the accessory tray onto the center leg brace of the tripod.

Motorized Base Mounting

Place the motorized base on the tripod head and secure it with the coupling screw.

Optical Tube Mounting

Loosen the altitude lock, position the tube clamp, and slide the optical tube into the fork arm.

Securing Optical Tube

Tighten the locking screw on the base to secure the optical tube.

Eyepiece and Diagonal Setup

Insert the star diagonal and the low power eyepiece into the focuser.

Hand Control Holder and Connection

Attach the hand control holder to the tripod and plug the hand control into the fork arm.

Battery Installation

Install 8-AA batteries into the battery compartment and replace the cover.

Final Setup Check

Ensure the tube lens cap is removed before viewing.

Hand Control Guide

Powering On and Initial Display

Turn on the power switch; the hand control should display 'LCM Ready'.

StarPointer Finderscope Alignment

Align the StarPointer finderscope by adjusting screws until the red dot centers an object.

Telescope Pointing and Slew Speed

Use directional buttons to point the telescope and adjust slew speed for accurate centering.

SkyAlign Procedure Overview

Begin the SkyAlign procedure by pressing ENTER when 'LCM Ready' is displayed.

Site and Time Information Entry

Enter your location (city database) and current time/date for accurate alignment.

Alignment Star Selection and Centering

Select bright celestial objects, center them in the finderscope and eyepiece, and press ALIGN.

Alignment Confirmation

Confirm alignment after centering the third object; display reads 'Match Confirmed'.

Object Finding and Information

Use the TOUR button to find visible objects and INFO to read about them.
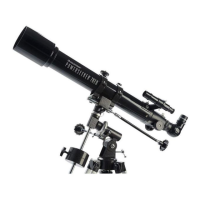
Related product manuals