15V3.15.22
InstallationNotes:
1. Theunitisshippedwith(4)wallmountingbrackets,a90°drainelbow,anda10’lengthof½”
I.D.condensatedrainline.Therequiredhardwareisshippedloosewiththeunit.
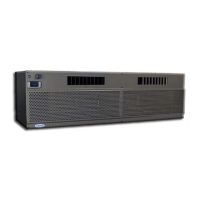
a. Model3200VSi/4200VSi(indoorinstallations):Selectthedesiredsetofmountingholes,
location#1,#2,or#3(shownabove).Themountingbracketscanbeusedoneithersideof
thewall.
b. Model3200VSx/4200VSx(outdoorinstallations):Therearcoverusesholelocation#1.If
thisisalsothedesiredlocationforthemountingbrackets,firstmakecertaintherearcover
isinplace,andtheninstallthemountingbracketsovertherearcover.
2. Ifthe mounting bracketsare used on theoutside of the cellar in Location 1, ashelfwill be
neededtosupporttheweightofthecoolingunit.
3. Toattachthemountingbrackets,attachthesideandtopbracketstotheunitusing(8)#8x5/8”
sheetmetalscrews.Thebottombracketonlyattachestotheside brackets – thereare no
mountingholesforthebottommountingbracketinthecaseofthecoolingunit.Securethe
top and bottom brackets to the side brackets with (4) 1/4‐20x5/8”boltsandlockwashers
(included).
4. Attachinsulatedfoamtapetothemountingbracketsonthesidethatwillfacethewalltocreate
aninsulatedandairtightsealbetweenthewallandthebrackets.
5. Oncethecoolingunitisinstalled,allcracksandgapsbetweenthecoolingunitandthecellar
shouldbesealed.Acompleteandpropersealmustbemadebetweenthecellarandthecooling
unittoensurethatoutsideairdoesnotenterthecellar.Usesealanttapeorcaulkingtosealthe
perimeterwherethecoolingunittouchesthecellar.Checkthesealbyhavingahelperstandin
frontofthecabinetwhileyoushineaflashlightaroundthecoolingunitedgestodiscoverany
gapsinsealant.
6. Threadthedrainelbowtightlytothecondensateoverflowdrainline.Threadtapeisnot
required.Runtheoverflowdraintubetoagravitydrain,routingsothatthetubeformsawater
trapneartheunit.Chargethetubetrapwithwater,thenslidethe1/2”IDvinyltubingoverthe
hosebarb.
 Loading...