17
- Bluetooth control (for models СТ-8111/8112/8113/8114/8116/8118/8119/8122)
- Voice assist function (for models CT-8111/8112/8113/8114/8116/8119/8122)
CONTROLS
- ON button /mode selector
- Bluetooth control (in models СТ-8111/8112/ 8113/8114/8116/8118/8119)
- Radio frequency switch
- Radio programming buttons / МР3 setting buttons
- “Forward” button
- LED/LCD display
- RC signal receiver
- USB port
- AUX port
- SD/MMC/TF slot
- Dial regulator / Setup menu button
- “Back” button
- “Clock” button (in models СТ-8111/8112/8113/8114/8119 – voice assist button)
- “Mute” button (in model СT-8107 - MODE – mode selector, in model CT-8115 - EQ
-
Equalizer, in
model CT-8122 – voice assist button)
- Microphone (for models СT-8111/8112/8113/8114/ 8116/8118/8119/8122)
- “Reset” button (Clear settings)
- USB port for external device charging (in models СТ-8117/8119/8122)
- “Backlight color” button (in models СТ-8114/8118/8120)
- Voice assist button (in model СТ-8116)
- MOD button (in model СТ-8122)
- EQ button (in model СТ-8122)
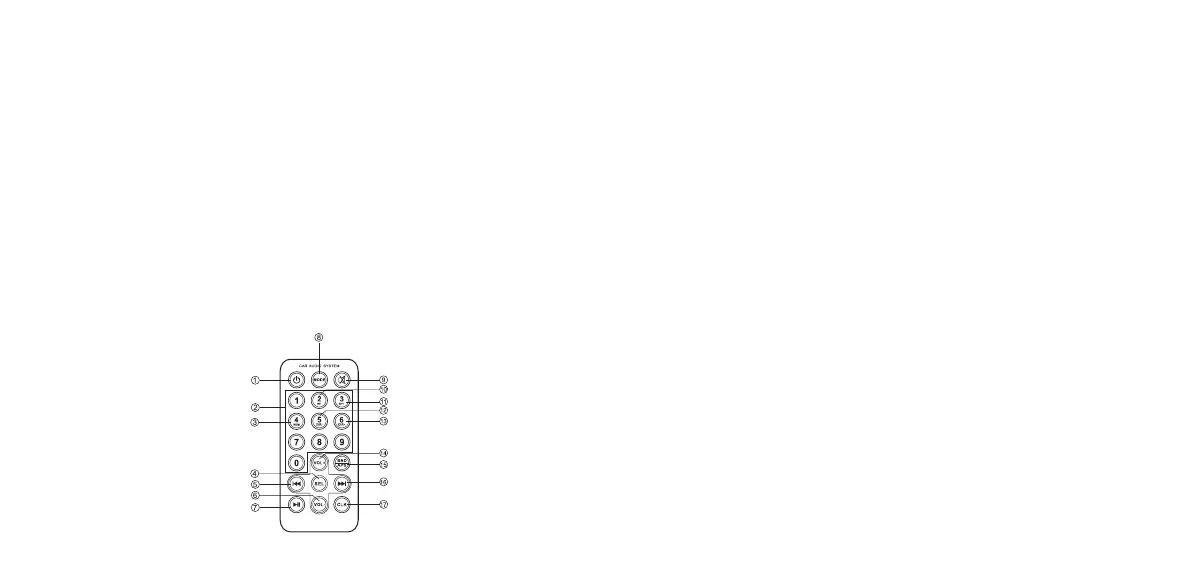
REMOTE CONTROL UNIT (for models 8110/8113)
1. ON/OFF button
2. Radio channel selector
3. Random playback
4. Settings menu
5. “Back” button
6. Volume down
7. Playback/Pause
8. Mode selector
9. Mute/sound on
10. Radio station scanning
11. “Repeat” button
12. Previous folder
13. Next folder
14. Volume up
15. Radio station auto search
16. “Forward” button
17. “Clock” button
3. SCOPE OF SUPPLY
1. Main unit complete with mounting sleeve - 1 pcs
2. Remote control unit complete with battery (lithium, 3 V) for models СТ-8110/8113 - 1 pcs
3. ISO connector - 2 pcs
4. Extraction key - 2 pcs
5. User manual - 1 pcs
4. INSTALLATION
- Insert the mounting sleeve into the opening, choose the appropriate bend-off brackets according to
material thickness and bend them inwards, making sure that the sleeve is properly seated.
- Install the sleeve as securely as possible, using upper and lower brackets. Bend the brackets by
90 degrees for reliable fastening.
ATTENTION! Prior to final installation connect the wiring temporarily to make sure that the unit
and the whole audio system functions properly. Use only the accessories supplied with the unit for
proper installation. The use of other accessories may cause failures. Consult your car dealer if holes
should be drilled or any other modifications made to the vehicle. Install the car stereo unit in such a
way that it will not interfere with the driver and not injure the passenger in case of an abrupt stop.
5. OPERATION
CONTROLS
- ON button/mode selector. Press the button to turn the unit on. Press and hold to turn the unit off.
When the unit is on, pressing the button will switch between playback modes.
- Bluetooth. The Bluetooth mode activates automatically when the unit is turned on. By pressing
the Mode button select ВТ mode. The Bluetooth icon will constantly blink on the front panel. After
successful synchronization with the phone the icon will stop blinking. The Bluetooth allows you to
play music from your phone. To answer a call press the button with the “Pick Up” icon. To end a call
press the “Hand Up” icon.
- Radio frequency switch. In the “Radio” mode use this button to select the band: FМ1-FМ2-FМ3.
Press the button and radio mode and hold it for 3 seconds to start the radio frequency search for the
strongest signal. The search will be over as soon as one full search cycle is completed. To exit the
setup process do not press any buttons for more than 5 seconds.
- Radio programming buttons / MP3 setting buttons.
In the “Radio” mode press buttons 1 to 6 to select a number for the station to store. Hold down the button
for several seconds for the station to be stored under the corresponding number.
In the MP3 mode the buttons function as follows:
- Play/Pause: use this button to start or suspend playback.
INT: during playback press the INT button to play the first 10 seconds of all tracks on the data
carrier (INTRO mode).
RPT: press to repeat all tracks.
RDM: press to play tracks in random order.
- 10: press to move 10 tracks back, press and hold to return to the first track in the folder.
+ 10: press to move 10 tracks forward, press and hold to advance to the last track in the folder.
- “Forward” button. In the MP3 mode press to play the next track. Press and hold to fast forward within
the track. In the Radio mode press to automatically search for the next station.
- LED/LCD display. Displays the radio frequency or the contents of the flash drive (USB/SD/MMC/TF).
- RC signal receiver (models СТ-8110/8113). Point the RC towards the receiver.
- USB port. Insert USB flash drive into the port to automatically play back the tracks stored on it.
- AUX port. Connect the playback device to the AUX port, select the AUX mode – the audio signal from
your source device will be played through the car speakers.
SD/MMC/TF slot. Insert the memory card into the card reader slot to automatically playback the
tracks stored on it.
Dial regulator / Setup menu button.
Turn the dial to increase or decrease volume.
Press the dial to enter the setup menu:
In the МР3 mode: Volume-BASS
-
TREBLE
-
BAL
-
FAD
-
LOUND OFF/ON
-
Volume.
In the Radio mode: BAS
-
TRE
-
BAL
-
FAD
-
DX/LOC
-
VOL.
Turn the dial right and left to set the desired sound parameters.
In models CT-8111/8112/8113/8114/8119 holding down the dial will display the time on the screen. Press
the dial again shortly to enter time setting mode.
- “Back” button. In the MP3 mode press to play the previous track. Press and hold to rewind the track.
In the Radio mode press to automatically search for the previous station.
- “Clock” button. Short press to display current time. Press and hold until the digits on the screen start
blinking to enter time settings. Use buttons (5) and (12) to adjust time (hours/minutes).
- “Mute” button. Turn audio output off or on.
- Microphone. In the Bluetooth mode it allows making phone calls via the unit.
- “Reset” button. Press and hold using a thin pointed object to return factory settings.
- USB port for external device charging. This USB port should be used for powering and charging
different mobile devices (smartphones, tablets, video recorders, players, etc.).
- “Backlight color” button. Press to change the unit button backlight color.
- Voice Assist button. In models СТ-8111/8112/8113/8114/8116/8119/8122 it allows to activate the voice
assist function in the connected phone.
MP3 C USB/SD/MMC/TF FILE PLAYBACK
SD/MMC/TF type memory cards with a capacity up to 32 GB are supported.
Note: Because of constant improvement of SD type memory card design and data exchange protocols
we cannot guarantee full compatibility of the unit with all SD cards. The storage capacity of the card
may vary depending on manufacturer. Compatibility of 2-in-1 type memory cards is not guaranteed.
USB flash card support. Maximum USB flash card capacity – 32 GB.
Note: Not all USB devices can be compatible with this unit, as there are currently a multitude of USB
device operation standards used by different manufacturers.
 Loading...