Do you have a question about the Central Machinery 46727 and is the answer not in the manual?
Ensures a safe workspace by maintaining cleanliness and dryness to prevent injuries.
Restricts children's access to the product to prevent handling and potential harm.
Proper storage in a dry location prevents rust and keeps tools out of children's reach.
Advises against operating the tool while impaired, emphasizing the importance of clear judgment.
Mandates wearing ANSI-approved safety glasses and hearing protectors during operation.
Recommends non-skid footwear, avoiding loose clothing/jewelry, and using hair covering.
Emphasizes compliance with Occupational Safety and Health Administration standards for industrial use.
Advises maintaining proper footing and balance to prevent falls and injuries.
Stresses the importance of focus, common sense, and avoiding operation when tired or distracted.
Instructs users to inspect the machine for damage before operation and replace faulty parts.
Recommends using identical replacement parts and intended accessories for servicing.
Advises keeping the tool clean and dry for optimal and safe performance.
Recommends that service and maintenance be performed regularly by a qualified technician.
Warns against using the tool for unintended purposes or with incorrect attachments.
States that manual warnings cannot cover all situations; common sense and caution are operator responsibilities.
Emphasizes disconnecting power before any service, maintenance, or accessory changes.
Instructs users not to leave the machine running without supervision and to turn it off.
Ensures the machine is always plugged into a grounded, 115 Volt, 3-hole receptacle.
Instructs users to confirm the power switch is off before connecting the power cord.
Advises against yanking the cord, moving the machine with it plugged in, and keeping it from heat/sharp edges.
Warns against using the sides of the grinding wheel for grinding objects.
Provides guidelines on selecting the correct AWG rating for extension cords based on length and amperage.
Ensures all guards remain in position and functional for safe operation.
Instructs users to remove all adjusting tools before turning the machine on.
Details requirements for a safe workspace including ventilation, lighting, and avoiding hazardous conditions.
Advises operating the tool within its designed speed and capacity for optimal performance.
Ensures preparedness before turning the power switch on to prevent accidental starts.
Warns against removing stuck material from moving parts while the machine is plugged in and running.
Requires the machine to be securely mounted on a flat, level, and sturdy workbench.
Warns about potential exposure to cancer-causing chemicals in dust and advises protective measures.
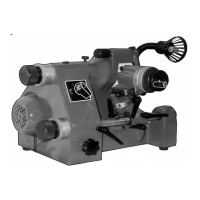
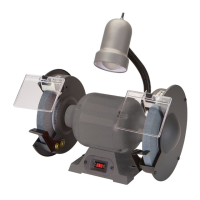
Advises users to familiarize themselves with the main components and their functions before operating.
Ensures the tool grinder is mounted on a flat, level, sturdy workbench capable of supporting its weight.
Identifies the four 5/16" mounting holes on the motor base for securing the grinder.
Guides on positioning the grinder, marking holes, removing it, and drilling the workbench.
Instructs on drilling the marked holes through the workbench using a 5/16" drill bit.
Details aligning the grinder's holes with the workbench and securing it with bolts, washers, and nuts.
Provides steps to assemble the grinding wheel on the right side of the tool grinder.
Instructs to slide the grinding wheel onto the adjusting bushing as part of the assembly.
Details reattaching the screw, nut, and bushing after mounting the grinding wheel.
Instructs to repeat the previous steps to assemble the grinding wheel on the left side.
Provides steps to attach the water tray to the right side of the tool grinder.
Instructs to repeat the water tray assembly for the left side of the grinder.
Guides on attaching the work support to the right side using screws, washers, and nuts.
Instructs to repeat the work support assembly for the left side of the grinder.
Details how to attach the miter dial unit to the work support on the right side.
Instructs to repeat the miter dial assembly for the left side of the grinder.
Provides steps to attach the water cup to the right side of the tool grinder using the set pin.
Instructs to repeat the water cup assembly for the left side of the grinder.
Guides on filling the water cup and setting the water valve to the correct position.
Details how to adjust the work support angle using the locking pole and dial.
Explains how to slide and lock the miter dial to the desired angle for grinding.
Instructs to connect the power cord to a 120 Volt, 3-prong electrical outlet.
Advises adjusting the lamp for optimal illumination of the work area.
Explains how to use the power switch to turn on the grinding wheel in either direction.
Instructs users to allow the grinding wheel sufficient time to reach full operating speed.
Details turning the water valve clockwise to release water onto the grinding wheel.
Guides on placing the tool against the miter dial and feeding it into the grinding wheel.
Instructs to turn the power switch to the 'OFF' position after grinding.
Advises turning off the lamp after completing the grinding operation.
Instructs to disconnect the power cord from the electrical outlet.
Details turning the water valve counterclockwise to stop the flow of water.
Instructs to remove and empty the water tray after use.
Emphasizes completing all calibrations and setup before starting the grinding process.
Guides on turning the scale plate to the desired horizontal angle and locking it.
Explains tilting the work support to the desired vertical angle and locking it.
Details how to move the tool against the grinding wheel to complete the angle on one side.
Instructs to grind the remaining sides of the tool, adjusting angles as needed.
Advises inspecting the grinder for loose parts, damage, or conditions affecting safe operation.
Covers replacement of damaged wheels and the importance of their rated speed.
Explains the need for dressing grinding wheels to keep them sharp and clean for effective cutting.
Provides instructions for cleaning the grinder with a damp cloth and mild solvent.
Advises lubricating all moving parts, excluding grinding wheels, with light weight oil.
Recommends covering the tool grinder with a clean cloth cover when storing.
| Brand | Central Machinery |
|---|---|
| Model | 46727 |
| Category | Grinder |
| Language | English |