EasyManua.ls Logo

Chad Valley Magic House User Manual

Chad Valley Magic House
14 pages
To Next Page IconTo Next Page
Page #1 background imageLoading...
Page #1 background image
Magic House
Assembly & User Instructions - Please keep for future reference
Important - Please read these instructions fully before assembly or use
These instructions contain important information which will help you get the best from your
product and ensure safe and correct assembly, use and maintenance.
If you need help or have damaged or missing parts, call the Customer Helpline: 01291 650581
5548598
Question and Answer IconNeed help?

Do you have a question about the Chad Valley Magic House and is the answer not in the manual?

Chad Valley Magic House Specifications

General IconGeneral
BrandChad Valley
ModelMagic House
CategoryToy
LanguageEnglish

Summary

Magic House Product Overview

Assembly & User Instructions Advisory

Important notice to keep instructions for future reference and read before assembly or use.

Product Parts Identification

Component List and Labels

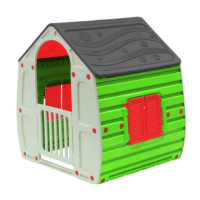
Visual identification of all parts (A-N) with associated part numbers and quantities.

Assembly Instructions

Step 1: Side Wall Assembly

Connect the two halves of each side wall (E) together.

Step 2: Secure Side Walls

Fix the side wall halves using screws (L) and nuts (N).

Step 3: Install Wall Connectors

Attach wall connectors (M) to the side walls with screws (L) and nuts (N).

Step 4: Assemble Front Wall Structure

Connect triangle panel (F) and bottom beam (G) to front wall parts (A&B).

Step 5: Assemble Rear Wall Structure

Connect triangle panel (F), fence (D), and bottom beam (G) to rear wall parts (A&B).

Step 6: Connect Main Walls

Join front and back walls to the side walls using screws (L) and nuts (N).

Step 7: Assemble Roof Components

Connect the two roof parts (H) to each other with screws (L) and nuts (N).

Step 8: Mount the Roof

Place the roof onto the house and secure it to the side walls.

Step 9: Attach Window Shutters

Connect window shutters (I & J) to the hinges on the side walls.

Step 10: Install the Door

Attach door hinges (K) to the door (C) and insert into front wall slots.

Important Warnings and Product Details

General Safety and Usage Precautions

Covers domestic use, weight limits, supervision, safe placement, and maintenance advice.

Product Specifications and Support

Details product dimensions, customer helpline, and manufacturer's contact information.

Related product manuals