en 7
20
21
22
23
Installation of photocells (Optional accessory)
Connecting the opener
Program opener and test
Setting the Limits
After installing and adjusting the door opener, photocells can be instal-
led (incl. in ML810EV-SMART, ML1040EV/-SMART)� The instructions
for installation are included in the scope of delivery of the light barrier
and must be followed� The optional photocells ensure that the door
is open, or remains open, if people, especially young children, are
in the door area. By means of the photocells, a closing door is opened
or an open door is obstructed from closing, if a person located in the
door area interrupts the sensor beam�
Photocells are particularly recommended for families with young
children.
Connect opener in accordance with local rules and regulations to a
properly installed wall socket�
NOTE: When the opener is switched on, the operator light is also turned
on for 2�5 minutes�
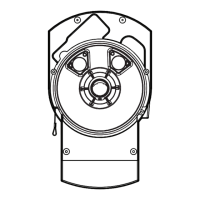
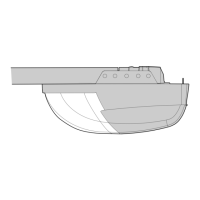
PROGRAMMING BUTTONS:
The programming buttons are located under a removable cover on the
back side of the garage door opener (see g23).
1� Press and hold the square Adjustment Button until the UP Button
begins to ash.
2� Press and hold the UP Button until the door is in the desired UP
position� NOTE: The UP and DOWN Buttons can be used to move
the door up and down as needed�
3� Once the door is in the desired UP position press and release the
Adjustment Button. The garage door opener lights will ash and
the DOWN Button will begin to ash.
4� Press and hold the DOWN Button until the door is in the desired
DOWN position� Make sure the rail does not bend� NOTE: The UP
and DOWN Buttons can be used to move the door up and down as
needed�
5� Once the door is in the desired DOWN position press and release
the Adjustment Button. The garage door opener lights will ash
and the UP Button will begin to ash.
6� Press and release the UP Button� When the door travels to the pro
grammed UP position, the DOWN Button will begin to ash. Note:
IF the door does not travel to the UP position the travel limit pro-
gramming failed� Begin again with step1� If door travel is too short
please refer to section 36 ”Frequently Asked Questions”�
7� Press and release the DOWN Button� The door will travel to the
programmed DOWN position� Programming is complete�
Travel limits regulate the points at which the door will stop when moving
up or down� Follow the steps below to set the limits�
This operator is equipped with a two speed system that is automatically
set by the software� Canopy or 1-piece garage doors will automatically
run in slow speed to insure a safe operation according regulatory� Doors
traveling shorter than 190 cm will run automatically slow�
INTRODUCTION:
Your garage door opener is designed with electronic controls to make
setup and adjustments easy� The adjustments allow you to program
where the door will stop in the open (UP) and close (DOWN) position�
The electronic controls sense the amount of force required to open and
close the door� The force is adjusted automatically when you program
the travel�
NOTE:
If anything interferes with the door’s upward travel it will stop� If anything
interferes with the door’s downward travel, it will reverse� To watch a
short instructional video on programming your new garage door opener
use your smartphone to read the Code on this manuals back side
or visit www�chamberlain�eu�
The door opener should only be used if the operator can see
the entire door area and is assured that it is free of obstac-
les and the door opener is set correctly� No one may pass
through the door while it is moving. Before the rst opening operation,
check that all the facilities that are not needed are turned o. Remove
all mounting aids and tools from the pivot area of the door�
 Loading...